
Sensors
This area provides an overview of all sensors which help to identify cyber attacks and allows to manage them. The total number of sensors is displayed separately ①.
Sensors observe traffic data; this is a precondition for detecting suspicious findings in Attack.
Sensor status
Per sensor, the sensor list shows the current status ②, the sensor name ③ , when the sensor had sent data last time ④, and its condition ⑤.
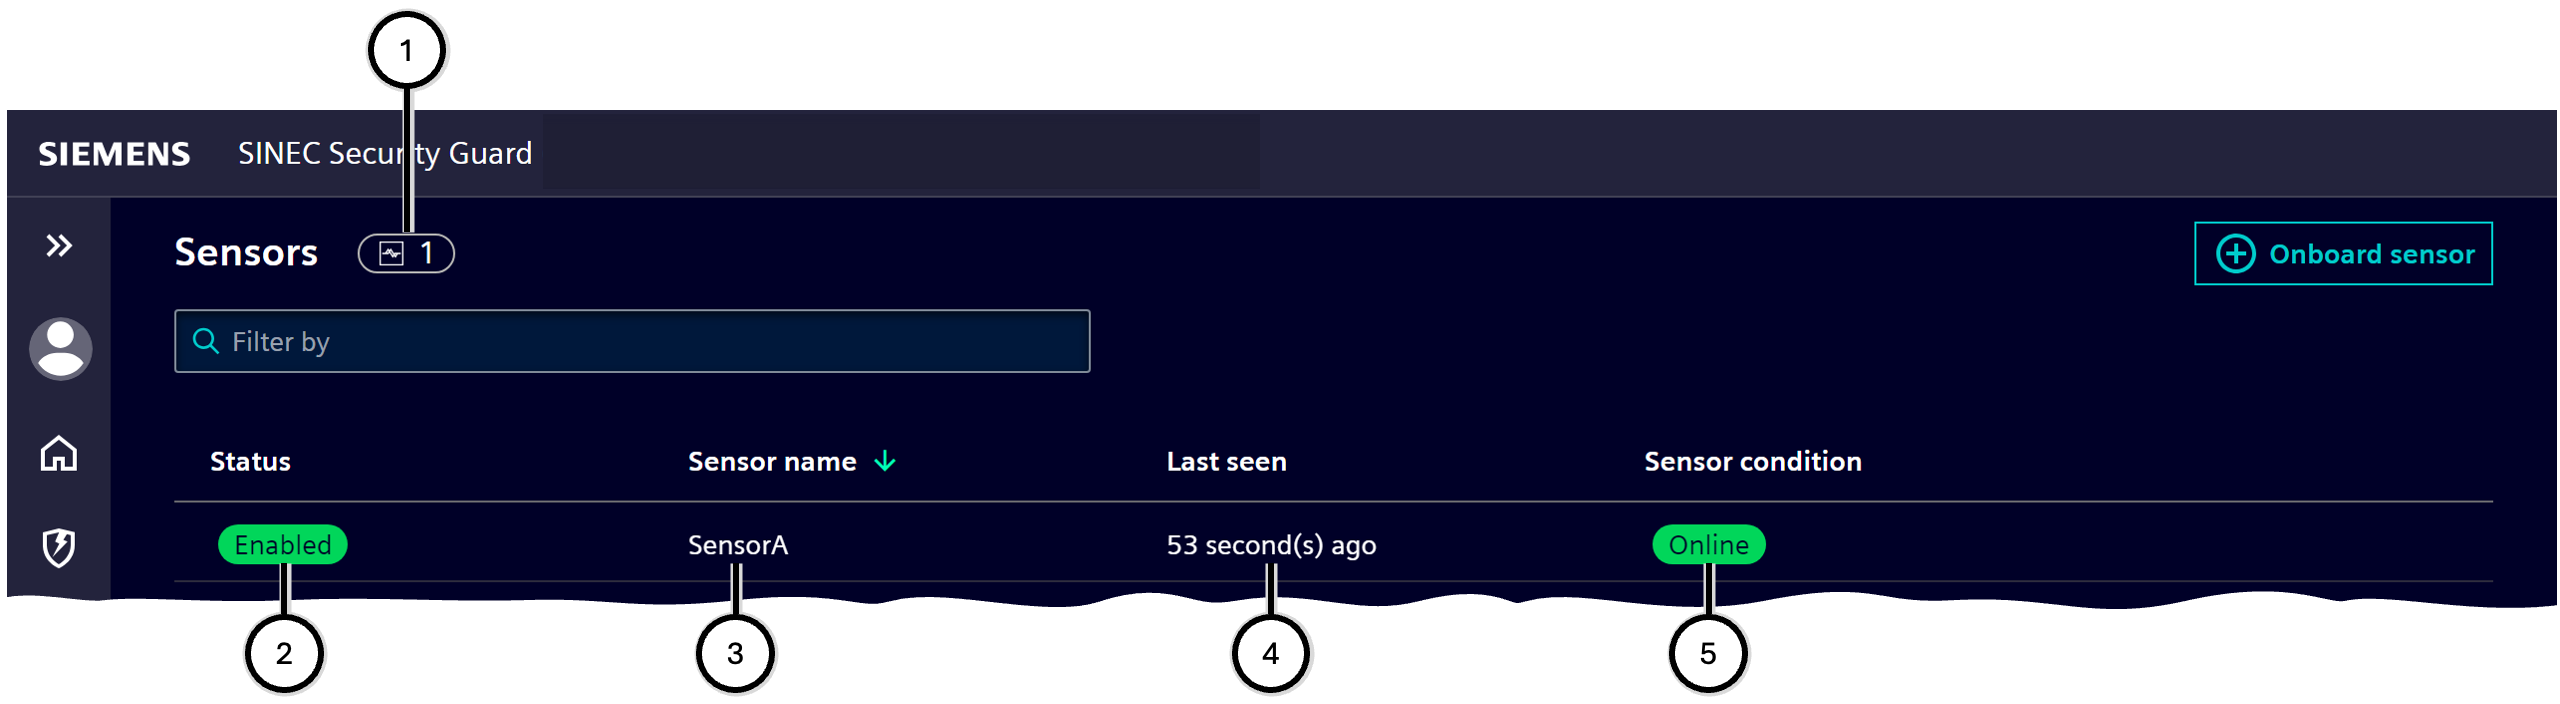
| Number | Description |
|---|---|
| ① | Total amount of sensors |
| ② | Current status of the sensor - see below status' |
| ③ | Name of the sensor |
| ④ | Last contact was ... |
| ⑤ | Condition of the sensor - see below sensor conditions |
| Status | Description |
|---|---|
 |
Sensor newly onboarded; follow the setup process to enable the sensor |
 |
Sensor is enabled to be used |
 |
Sensor became disabled manually; enable it again for further usage |
| Sensor condition | Description |
|---|---|
 |
Sensor and Industrial Edge Device are synchronized |
 |
Sensor and Industrial Edge Device are out of sync and will synchronize soon automatically |
 |
Sensor shows a critical error - check Industrial Edge Device for notifications on that sensor |
 |
Sensor is not responding - evaluate the sensor's condition |
 |
Sensor became disabled manually; enable it again for further usage |
Onboarding, offboarding and managing a sensor
To onboard a new sensor, follow the procedure below.
Note Review the System requirements for onboarding in advance. Note As you need to switch some times between SINEC Security Guard Sensor app and SINEC Security Guard, it may be convenient to open both products in separate browser instances (tabs or windows) and switch between these. Note In the procedure twice a code becomes generated by one system which needs to be entered in the other system. When using SINEC Security Guard Sensor app and SINEC Security Guard on two separate computers, copying their codes to paste them on each the other computer will not work.
- In Industrial Edge Device's SINEC Security Guard Sensor app:
- Use 'Onboard sensor' ①; the 'Onboard sensor' dialogue will open.
- In the dialogue, define the name of the sensor ②. The sensor name has to meet these criteria:
- uniqueness: there must be only one sensor with this name on this Industrial Edge Device
- allowed characters: digits, letters (no umlaut's), whitespace, hyphen, underscore
- capitalization: uppercase letters are unequal lowercase letters
- length: 1 to 100 characters
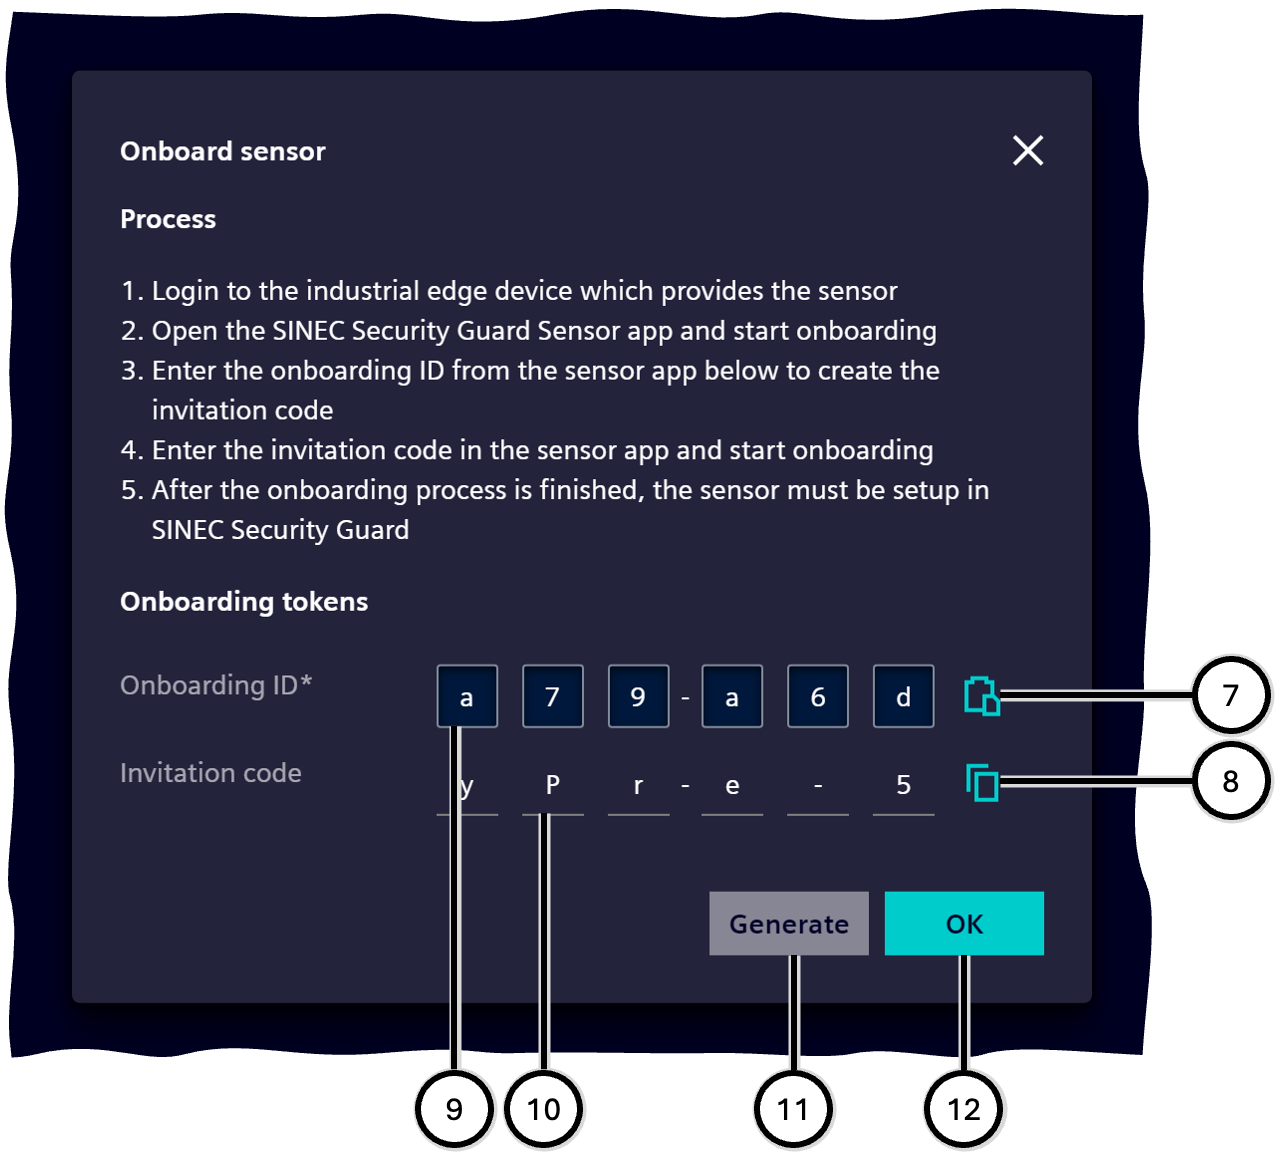
- The Onboarding ID ④ becomes generated automatically. Copy the Onboarding ID - use the copy functionality ③, or note the characters otherwise.
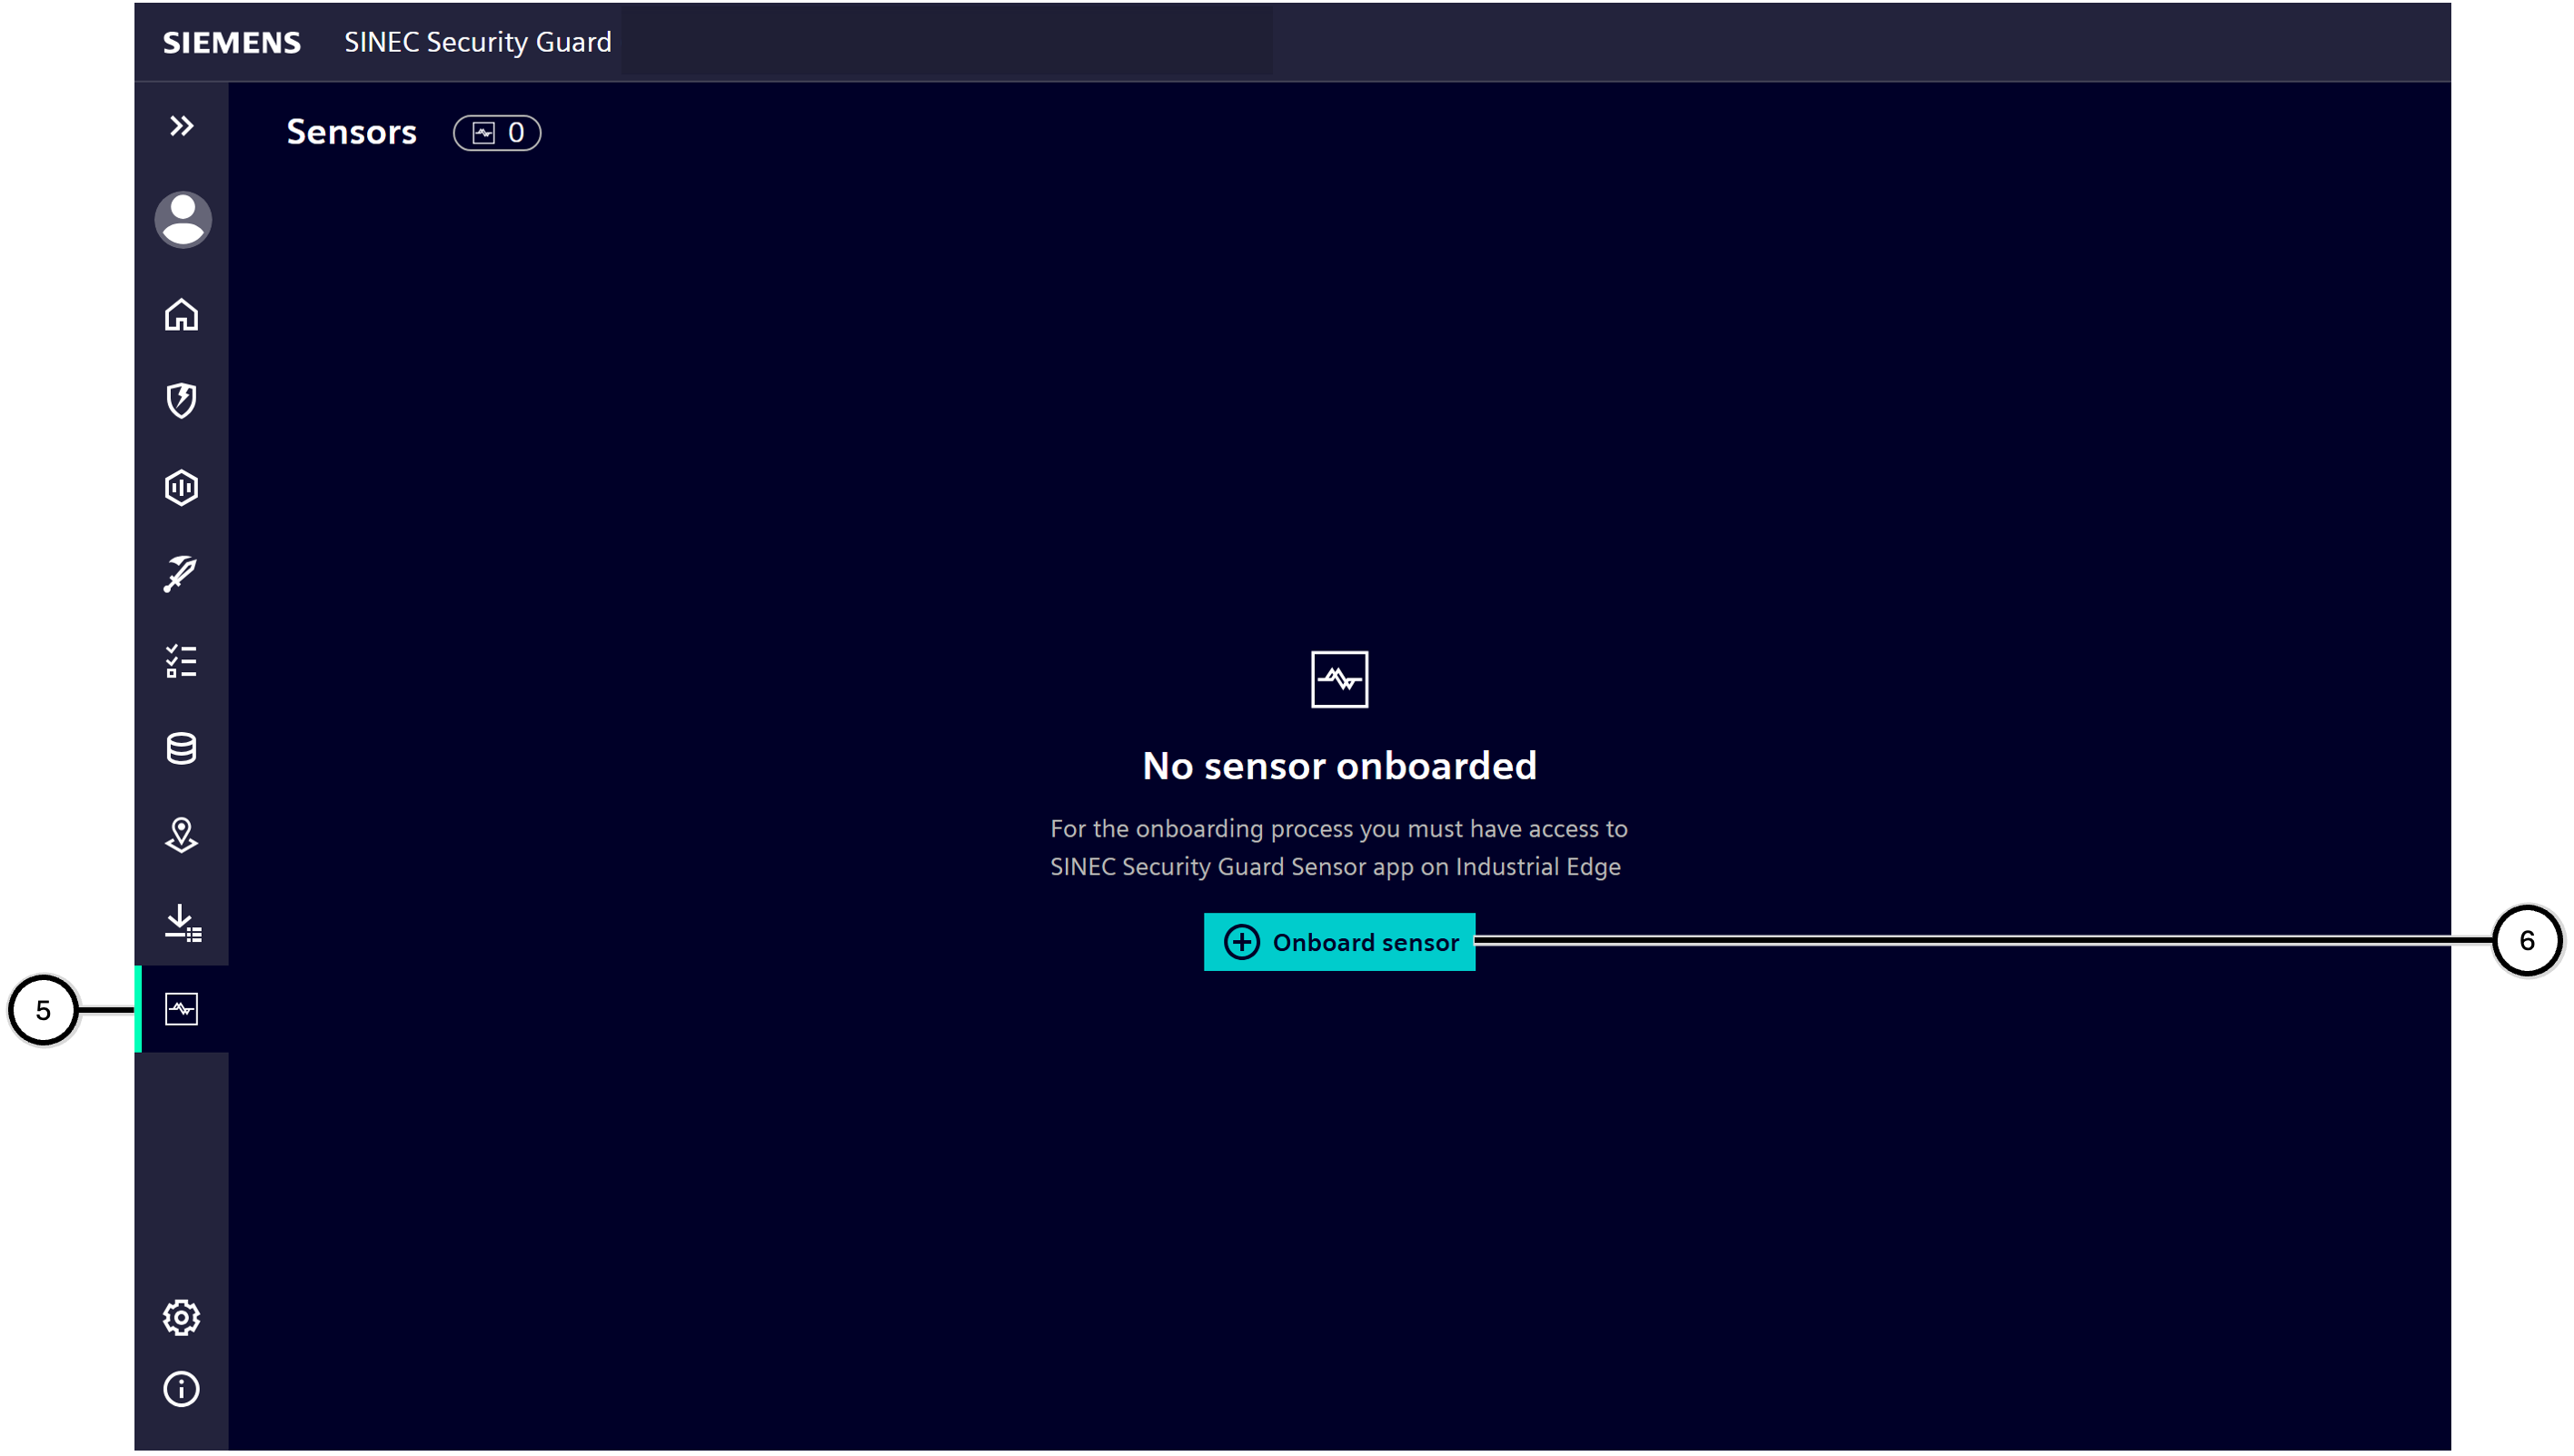
- In SINEC Security Guard:
- Navigate to 'Sensors' ⑤.
- Use 'Onboard sensor' ⑥, ⑳.
- Paste ⑦ or enter the Onboarding ID ⑨. In most situations this initiates the automatic generation of the Invitation code ⑩; if the Invitation code does not show up after a few seconds, use 'Generate' ⑪.
- Copy the Invitation code - use the copy functionality ⑧, or note the characters otherwise.
- Use 'Ok' ⑫ to close the onboarding dialogue.
- In Industrial Edge Device's SINEC Security Guard Sensor app:
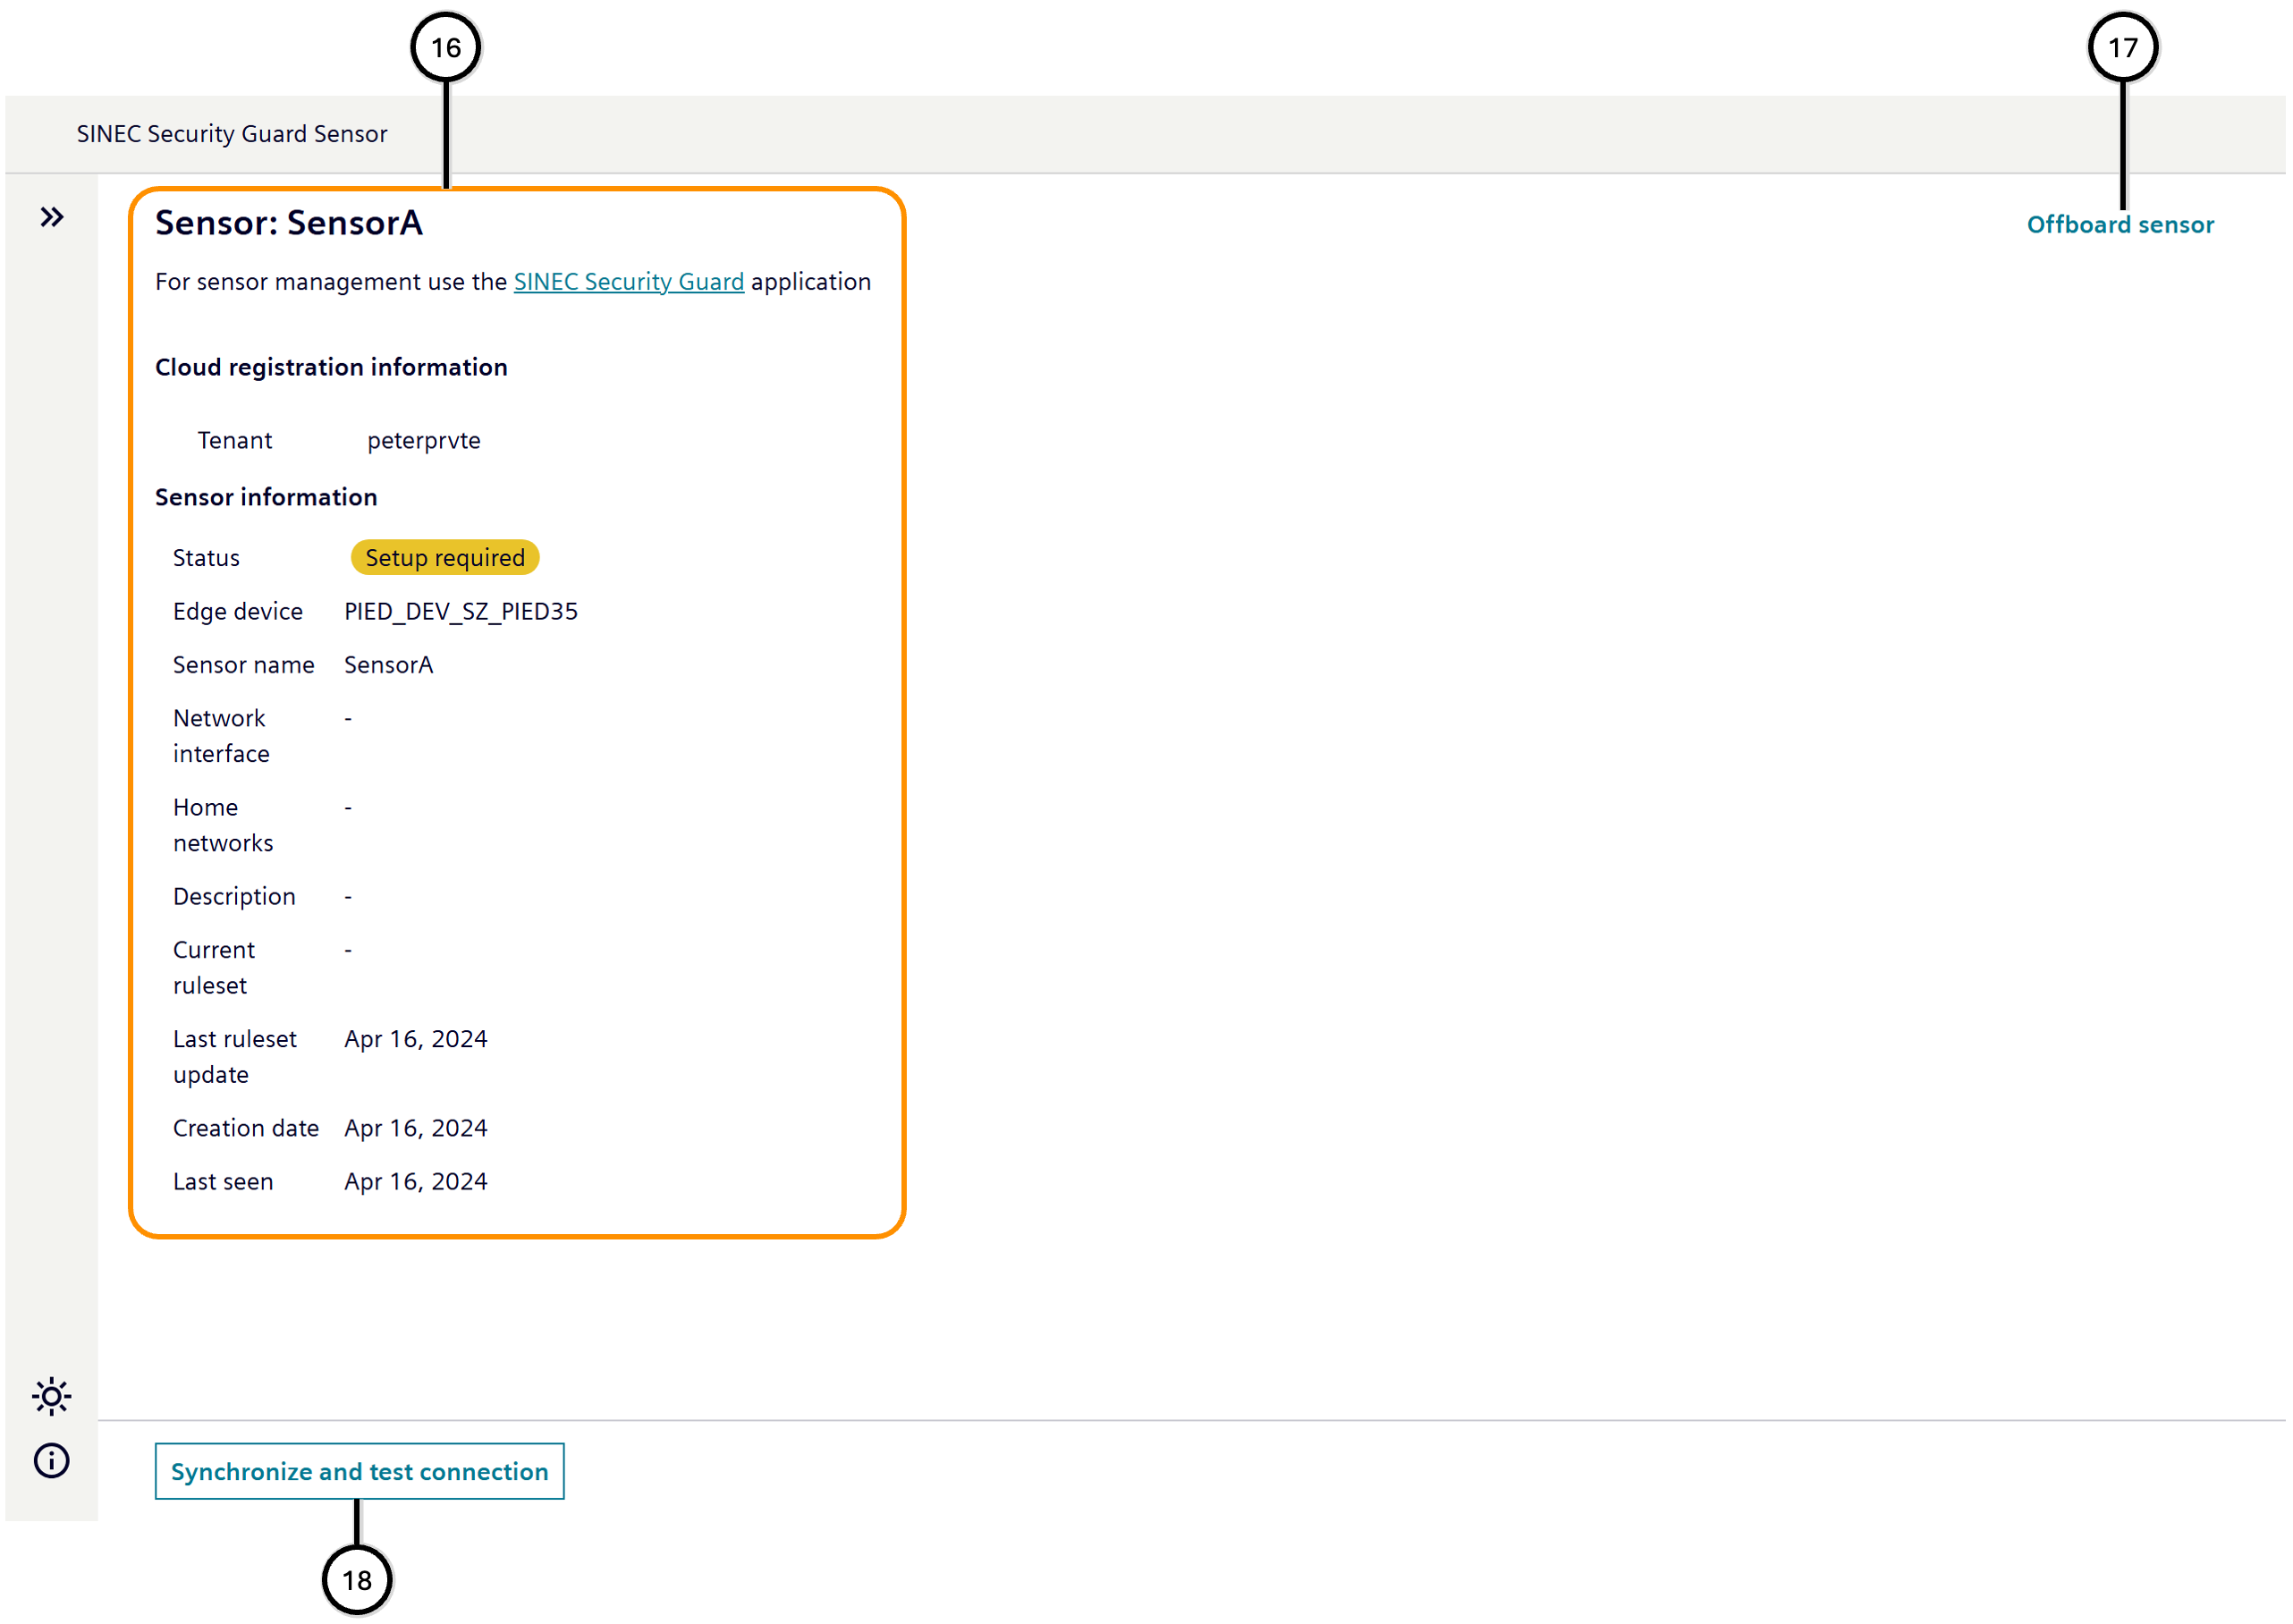
- Paste ⑬ or enter the Invitation code ⑭ and use 'Start onboarding' ⑮; after some seconds the details of the newly onboarded sensor ⑯ are shown.
- In SINEC Security Guard:
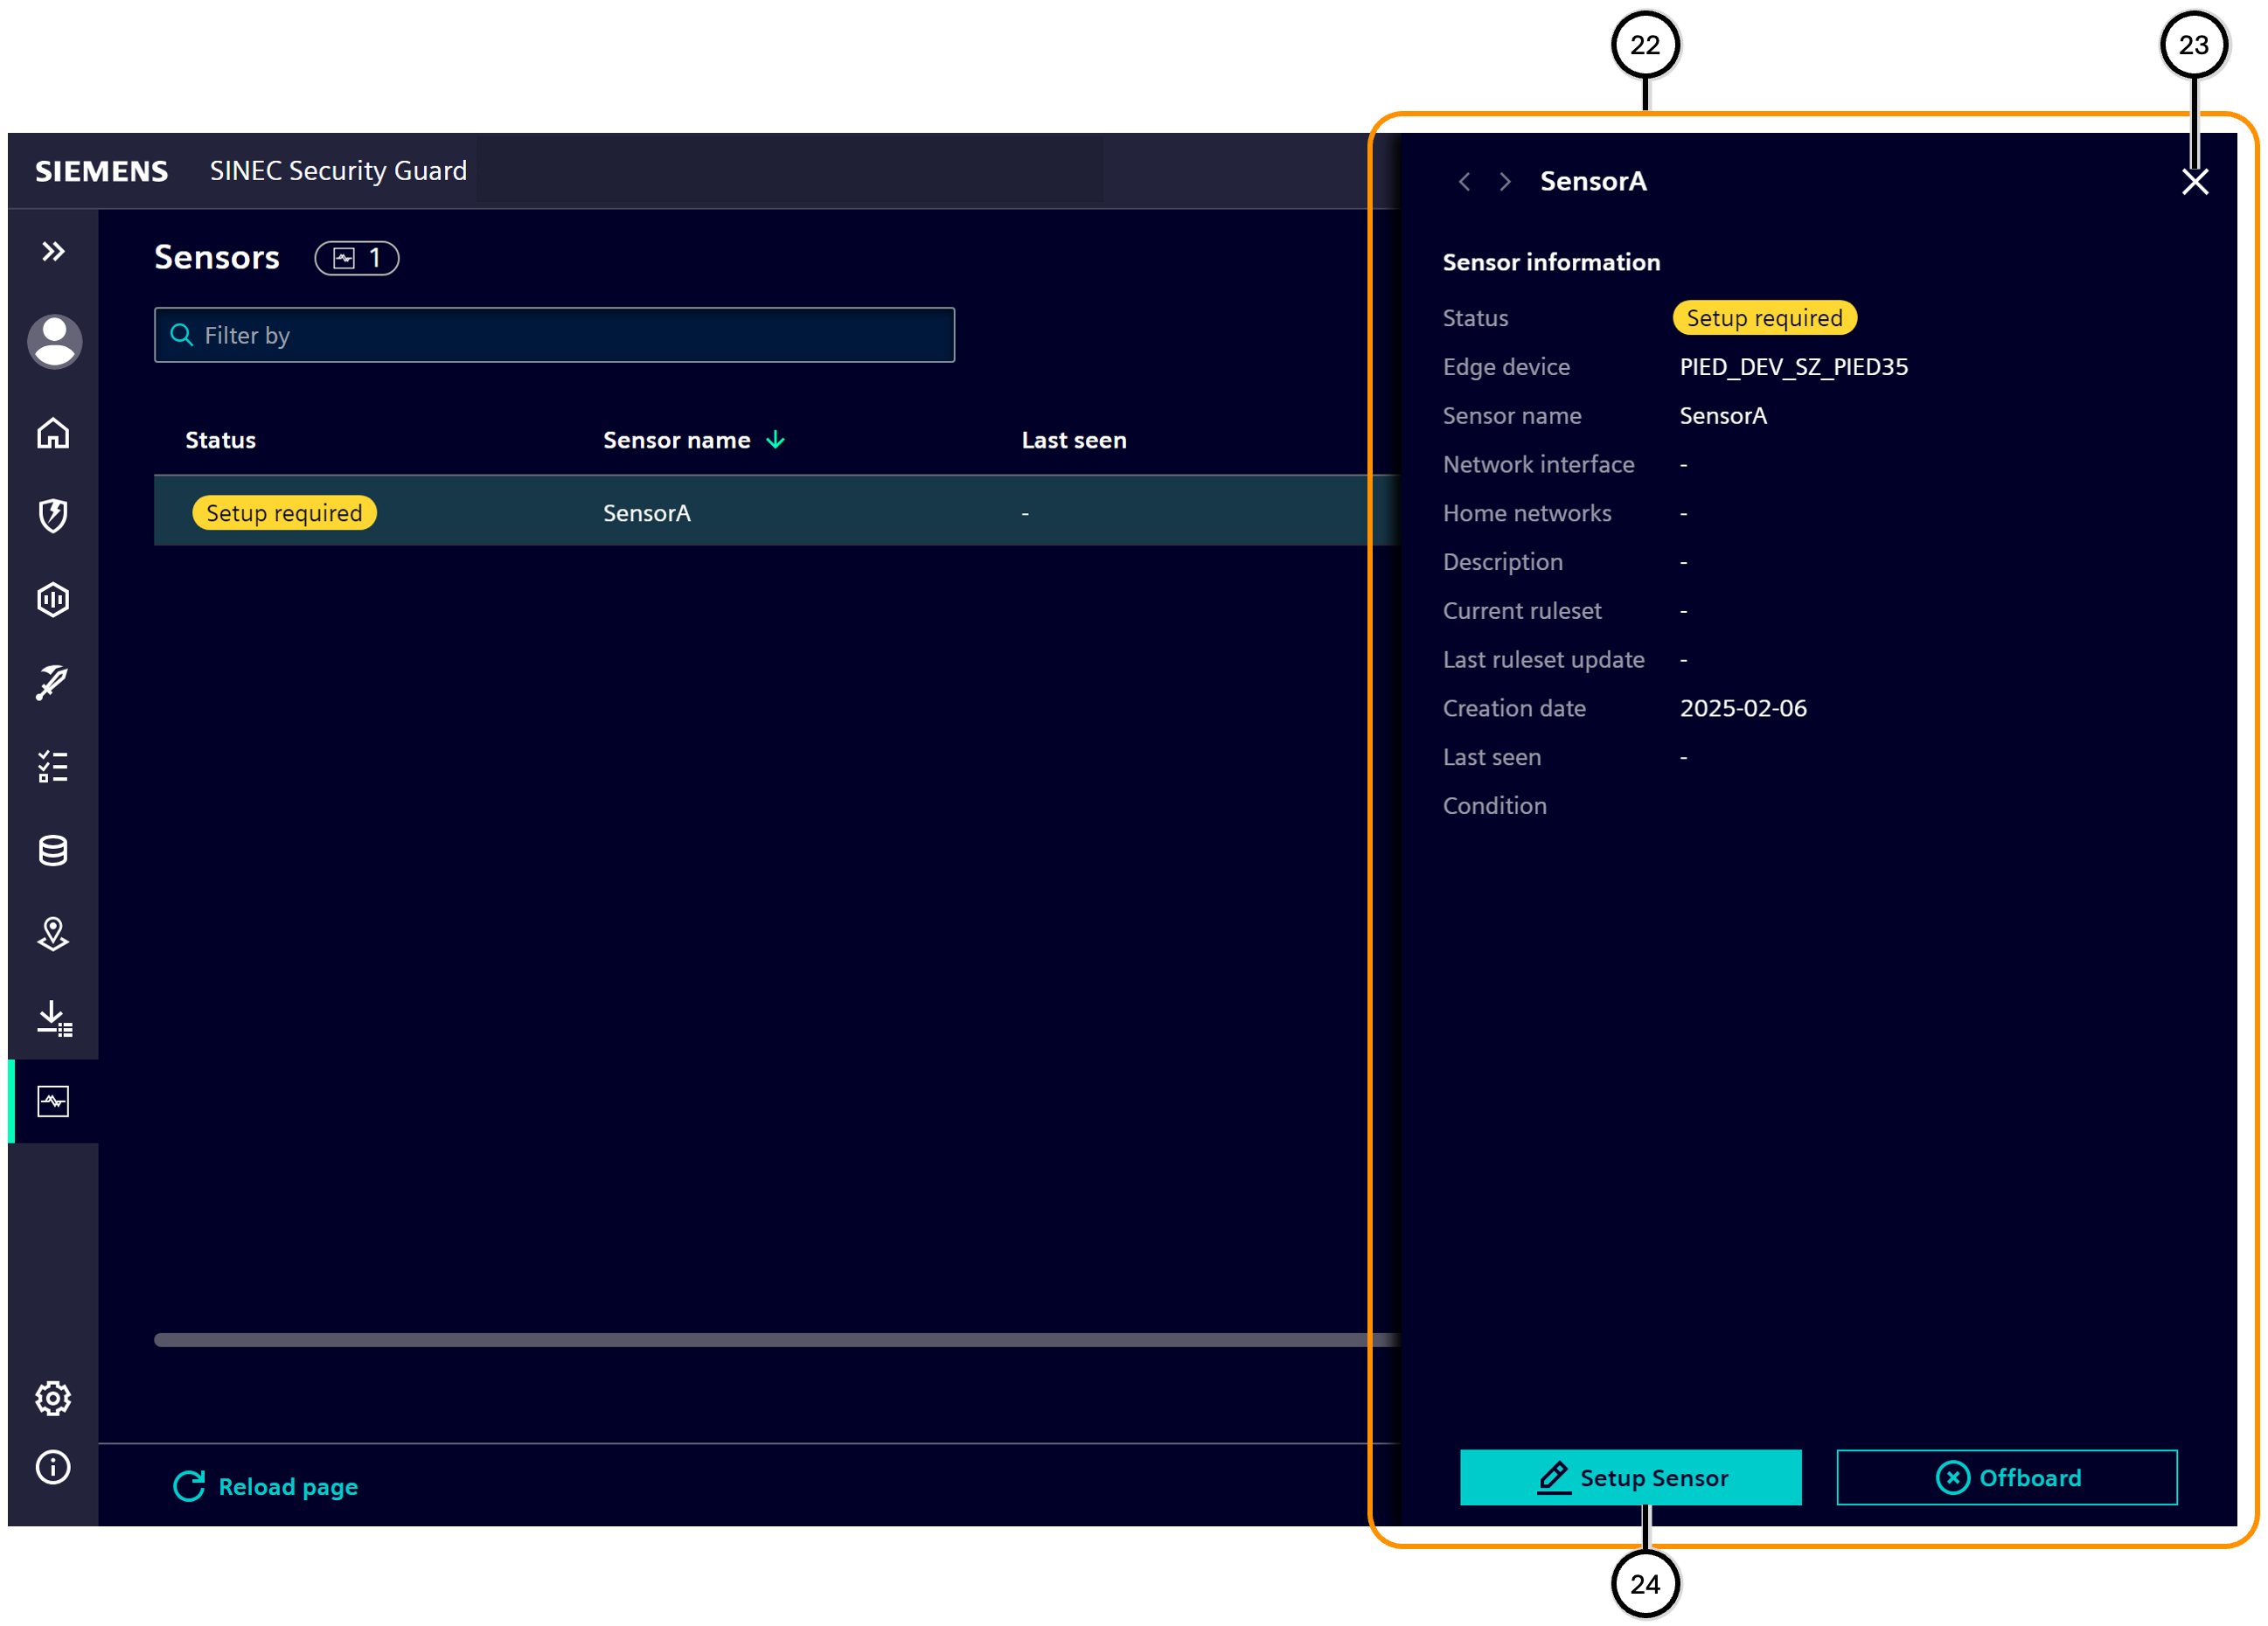
- Use 'Reload page' ㉑.
- The onboarded sensor shows up in the list of sensors with status 'Setup required' ⑲.
- Select the sensor to open the related 'Sensor information' panel ㉒.
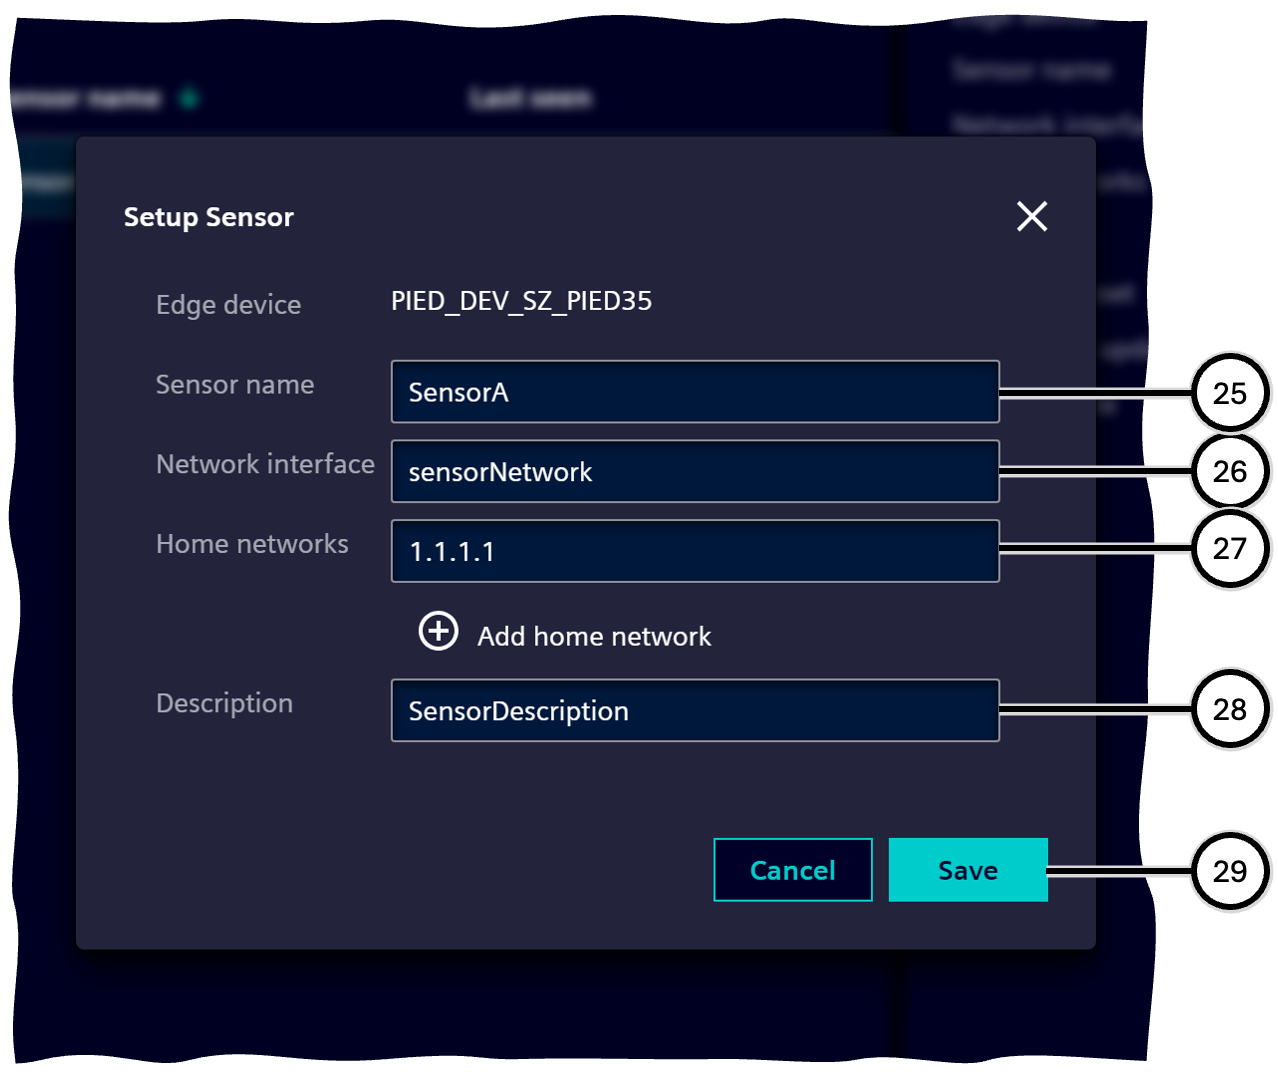
- Use 'Setup sensor' ㉔ to open the 'Setup sensor' dialogue.
- Define data for Network interface ㉖, Home networks ㉗, and Description ㉘; the already given Sensor name ㉕ also can be edited here again. Save the data ㉙.
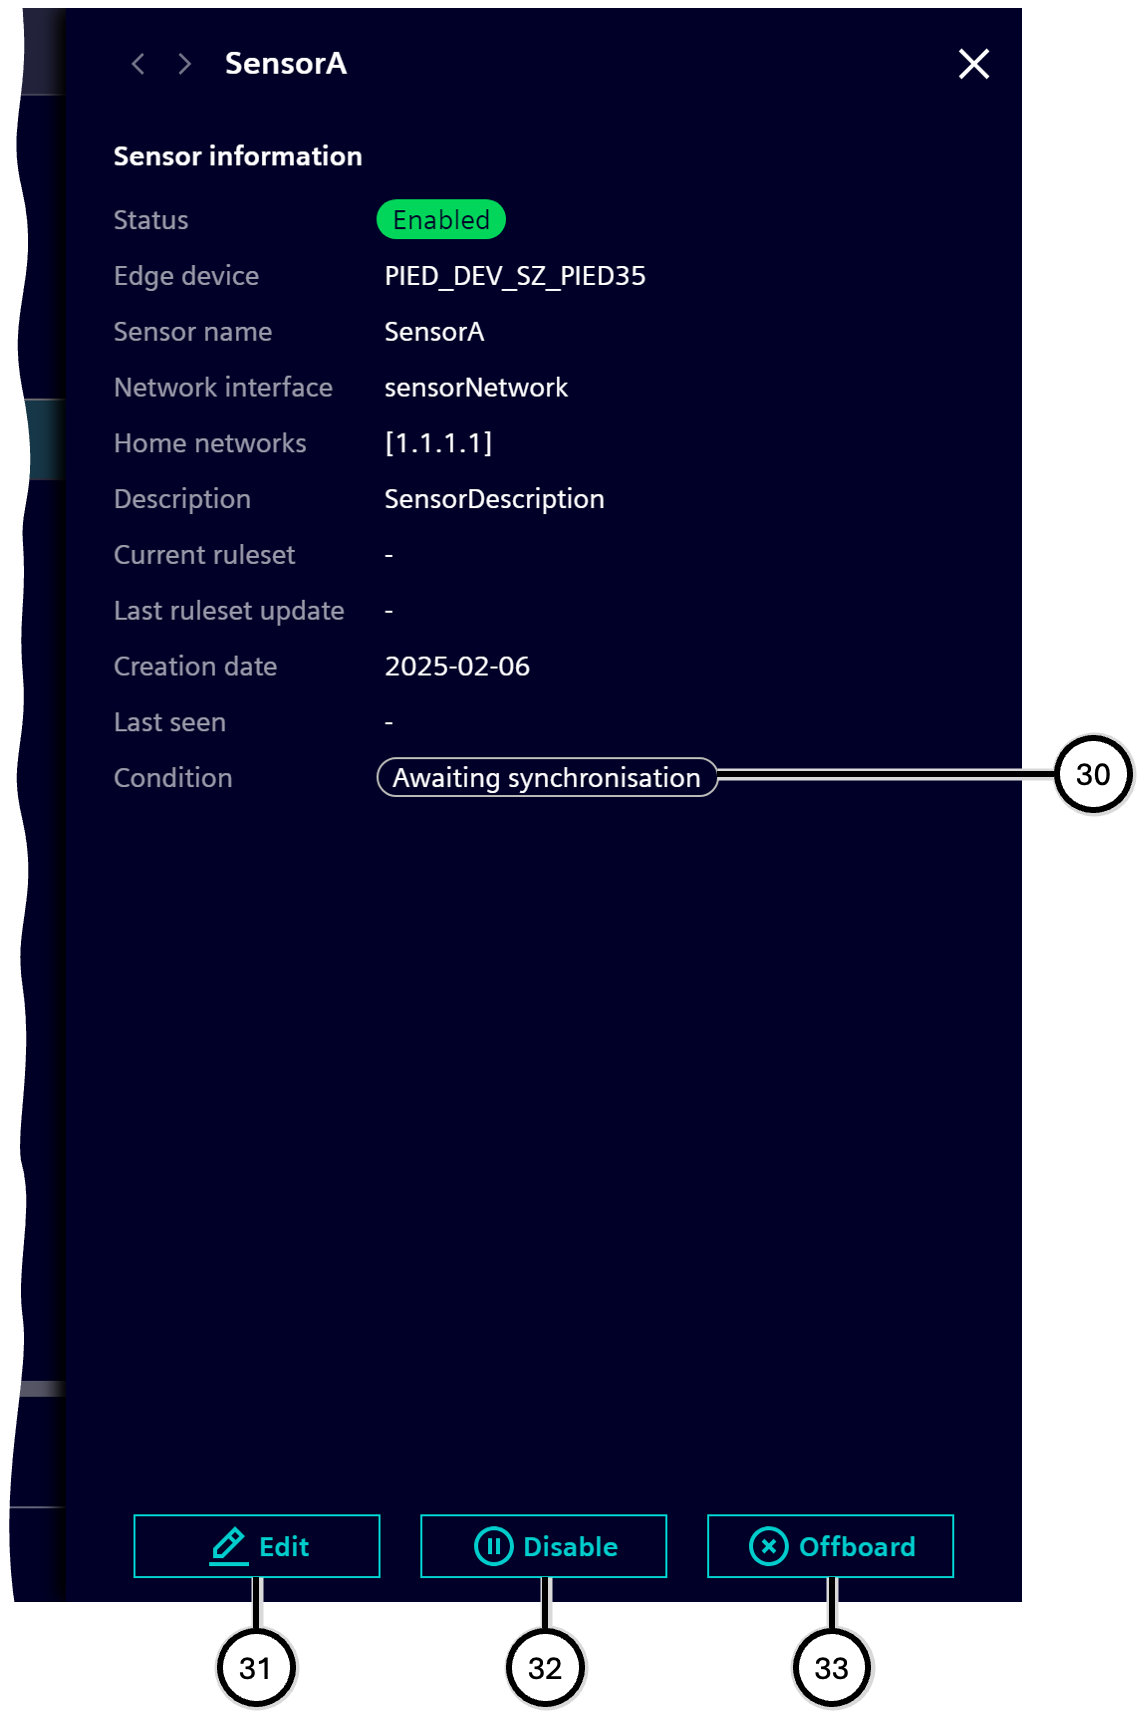
- The sensor now awaits synchronisation ㉚.
- Close the 'Sensor information' panel ㉓.
- In Industrial Edge Device's SINEC Security Guard Sensor app:
- Use 'Synchronize and test connection' ⑱.
- After a few seconds all data from SINEC Security Guard 'Setup sensor' dialogue is presented, and the sensor status is 'Online'.
- In SINEC Security Guard:
- Use 'Reload page' ㉑.
- The condition of the setup sensor is either 'No heartbeat received' or 'Online', depending on currently transfered data.
In the 'Sensor information' there are further options to control the sensor:
- To change some of the sensor's data, use Edit ㉛.
- To shut-down the sensor temporarily without offboarding it, use Disable ㉜; the sensor then will not work until it becomes enabled again ㉞.
- To get rid of the sensor completely, use Offboard ㉝. Alternatively the sensor can also be offboarded via the SINEC Security Guard Sensor app ⑰.
Any action taken in SINEC Security Guard will be visible only after synchronization in the SINEC Security Guard Sensor app ⑱.
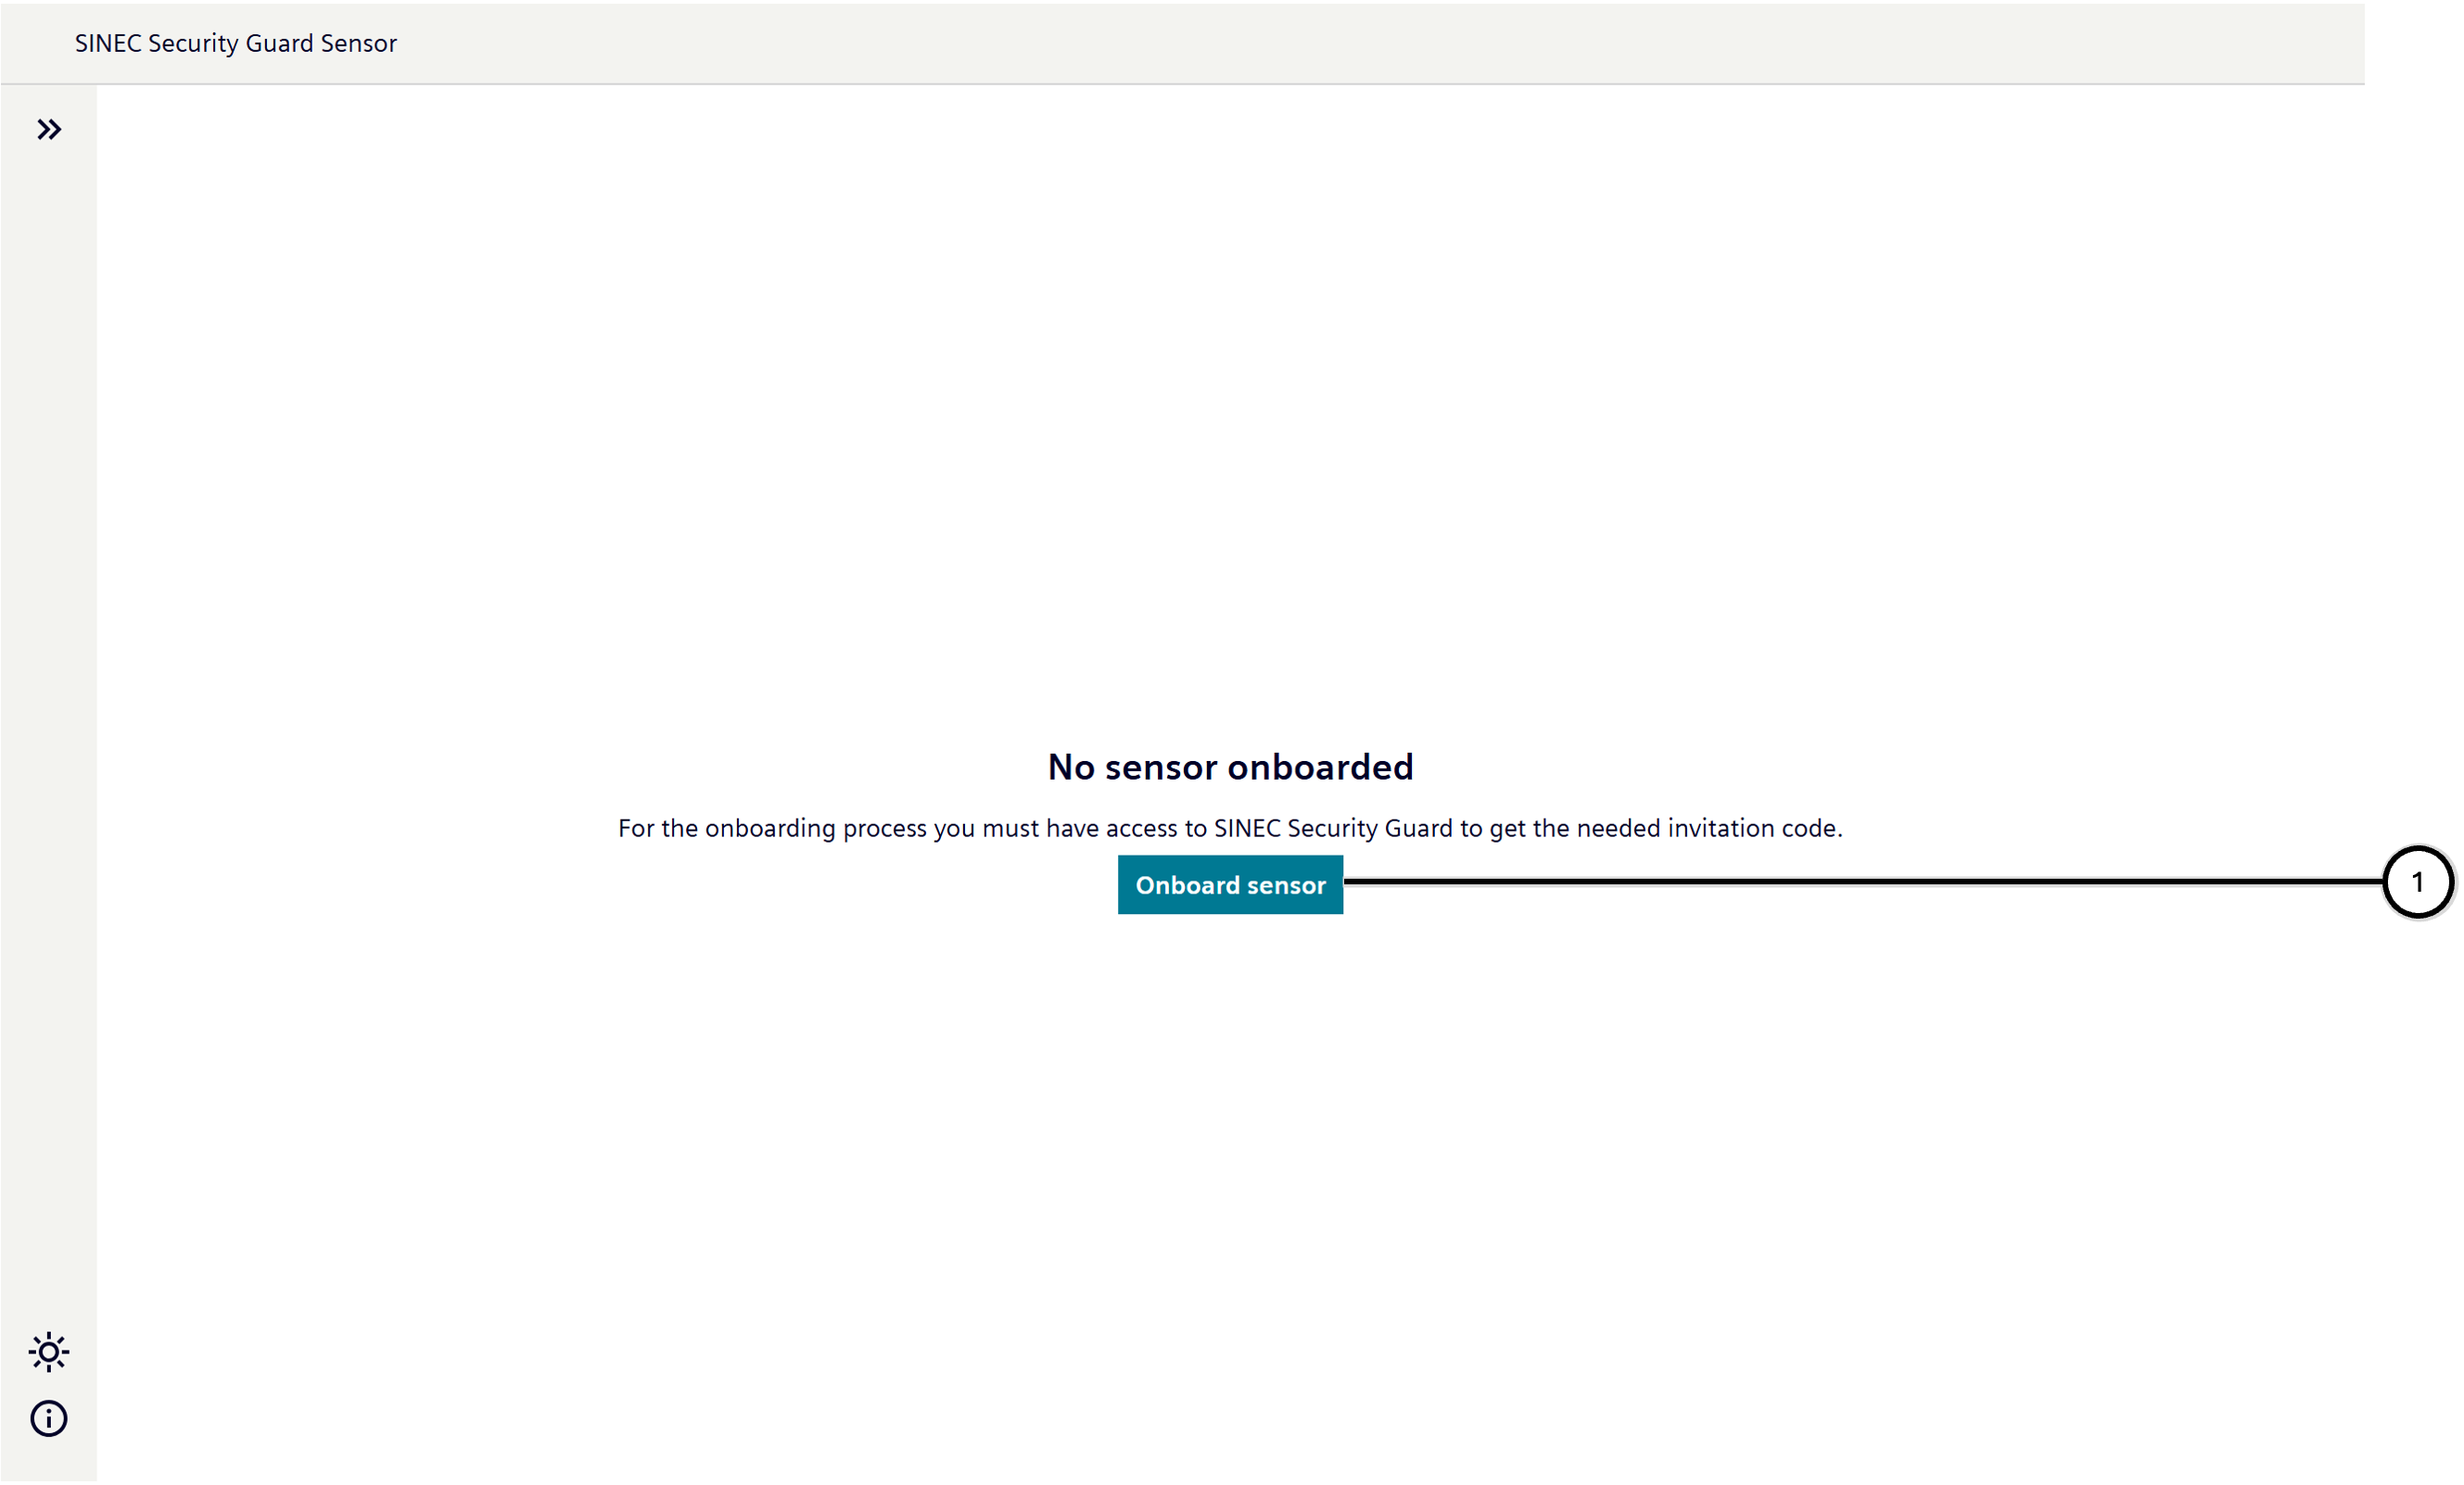
| Number | Description |
|---|---|
| ① | Button to start sensor onboarding |
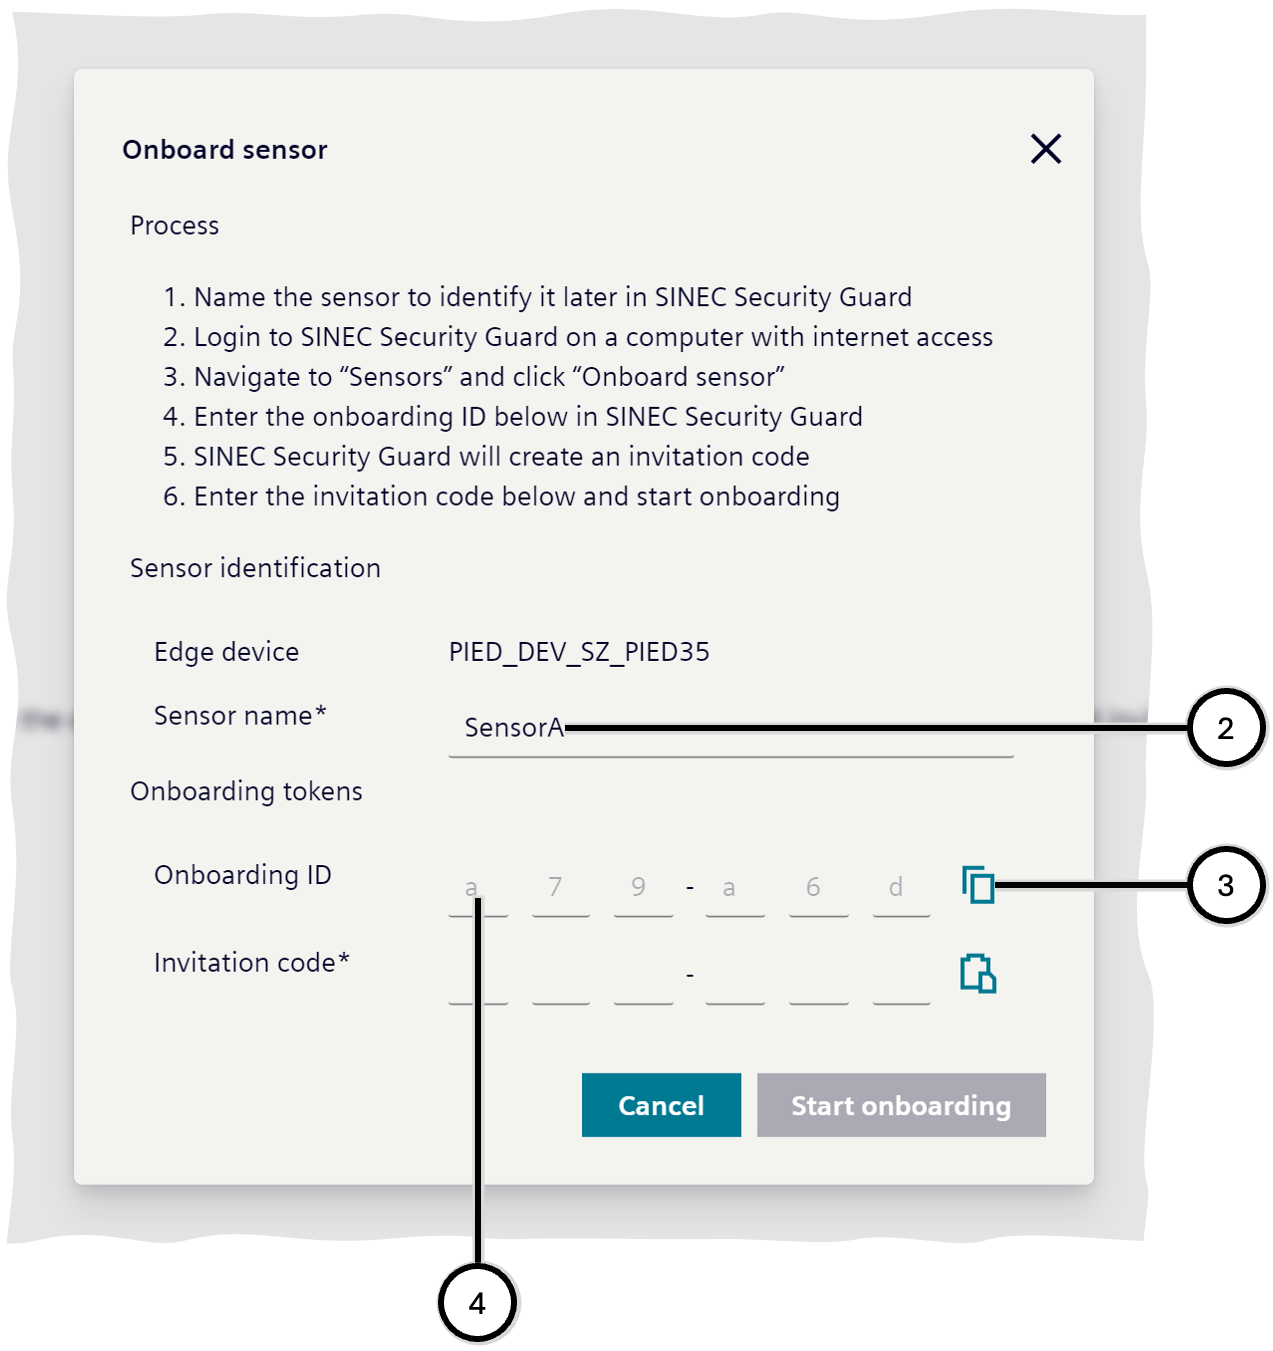
| Number | Description |
|---|---|
| ② | Field for sensor name |
| ③ | Button to copy the Onboarding ID into the clipboard |
| ④ | Onboarding ID |
| Number | Description |
|---|---|
| ⑤ | Main navigation button leading to 'Sensors' area |
| ⑥ | Button to start sensor onboarding |
| Number | Description |
|---|---|
| ⑦ | Button to paste the clipboard content into the field for the Onboarding ID |
| ⑧ | Button to copy the Invitation code into the clipboard |
| ⑨ | Field for entering the Onboarding ID |
| ⑩ | Invitation code |
| ⑪ | Button to manually trigger the generation of the Invitation code |
| ⑫ | Button to close the onboarding dialogue |
| Number | Description |
|---|---|
| ⑬ | Button to paste the clipboard content into the field for the Invitation code |
| ⑭ | Field for entering the Invitation code |
| ⑮ | Button to create the sensor in SINEC Security Guard Sensor app |
| Number | Description |
|---|---|
| ⑯ | Details of the onboarded sensor |
| ⑰ | Button to offboard the sensor permanently |
| ⑱ | Button to trigger synchronization between SINEC Security Guard Sensor app and SINEC Security Guard, and to test the connection between both |

| Number | Description |
|---|---|
| ⑲ | Newly created sensor that requires setup |
| ⑳ | Button to start sensor onboarding |
| ㉑ | Button to reload the page and showing latest data |
| Number | Description |
|---|---|
| ㉒ | Sensor information panel showing details of the onboarded sensor |
| ㉓ | Button to close Sensor information |
| ㉔ | Button to initially complete the sensor data |
| Number | Description |
|---|---|
| ㉕ | Field for sensor name |
| ㉖ | Field for network interface |
| ㉗ | Field for Home networks |
| ㉘ | Field for description |
| ㉙ | Button to save the data and close the dialogue |
| Number | Description |
|---|---|
| ㉚ | Indication of outstanding synchronisation |
| ㉛ | Button to edit the sensor data |
| ㉜ | Button to disable the sensor temporarily |
| ㉝ | Button to offboard the sensor permanently |

| Number | Description |
|---|---|
| ㉞ | Button to enable a formerly disabled sensor again |