Inventory
This area lists all assets that have been transferred from an update source (frequent synchronization with Siemens Industrial Asset Hub or import from a .CSV file) to SINEC Security Guard. Their total number ① is displayed separately.
Note The parallel use of both update sources (Siemens Industrial Asset Hub and .CSV file) is not possible.
The inventory lists assets which are transferred from the update source; the status of an asset is shown in the inventory - see column 'Status' ⑧.
| Status | Icon | Description | Remediation |
|---|---|---|---|
| Missing mandatory matching data |  |
Data which is required to identify the product is missing | Complete the data in the source |
| Missing vulnerability feed |  |
For this product there is no vulnerability feed known to retrieve vulnerability information from | Add the vulnerability feed of the asset's vendor |
| Matching data complete |  |
All data looks fine, but there is no vulnerabiliy detected for this product | None; as soon as a vulnerability becomes published for this product via the vulnerability feed, the data becomes validated automatically |
| Matching data validated |  |
Product and vulnerability feed data are fine | None |
Asset details ⑥ can be displayed for a selected asset.
The list of assets can be exported in a .CSV file for use in other systems ⑤.
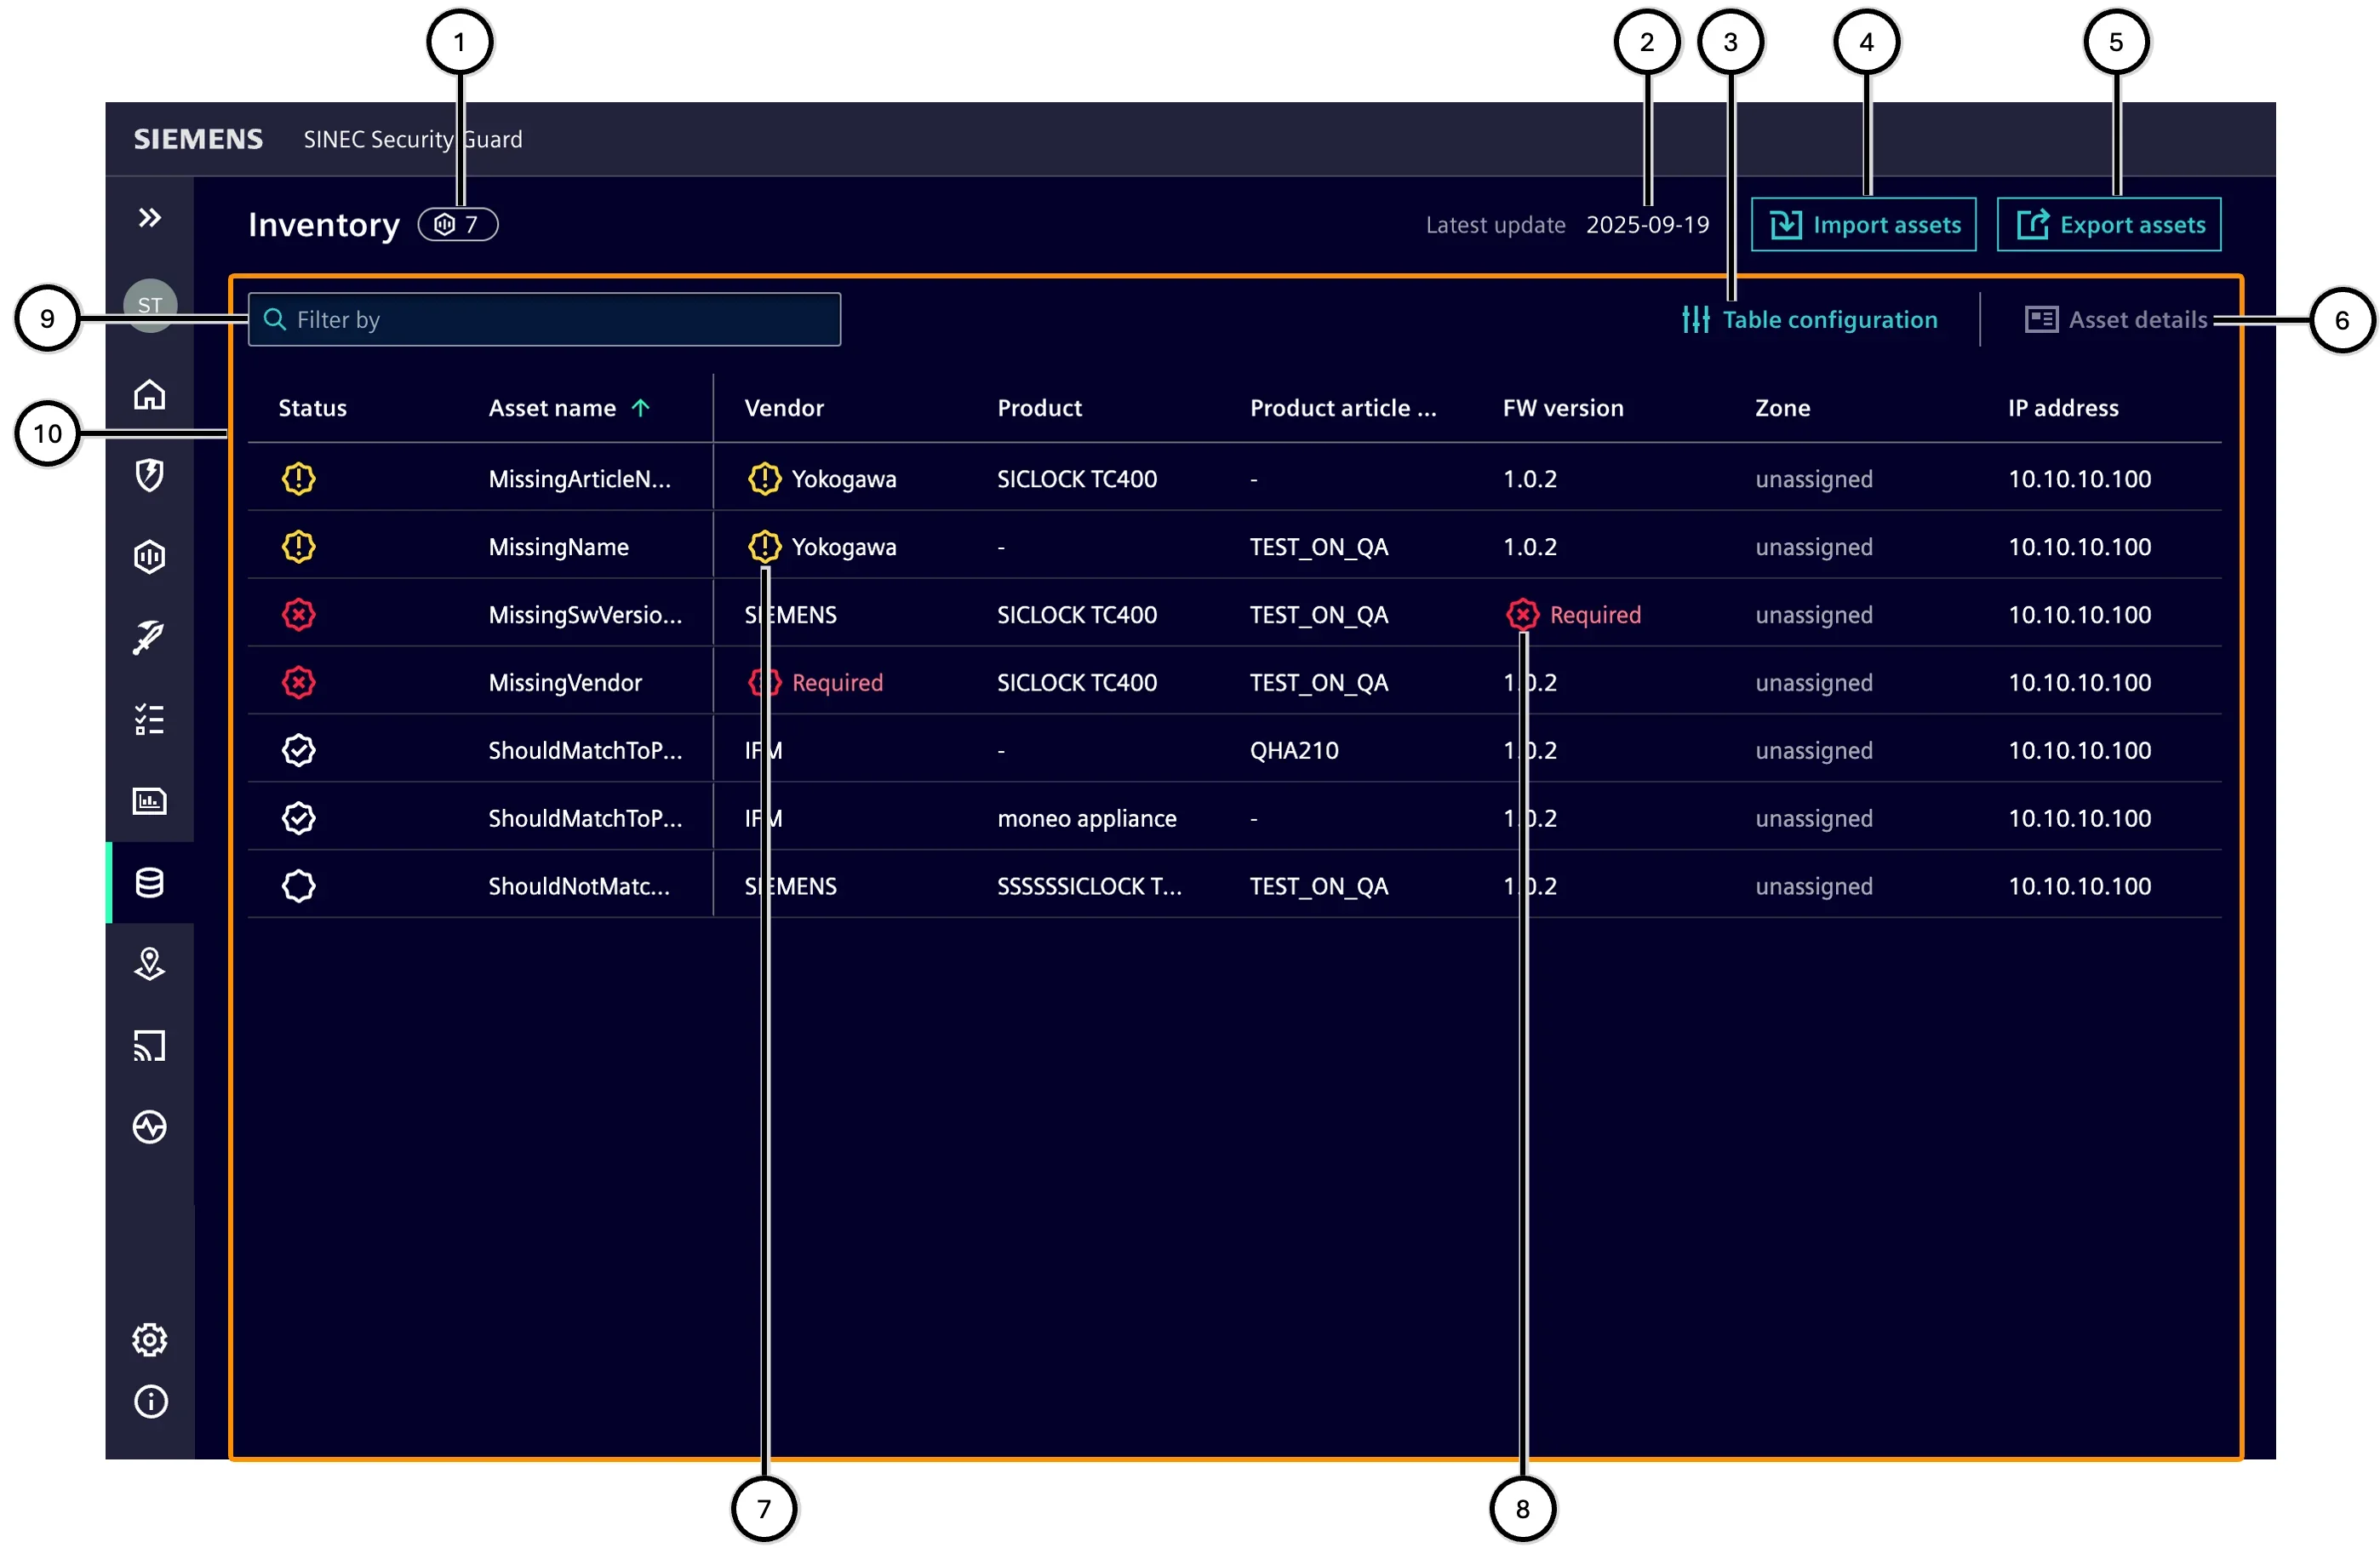
| Number | Description |
|---|---|
| ① | Total number of supported and unsupported assets in the inventory |
| ② | Point of time of last inventory update |
| ③ | 'Table configuration' button |
| ④ | 'Import assets' button |
| ⑤ | 'Export assets' button |
| ⑥ | 'Show asset details' button |
| ⑦ | Cell with missing vulnerabiliy feed information |
| ⑧ | Cell with missing matching data |
| ⑨ | Input field for filtering the assets |
| ⑩ | List of assets |
Configuration of the table
It can be defined for the table, which columns are displayed in which order:
- Only these columns will be displayed which are selected in the configuration dialogue ②; single columns are selected and may not be deselected ①.
- The position of a column can be changed by dragging and dropping the column header to the desired position.
- With the reset button ③ one can go back to the standards configuration of the table.
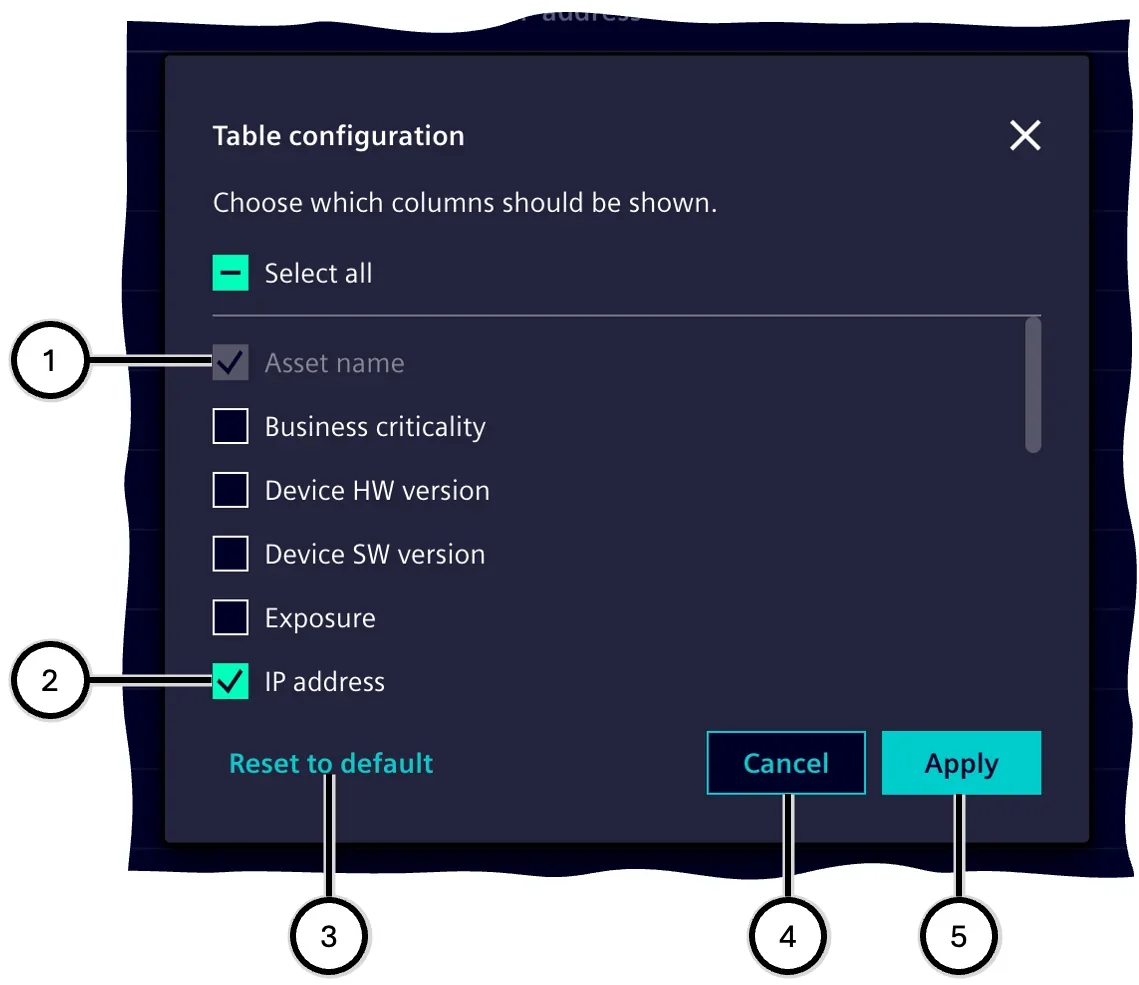
| Number | Description |
|---|---|
| ① | Selected column (locked) |
| ② | Selected column |
| ③ | 'Reset to default' button |
| ④ | 'Cancel' button |
| ⑤ | 'Apply' button |
Necessity and impact of updates
During the update, the data from the update source replaces the previous inventory. The data is not added to the existing inventory.
It is necessary to update the inventory if something changes in the hardware, firmware or configuration used, e.g. due to the replacement of assets, the installation of a firmware update or a changed IP address.
Per asset, a successful update has the following effect on new existing inventory:
| Asset exists in the previous inventory | Same asset exists in the update source (IAH or .CSV) | Effect on the new inventory |
|---|---|---|
| Yes | Yes | Asset data is replaced |
| Yes | No | for Delta upload: Asset and all associated data and tasks become updated; for full upload: Asset and all associated data and tasks are removed |
| No | Yes | Asset is newly added |
An update from a .CSV file fails if the file or its data structure is corrupt or if there is a problem with any given 'id' (either that any 'id' is missing or that any 'id' appears more than once). If an update from a .CSV file fails, nothing will be updated and the up-to-now existing inventory will remain untouched.
Synchronization with Siemens Industrial Asset Hub
Note The use of the update source Siemens Industrial Asset Hub is described here; importing from a .CSV file is then not possible. Contact Siemens Support if you have any questions.
The inventory automatically synchronizes with the Siemens Industrial Asset Hub in the background several times a day. Changes to assets or asset data in the Siemens Industrial Asset Hub are synchronized with SINEC Security Guard in a timely manner.
Import from a .CSV file
Note The use of the update source .CSV is described here; synchronization with Siemens Industrial Asset Hub is then not possible. Contact Siemens Support if you have any questions.
If an inventory is present in SINEC Security Guard, a note ② shows the age of the most recent import.
The import process is initiated via a button:
- ① shows the button in the event that there is no inventory;
- ③ shows the button in the event that an inventory is already present.
The process consists of two steps:
Step 1: Import mechanism
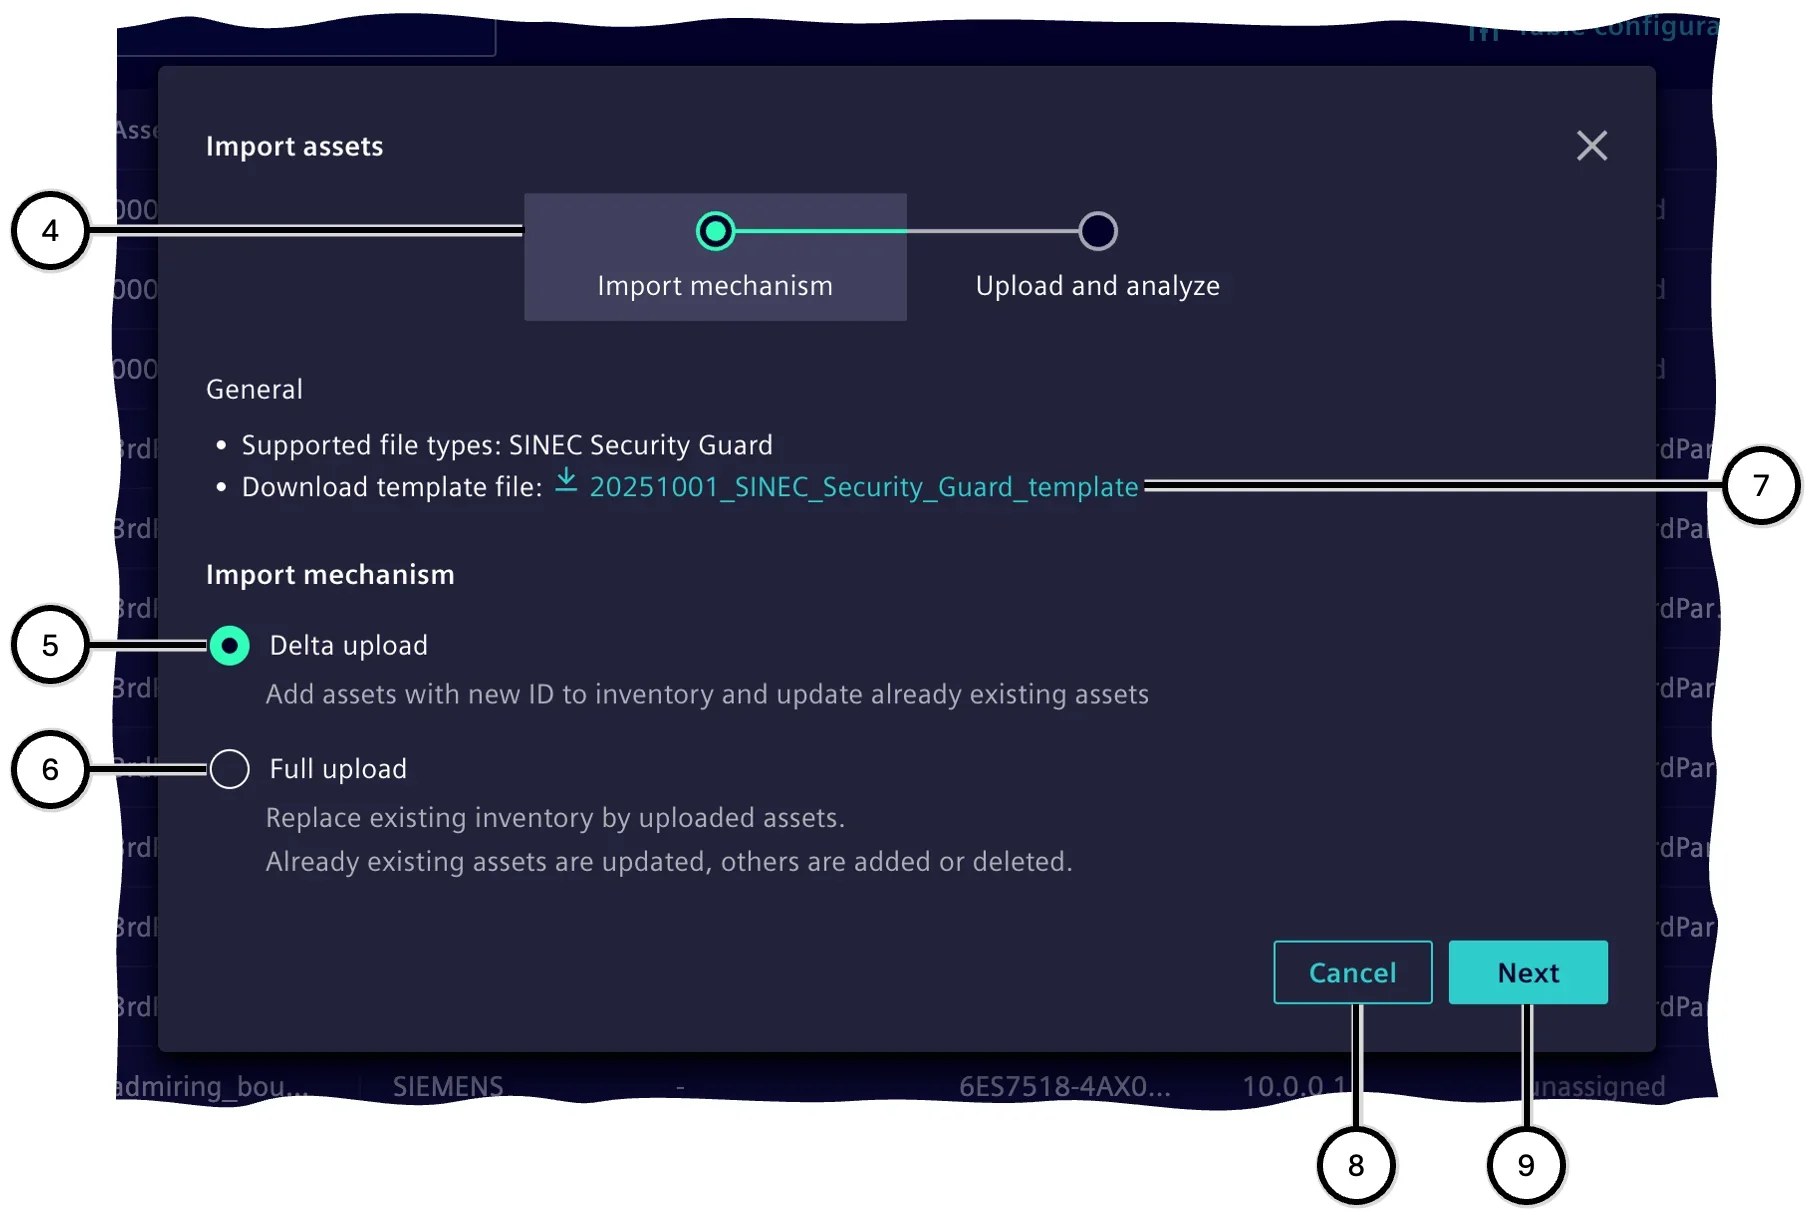
To import data from a file, the asset data must be stored in a .CSV file that follows a predefined structure. The required file structure is specified in the current template file, which can be downloaded using the corresponding button ⑦. Always use the structure provided by the latest template file. Using a structure that differs from the latest template file will result in an error, and the inventory already stored in SINEC Security Guard will remain unchanged.
Select the desired import mechanism:
- Delta upload ⑤: Data for assets that exist only in the inventory and not in the file remains unchanged. Data for assets that exist both in the inventory and in the file is updated using the values from the file; empty fields in the file will also clear the corresponding fields in the inventory. Data for assets that exist only in the file is added to the inventory.
- Full upload ⑥: The existing inventory and all tasks are completely cleared, and the data from the file is imported into the inventory.
Step 2: Upload and validate
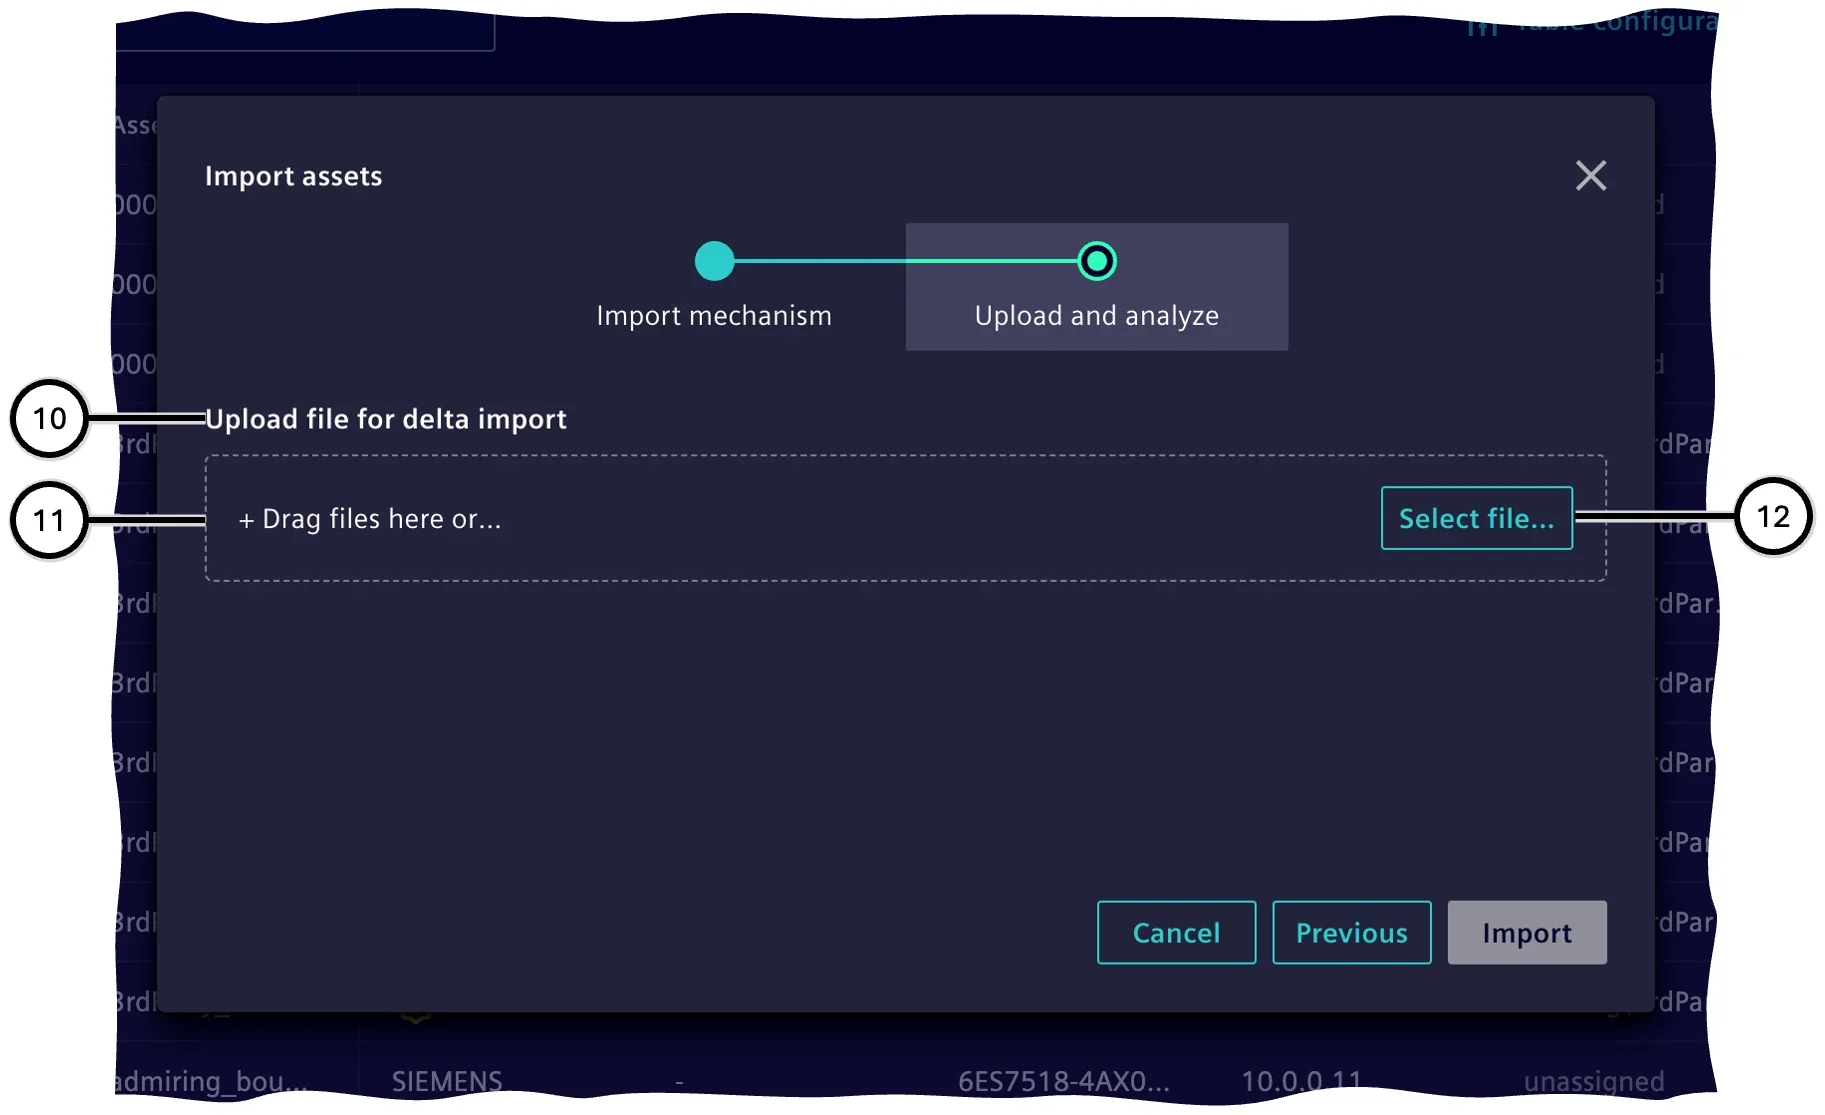
Provide the file containing the data to be uploaded (see also ./inventory.en.md#data-in-the-csv-file). You can either drag and drop the file from a file manager onto the upload area ⑪ or click the ⑫ button to open a file selection dialog and navigate to the file location.
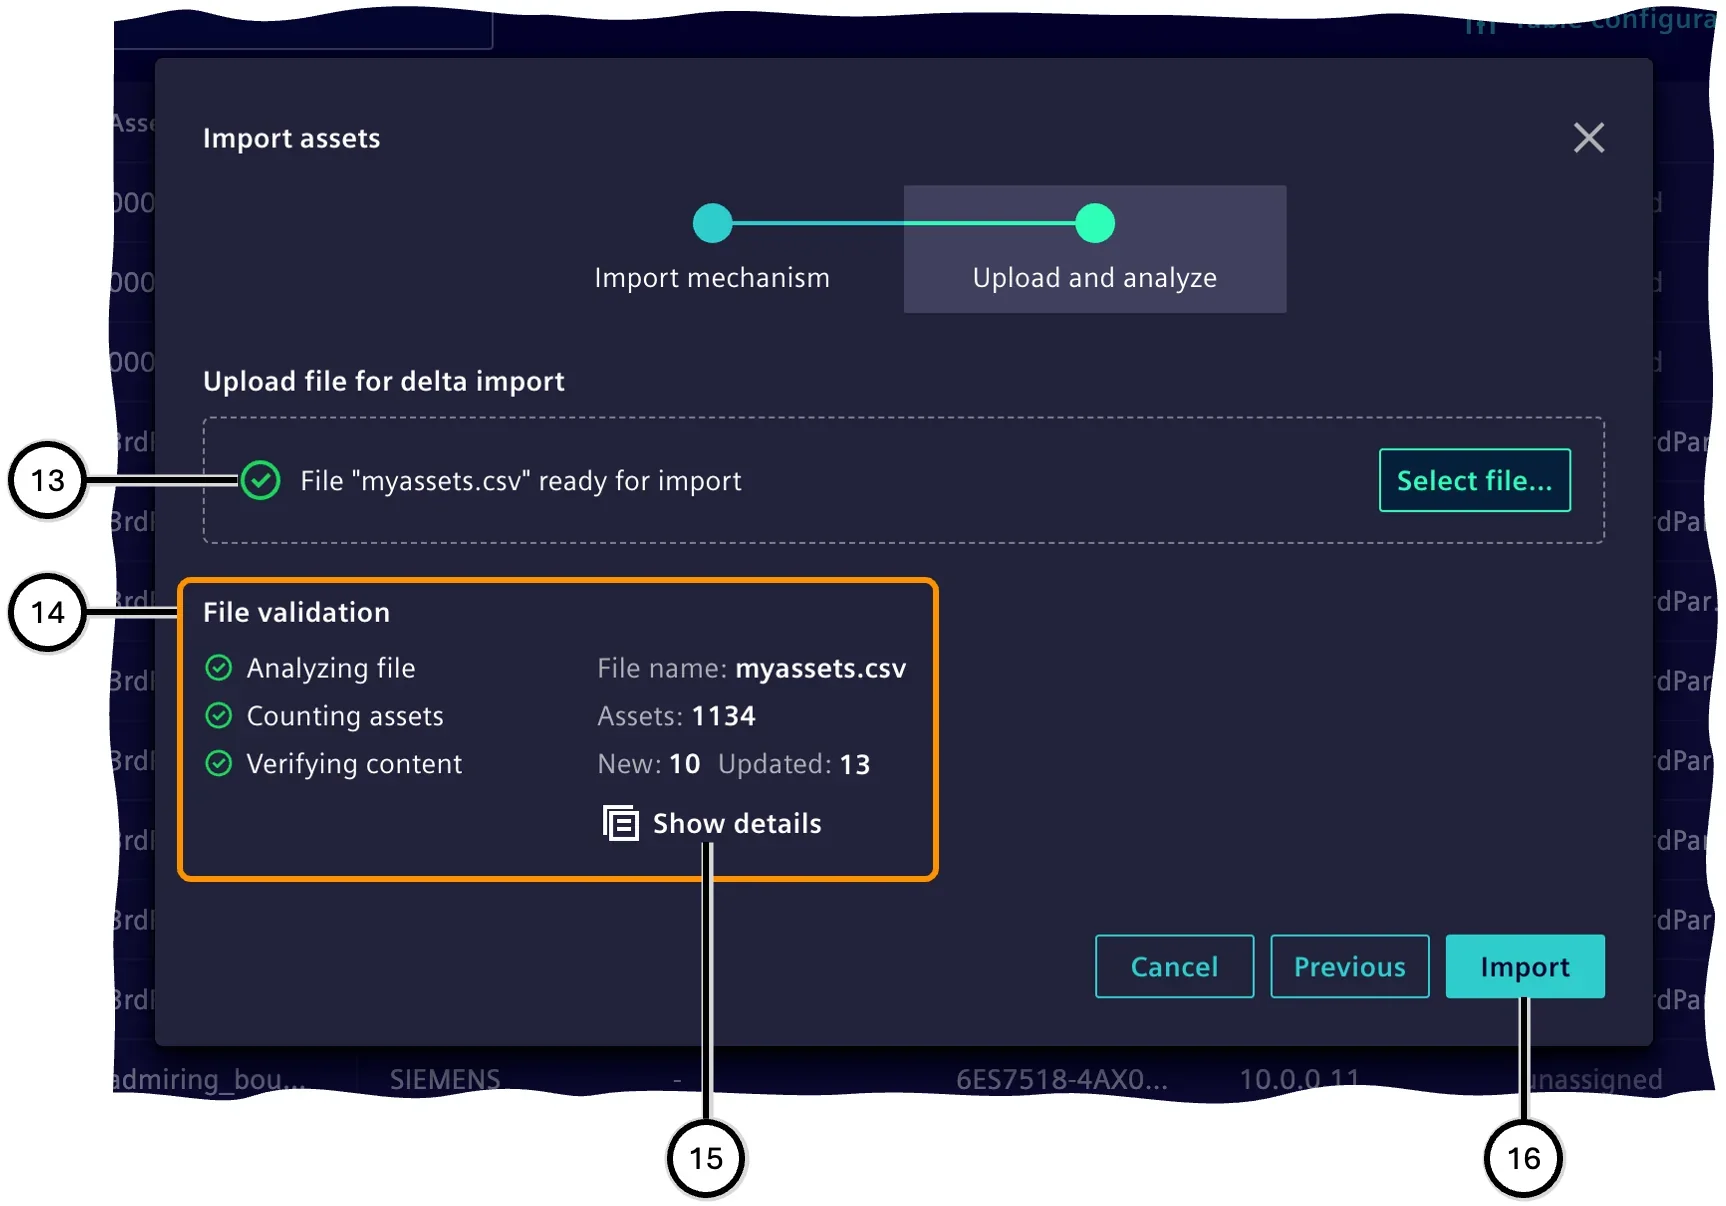
As soon as the file has been provided, the system verifies whether it can be imported ⑭. The file is validated on three levels:
- Analyzing file: Checks whether the file type and the structure of the contained data are compatible. If this validation fails, the validation process is aborted.
- Counting assets: Checks whether the amount of data contained in the file is within the allowed limits. If this validation fails, the validation process is aborted.
- Verifying content: Checks whether the contained data is complete
If errors occur on any validation level, the file cannot be imported. You can upload a different file or a corrected version of the file and repeat the process.
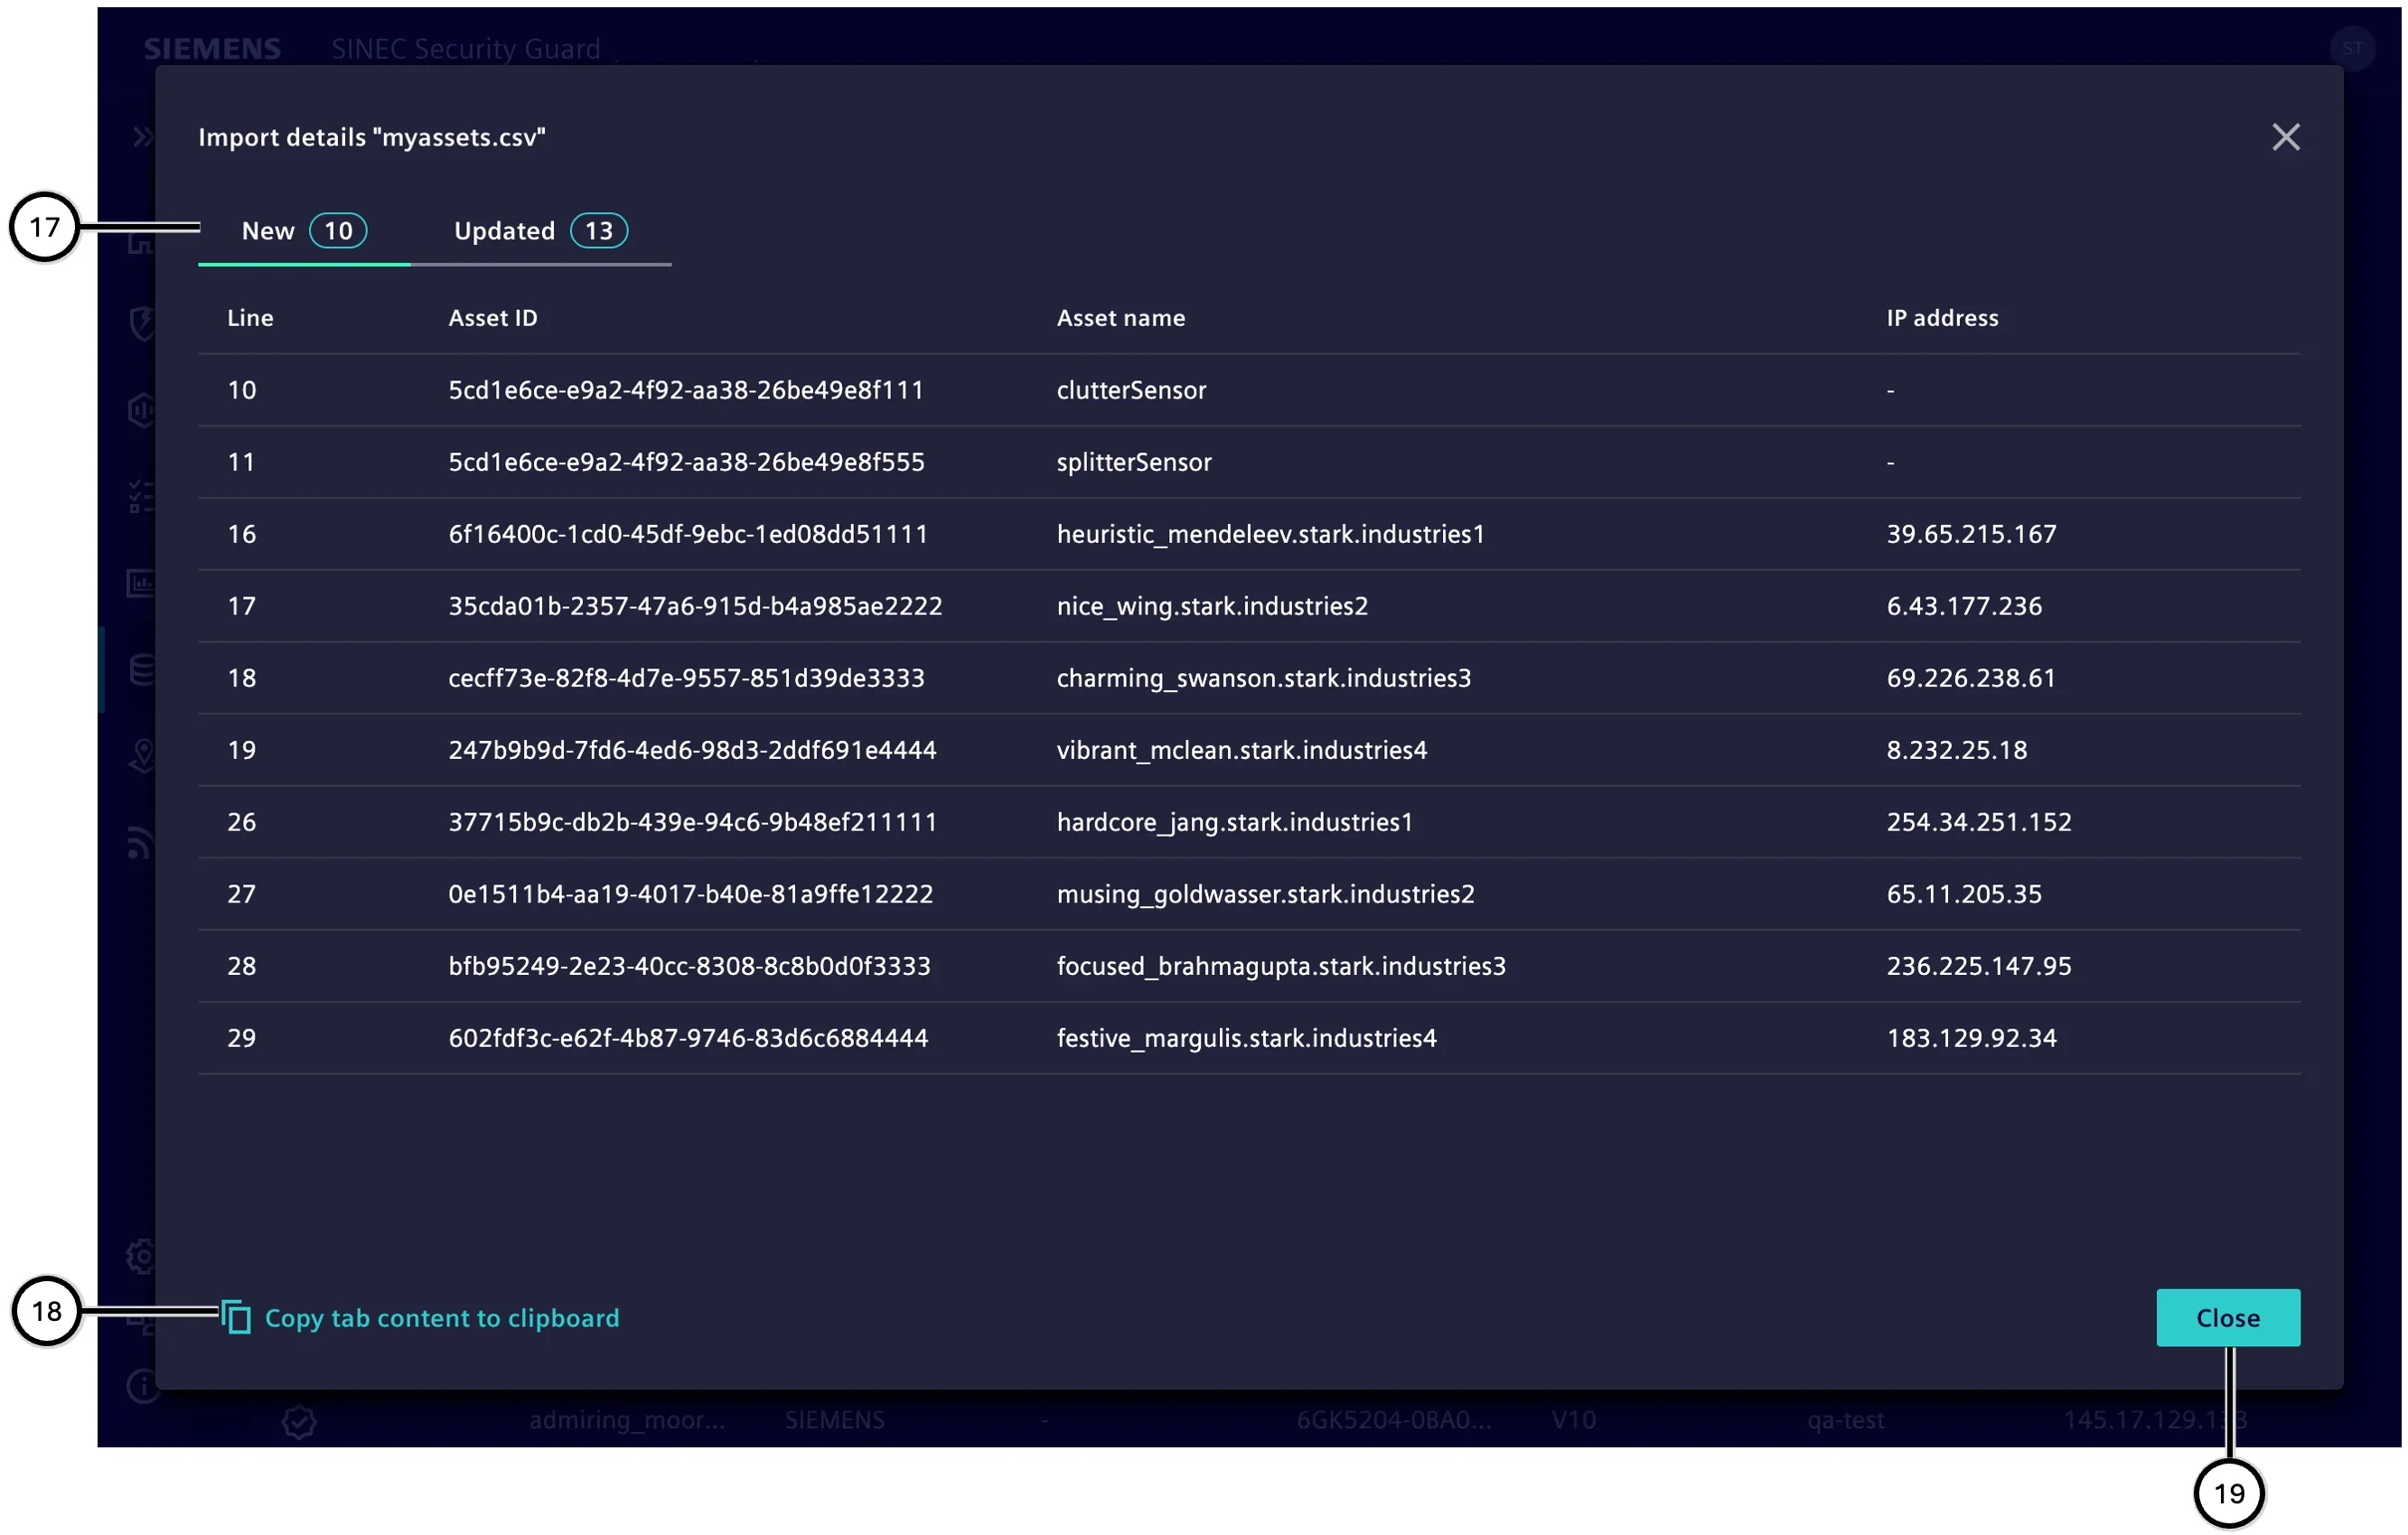
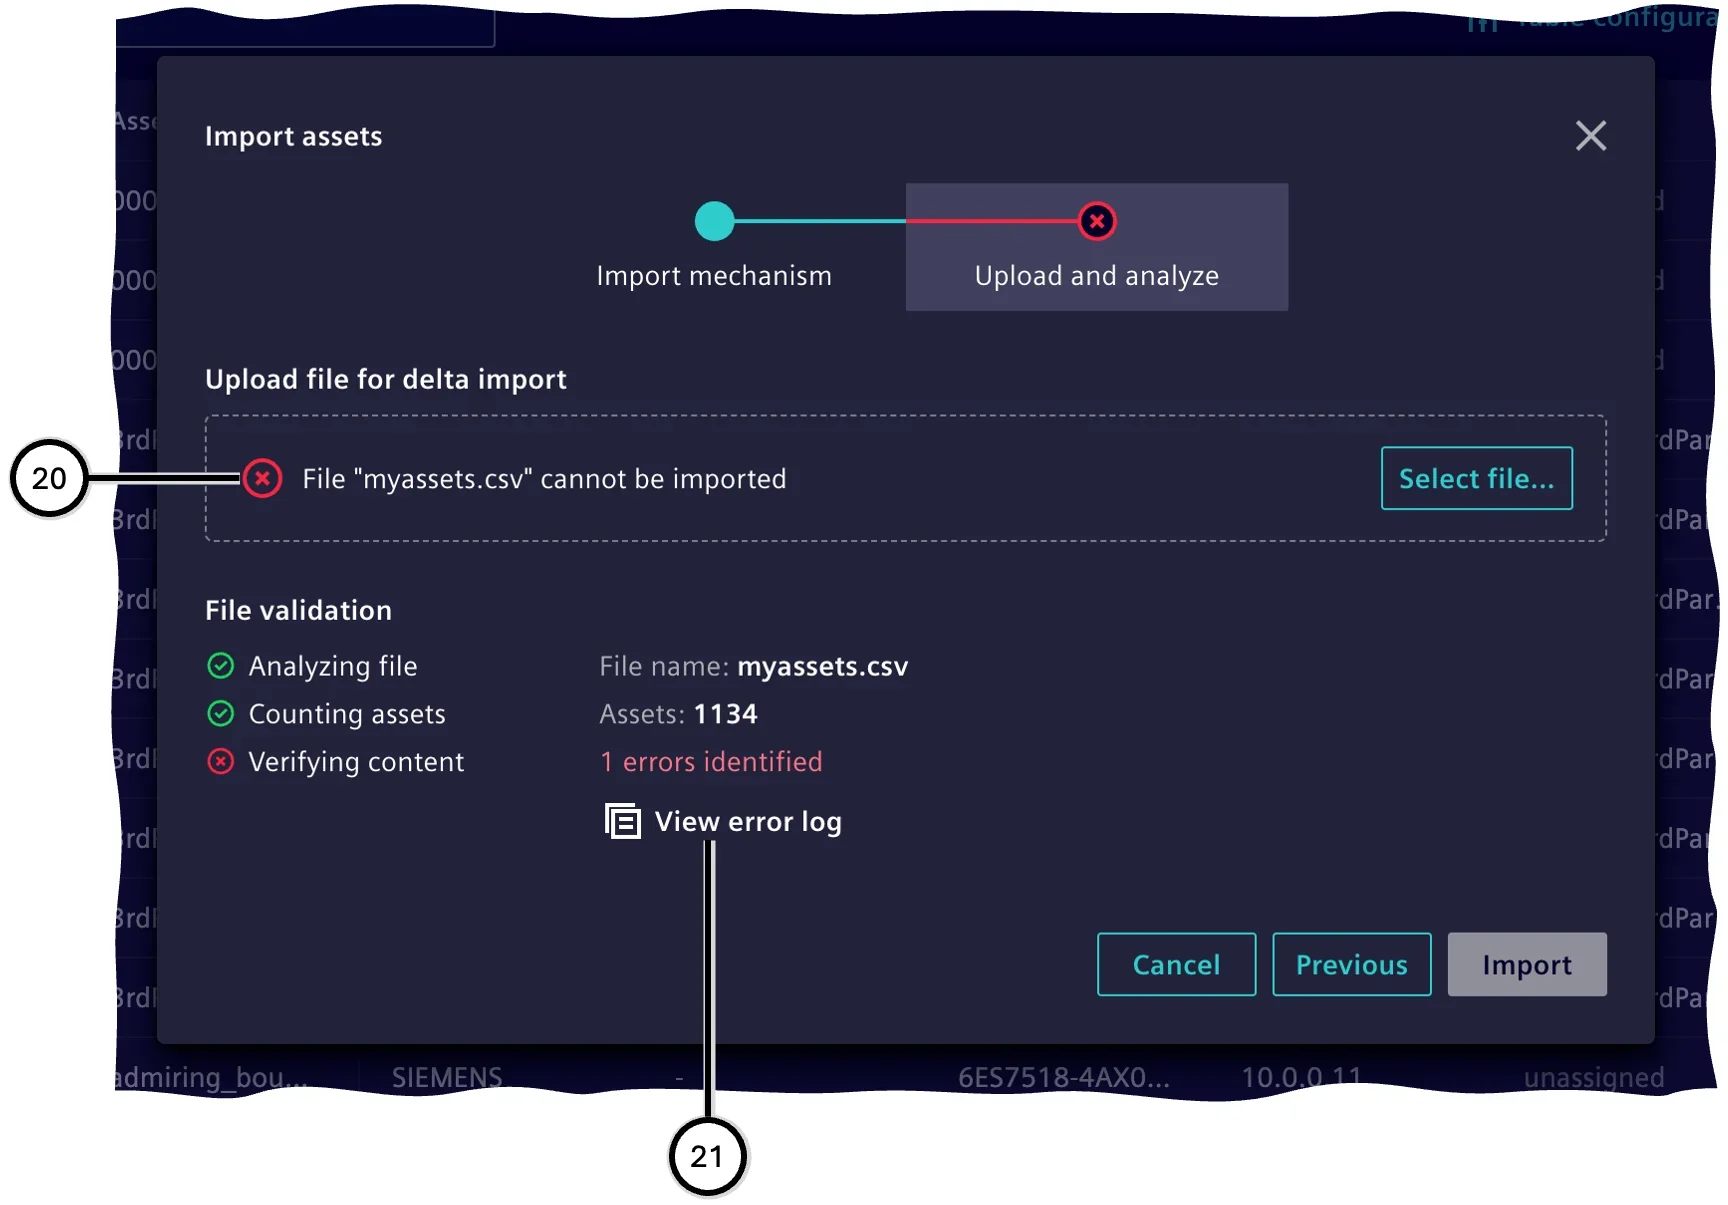
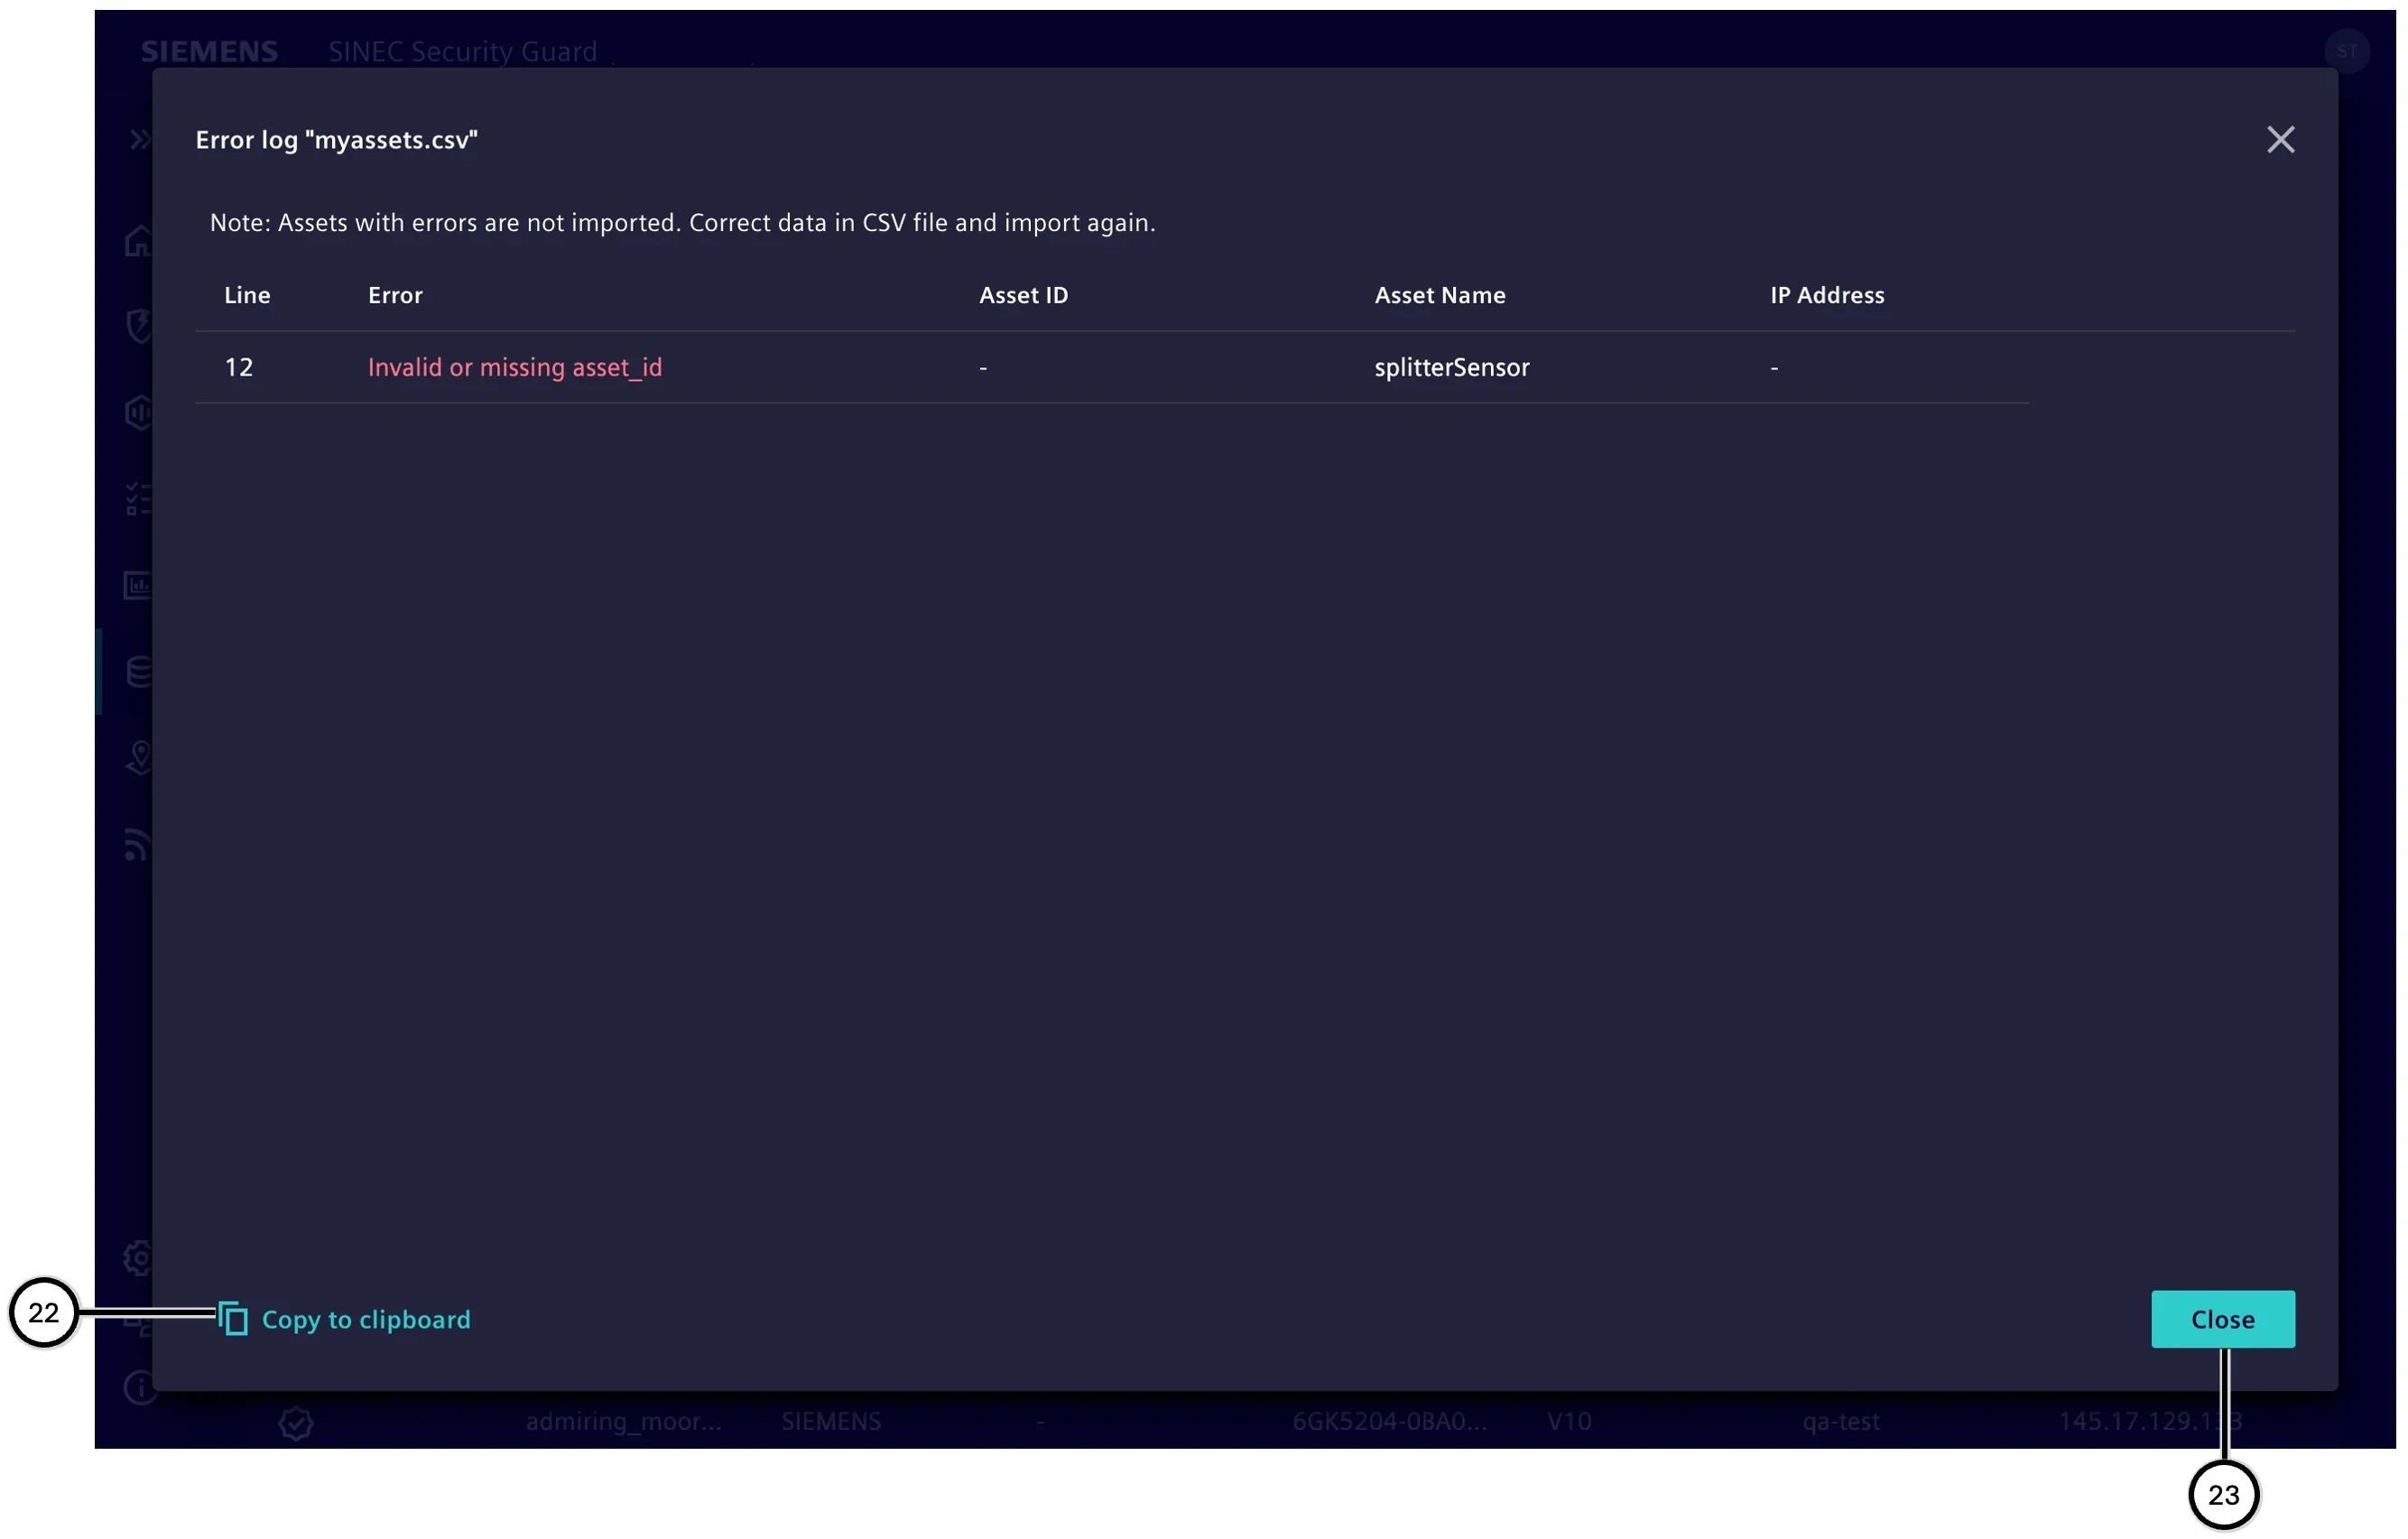
If the validation fails at “Verifying content”, you can open a table of affected assets and view further details ㉑. The contents of the table can be copied to the clipboard using the ㉒ button. If the file is importable, you can open a dialog ⑮ containing tables of new, updated, and removed assets and review further details. The contents of the selected table can be copied to the clipboard using the ⑱ button.
Up to this point, you can still cancel the import process without making any changes to the existing inventory.
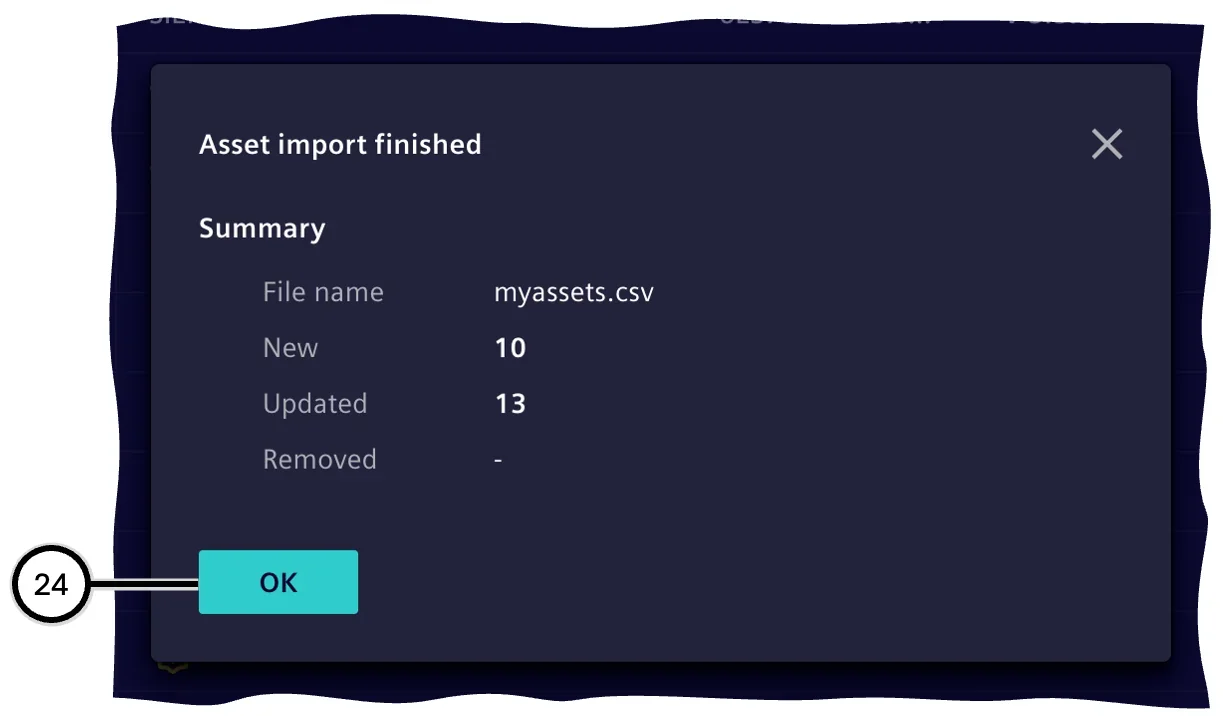
You can start the import by clicking the import button ⑯. The resulting changes to the inventory cannot be undone. A summary of the import operation is then displayed (24).
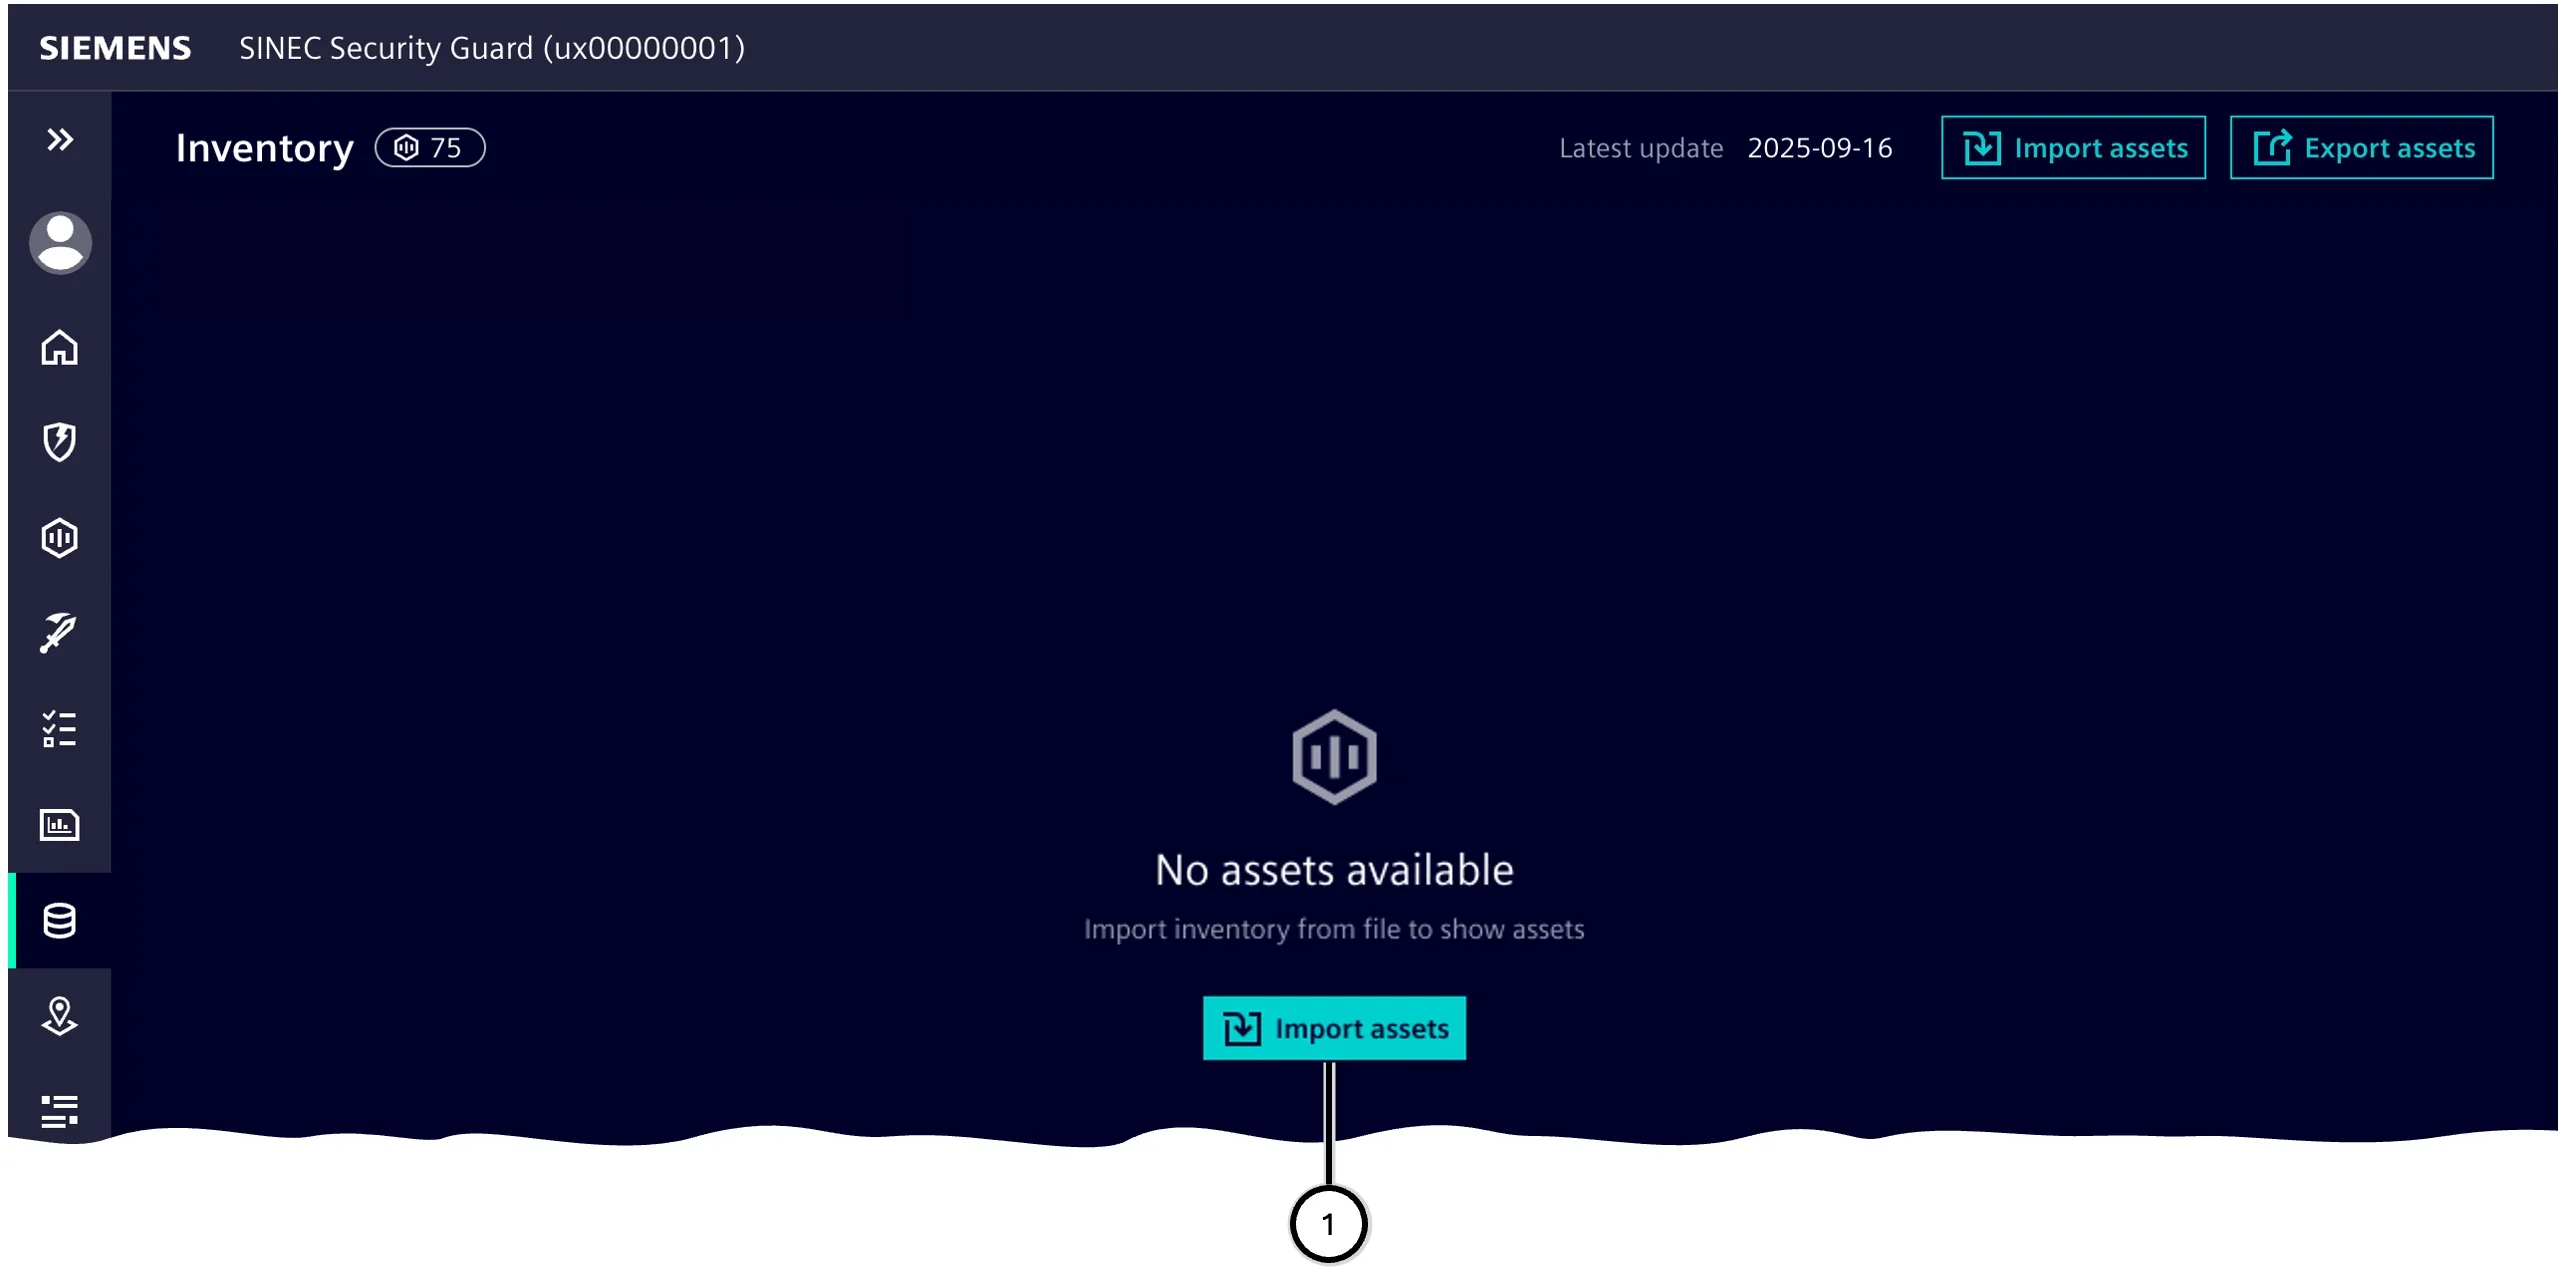
| Number | Function |
|---|---|
| ① | Button to import asset data from a .CSV file |
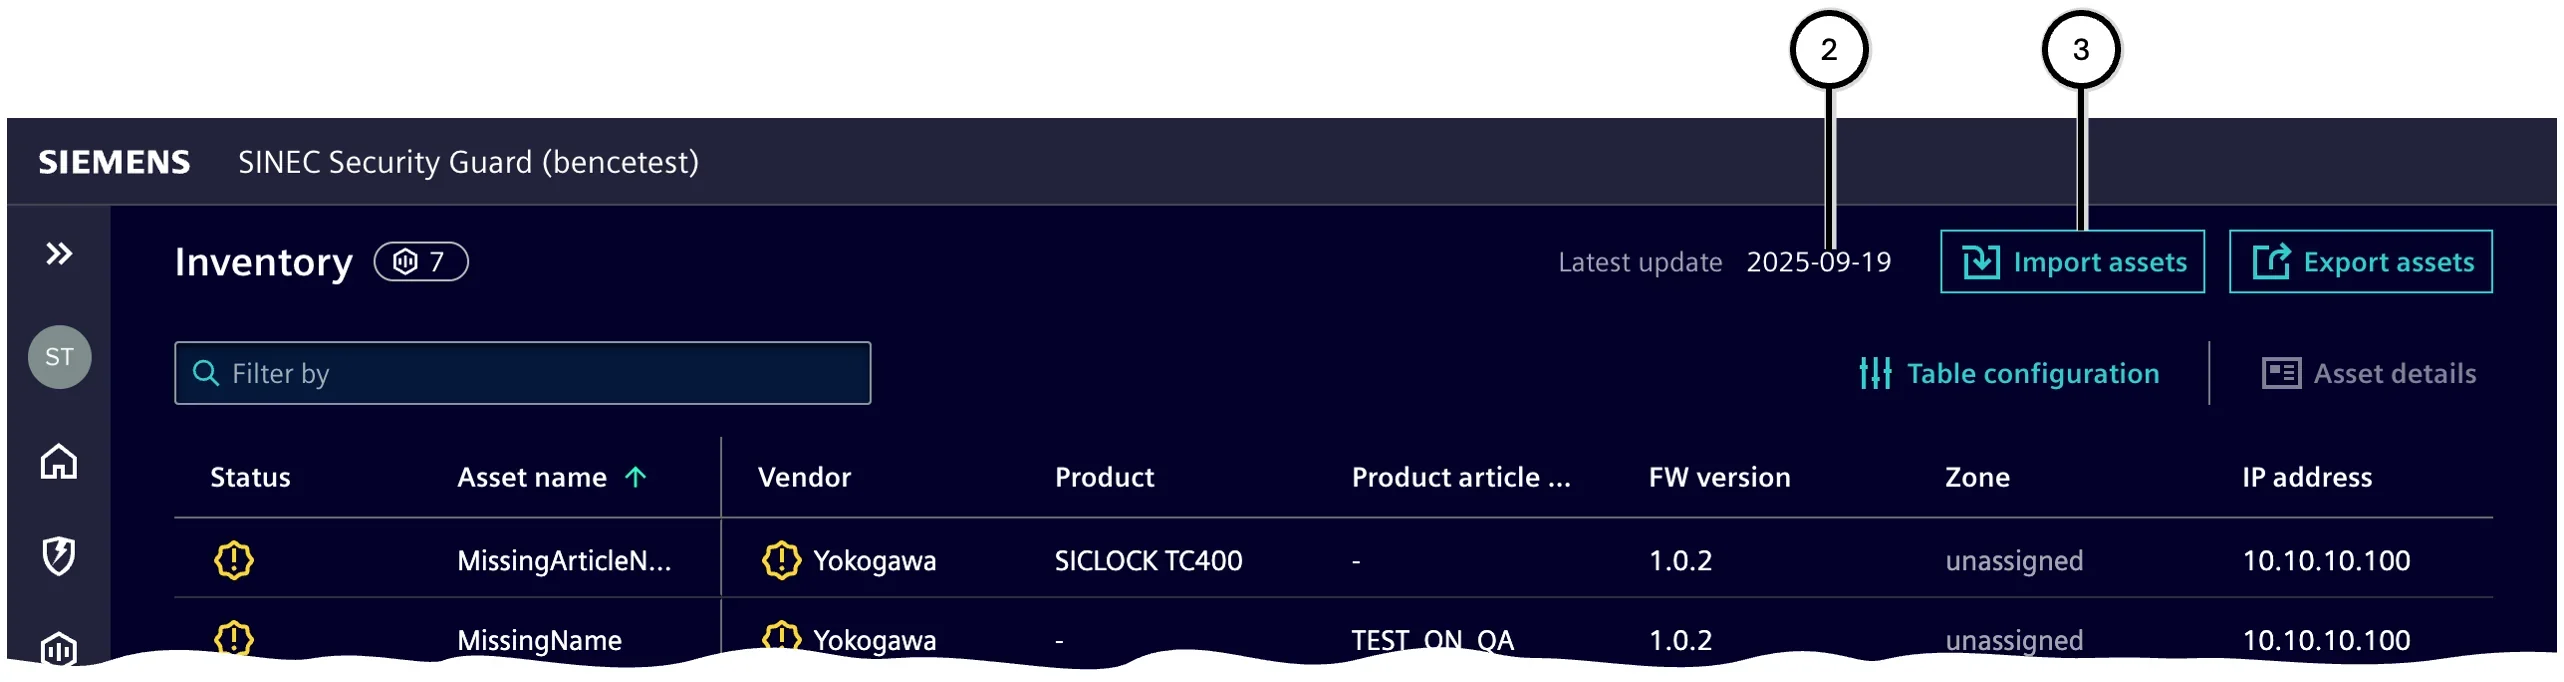
| Number | Function |
|---|---|
| ② | Age of the most recent import |
| ③ | Button to import asset data from a .CSV file |
| Number | Function |
|---|---|
| ④ | Steps of the 'Import wizard' |
| ⑤ | Option for the delta upload |
| ⑥ | Option for the full upload |
| ⑦ | Button to download the current .CSV template |
| ⑧ | Button to cancel the 'Import wizard' |
| ⑨ | Button to navigate to the next step of the 'Import wizard' |
| Number | Function |
|---|---|
| ⑩ | Information on the chosen import type |
| ⑪ | Area to drop the .CSV file |
| ⑫ | Button to select the .CSV file with asset data |
| Number | Function |
|---|---|
| ⑬ | Status display of the validation process - success state |
| ⑭ | Status of file validation |
| ⑮ | Button to show details |
| ⑯ | Button to start the import process |
| Number | Function |
|---|---|
| ⑰ | Navigation between provided import details |
| ⑱ | Button to copy the table content into the clipboard |
| ⑲ | Button to close |
| Number | Function |
|---|---|
| ⑳ | Status display of the validation process - error state |
| ㉑ | Button to show details |
| Number | Function |
|---|---|
| ㉒ | Button to copy the table content into the clipboard |
| ㉓ | Button to close |
| Number | Function |
|---|---|
| ㉔ | Button to close the summary |
Data in .CSV file
Note The structure of the .CSV file may change over time. Siemens recommends to always download the latest version of the .CSV file. You may edit the file with any text editor or spreadsheet editor. Formatting and column separation work according to the CSV standard.
The .CSV file's first row shows the column headers. Each further row contains the data of one asset (= one record). The order of the columns is arbitrary.
The table below informs about the structure of the .CSV file; the table contains this information:
- Column: Each column in the .CSV file represents one parameter that adds data to each asset. If the file contains other columns, they and their data will be ignored.
- Description: Meaning of the parameter.
- Required for import process: 'Yes' means that the .CSV file must contain the column with this header, and also data per record. 'No' means that an import will also run if no data is given here.
- Asset processing: Parameters which are marked as 'Yes' are used to process the asset's data for the SINEC Security Guard purpose; when the record does not contain data here, processing of this asset in means of SINEC Security Guard is not possible.
| Column | Description | Required for import process | Asset processing |
|---|---|---|---|
| asset_id | Unique ID of the asset (freely chosen) | Yes | No |
| asset_name | Name of the asset | No | No |
| serial_number | Serial number of the asset | No | No |
| hardware_version | Hardware version of the asset | No | No |
| firmware_version | Version of the firmware that is currently installed on the asset | No | Yes |
| network_name | Name of the network the asset is part of | No | No |
| ip | IP address of the asset (V4 or V6) | No | No |
| mac | MAC address of the asset | No | No |
| product_name | Name of the product - often used for non-Siemens assets | No | Yes. Only required if product_article_number is empty. |
| product_article_number | Article number of the asset, to be retrieved from the vendor | No | Yes. If empty, the product_name will be used. |
| product_vendor | Name of the company that has produced this asset | No | Yes |
| note | Leave any note here | No | No |
| zone_name | Name of the zone the asset belongs to | No | No. If empty: The asset gets applied to 'Unassigned assets'. If not empty: The asset gets applied to the zone of this name; if the zone doesn't yet exist, it becomes created. |
| new_asset_id | New unique identifier of the asset in case the identifier stated in asset_id shall be changed |
No | No |
Migrate the CSV imported data to the new format
- Export your current SINEC Security Guard -inventory into a .CSV file
- Keep the data in the column
asset_iduntouched (no changes, no removal) - In case you want to change
asset_idvalues: In the .CSV file, add a new column with the headernew_asset_id; this column will not show up in the template .CSV file or export .CSV file but has to be created manually when identifier shall be changed. - For rows you want to keep the identifier as given in the
asset_idcell: leave empty the respective cell in columnnew_asset_id - For rows you want to change the identifier: enter the desired new identifier into the column
new_asset_id, and take care that it is unique for both columnsasset_idandnew_asset_id - Save this file and import it into SINEC Security Guard
When importing a file with the column new_asset_id:
- All rows where the
new_asset_idcell is changed: The respective asset and all its remaining tasks will not be available anymore; an asset with the edited identifier becomes created and does not yet contain any tasks. - All rows where the
asset_idcell remains untouched and thenew_asset_idcell will keep their known identifier of the columnasset_id. - All rows where the
asset_idcell remains untouched and thenew_asset_idcell contains a value will use the new identifier instead of their known identifier and will update all relations inside SINEC Security Guard accordingly.
This process ensures that all data relations between the assets and their tasks are kept for both the assets which keep their identifier and the assets which get a newly defined identifier.
Export
The records of the inventory can be exported to a .CSV file. This file may be used to work with the data in other applications and systems. When starting the export, the .CSV file becomes created and downloaded to your system - consult the settings of the browser and the operating system you use to see where to find the file.
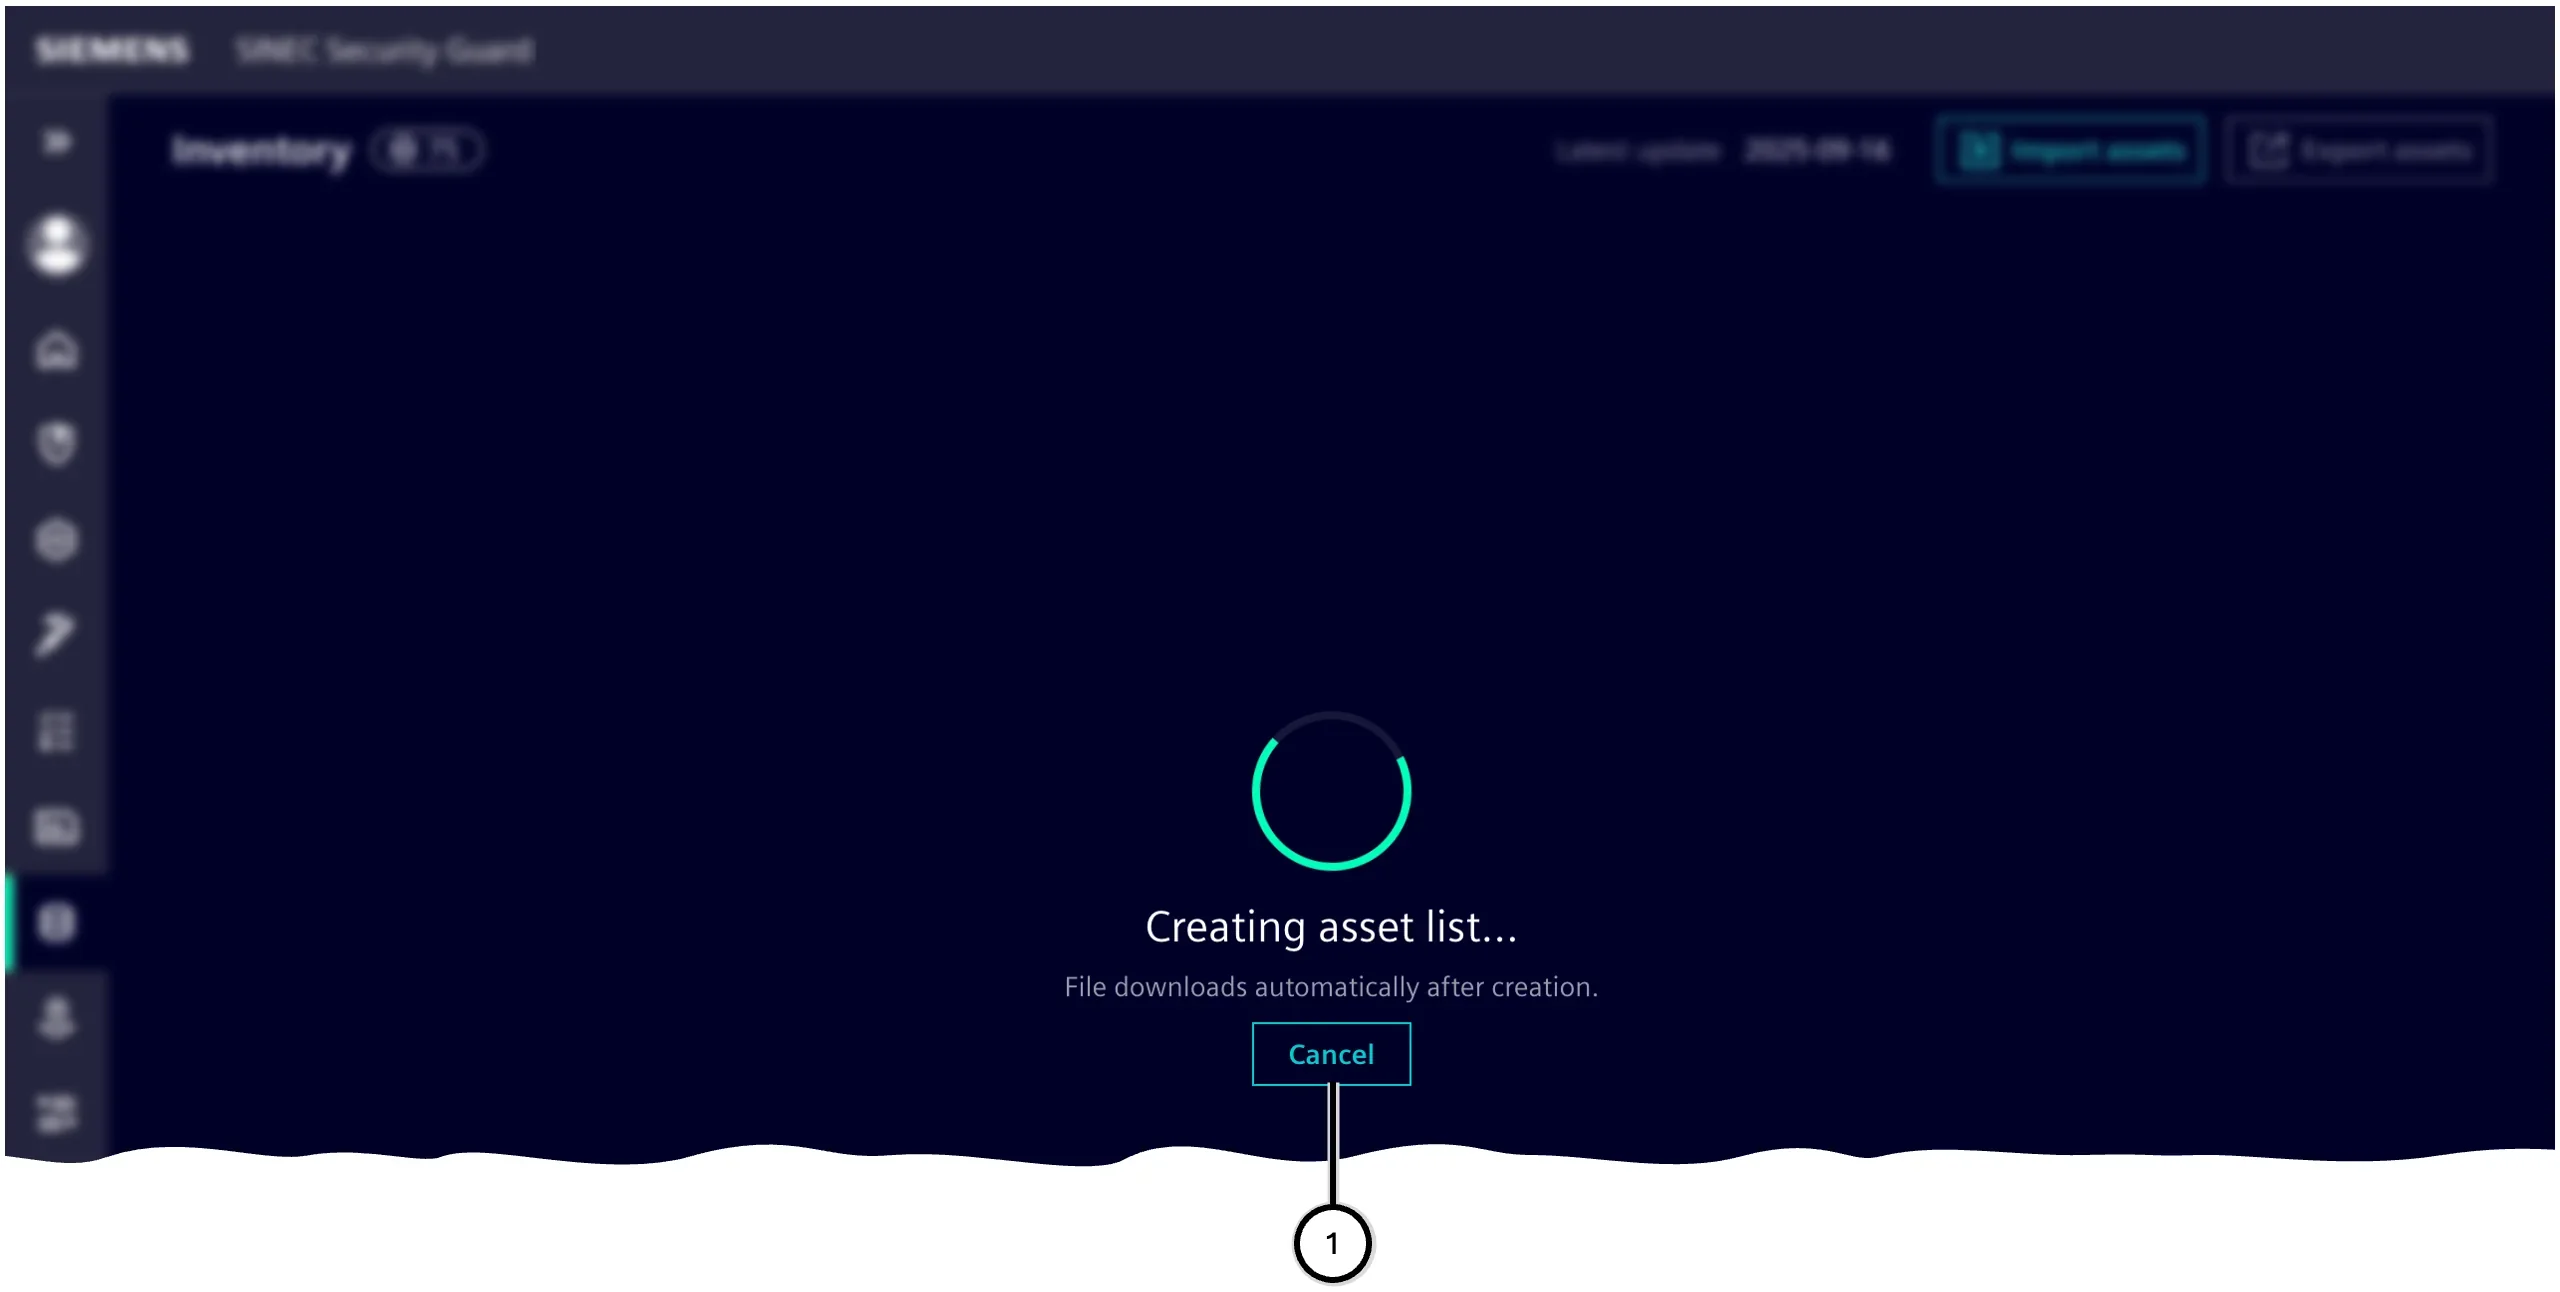
Depending on the internet connection and the number of records, the export process may take some time. As long as the process continues, SINEC Security Guard cannot be used otherwise. The export process can be cancelled ①. The name of the .CSV file contains date and time of the export.
Note Currently the structures of an exported .CSV file and the template to import data into SINEC Security Guard differ. To import data from an exported .CSV file one needs to apply the data to the structure of the import template file.
| Number | Description |
|---|---|
| ① | Button to cancel the export process |