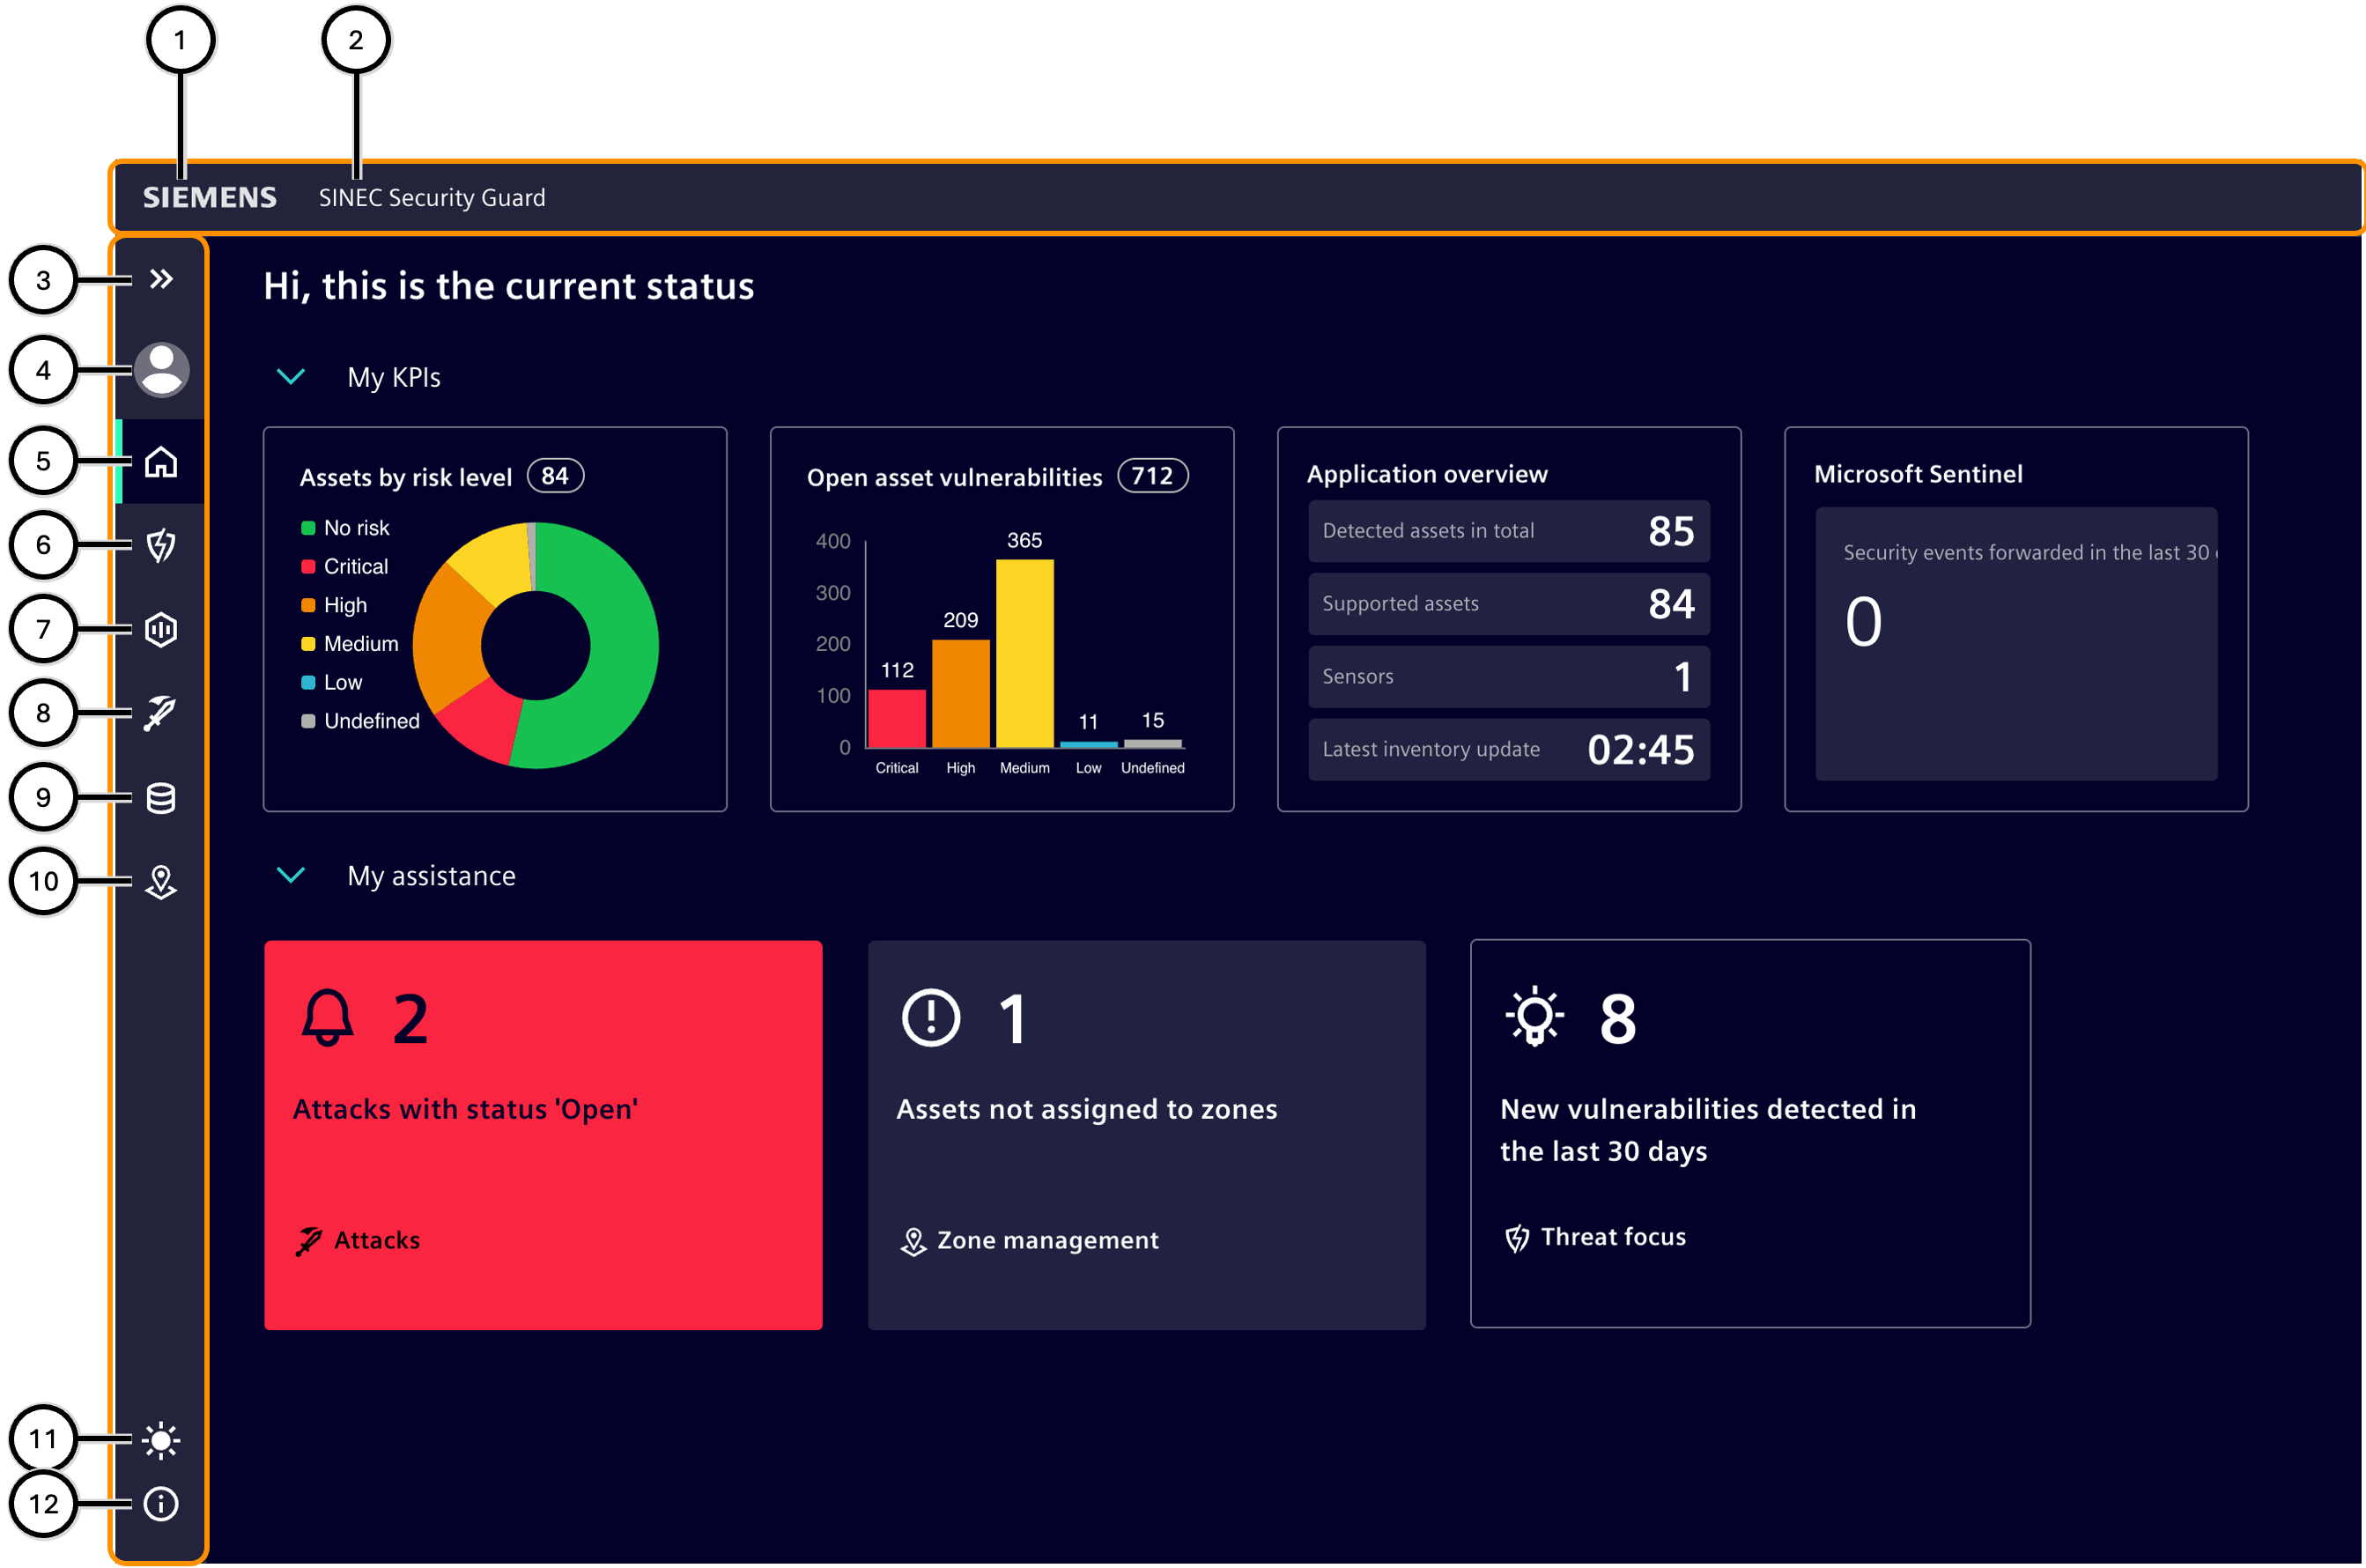
Basic structure
Navigation
| Number | Explanation |
|---|---|
| ① | Siemens logo: Siemens AG is the manufacturer of the SINEC Security Guard. |
| ② | SINEC Security Guard: Name of the product |
| ③ | User profile: Log out of the ongoing SINEC Security Guard session; to use SINEC Security Guard again, a new login is then required. |
| ④ | 'Menu' button: This allows the menu to be expanded and collapsed so that the labels are displayed or hidden. |
| ⑤ | Home: Overview on the most important values of the risk situation. |
| ⑥ | Threat focus: Overview of vulnerabilities that affect products in the plant. |
| ⑦ | Asset focus: Overview of zones and assets in the plant that are affected by vulnerabilities. |
| ⑧ | Task management: Overview of tasks which had been defined to handle vulnerabilities of assets. |
| ⑨ | Reporting: Overview of all assets that SINEC Security Guard monitors. |
| ⑩ | Inventory: Overview of all assets that SINEC Security Guard monitors. |
| ⑪ | Zone management: Overview of the created zones and the assigned assets. |
| ⑫ | Vulnerability feeds: Overview of the sources of vulnerability information. |
| ⑬ | Settings: Adapt SINEC Security Guard to personal preferences. |
| ⑭ | About & Legal information: Legal and version-related information as well as the documentation. |
Home
The Home section provides information about the current status of SINEC Security Guard.
In the upper area, tiles (①-③) show KPIs that are relevant for the assessment of the security situation of the plant. Most of these tiles are clickable and link to the relevant pages.
These tiles are always shown, regardless of their urgency:
-
'Assets by risk level'
Each supported asset is counted with its highest total risk level; an asset with the risk levels '3 x High' and '1 x Low' counts as '1 x High' (since it is an asset and its highest risk level is 'High'). Clicking on this tile will redirect to the Asset focus page.
-
'Open asset vulnerabilities'
Each vulnerability counts with the risk level assigned to it; if an asset has 4 vulnerabilities with the risk levels '3 x High' and '1 x Low', the 'High' counter is increased by 3 and the 'Low' counter by 1. Clicking on this tile will redirect to the Threat focus page.
-
'Application overview'
Total number of assets in the inventory and the number of these that are compatible with SINEC Security Guard. In addition, the time of the last inventory update is specified. Clicking on this tile will redirect to the Inventory page.
In the lower area, tiles provide information about urgent fields of activity (④-⑤). Tiles are only shown for activity fields where there is an urgent need for change. Fields of activity without an urgent need for change are hidden and only displayed when there is a need for change.
-
'Assets not assigned to zones'
The risk level cannot be calculated for such assets. All assets should therefore be assigned to zones or the list of assets to ignore. Clicking on this tile will redirect to the Zone management page.
-
New vulnerabilities dectected in the last 30 days
The known sources of vulnerability descriptions are checked. All newly released vulnerabilities for assets from the inventory during the past 30 days are counted here. Clicking on this tile will redirect to the Threat focus page.

| Number | Tile |
|---|---|
| ① | Asset by risk level |
| ② | Threats |
| ③ | Application overview |
| ④ | Number of assets that are not yet assigned to any zones |
| ⑤ | Number of newly detected vulnerabilities |
Threat focus
This area lists all vulnerabilities ③ that are known for supported assets from the inventory. When you click on a vulnerability, additional details about it ④ are shown.
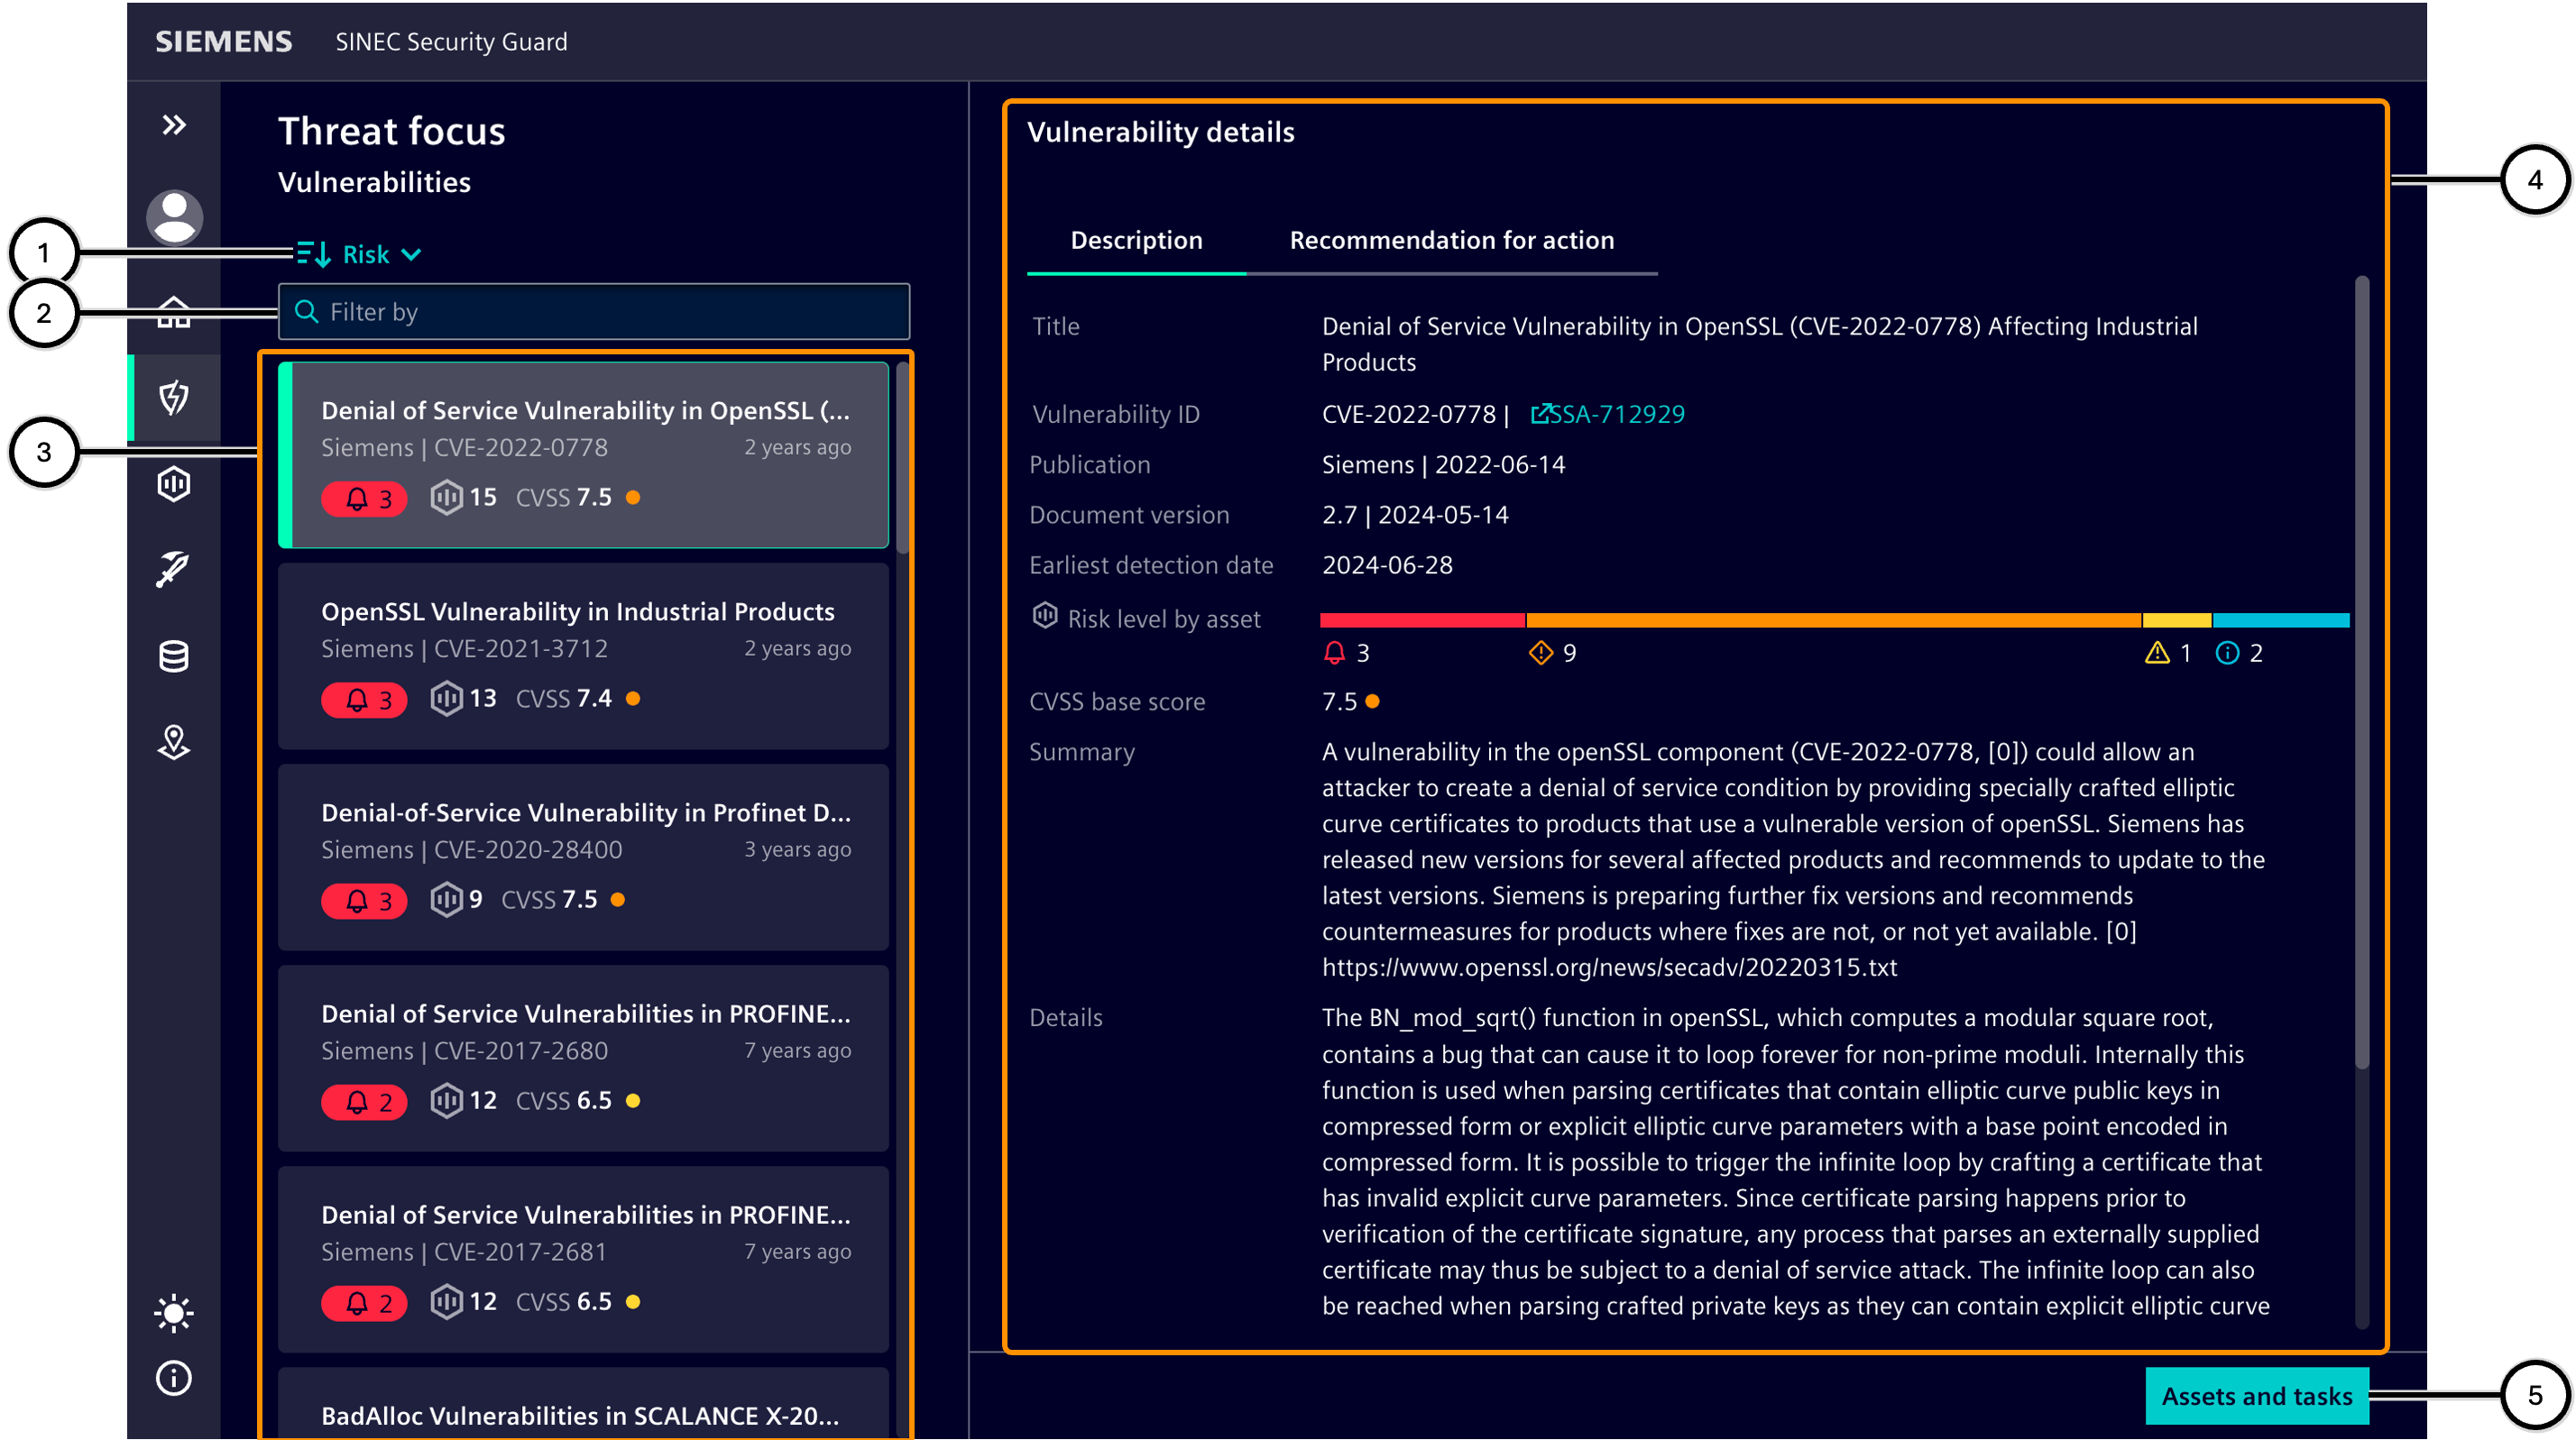
| Icon | Description |
|---|---|
| ① | Sort order selection button |
| ② | Input field for filtering the vulnerabilities |
| ③ | List of existing vulnerabilities |
| ④ | Details of the selected vulnerability |
Vulnerability
Additional information is displayed for each vulnerability.
The CVSS rating is as follows:
| Rating | CVSS score | Color coding |
|---|---|---|
| None | 0.0 | (none) |
| Low | 0.1 – 3.9 | Blue |
| Medium | 4.0 – 6.9 | Yellow |
| High | 7.0 – 8.9 | Orange |
| Critical | 9.0 – 10.0 | Red |
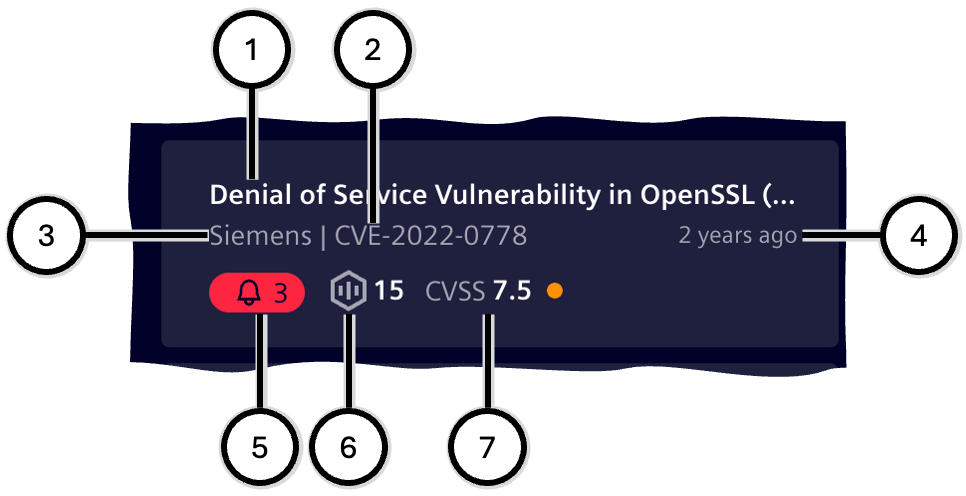
| Icon | Description |
|---|---|
| ① | Title of the vulnerability |
| ② | ID of the vulnerability |
| ③ | Publisher of the vulnerability description |
| ④ | Age of the vulnerability description |
| ⑤ | Total risk level: Highest risk and number of assets affected by the highest risk |
| ⑥ | Total number of assets affected by this vulnerability, across all risk levels; this total number also includes the assets affected by the total risk level |
| ⑦ | CVSS score of the vulnerability; the value is also shown in color |
Details of the selected vulnerability
Only information related to assets included in the inventory is displayed.
Description
This area shows information about the description of the vulnerability as well as its impact and occurrences on assets in the plant; see 'Threat details'. This area shows options to fix the vulnerability or at least to reduce its impact or lessen the vulnerability; see 'Threat details'.
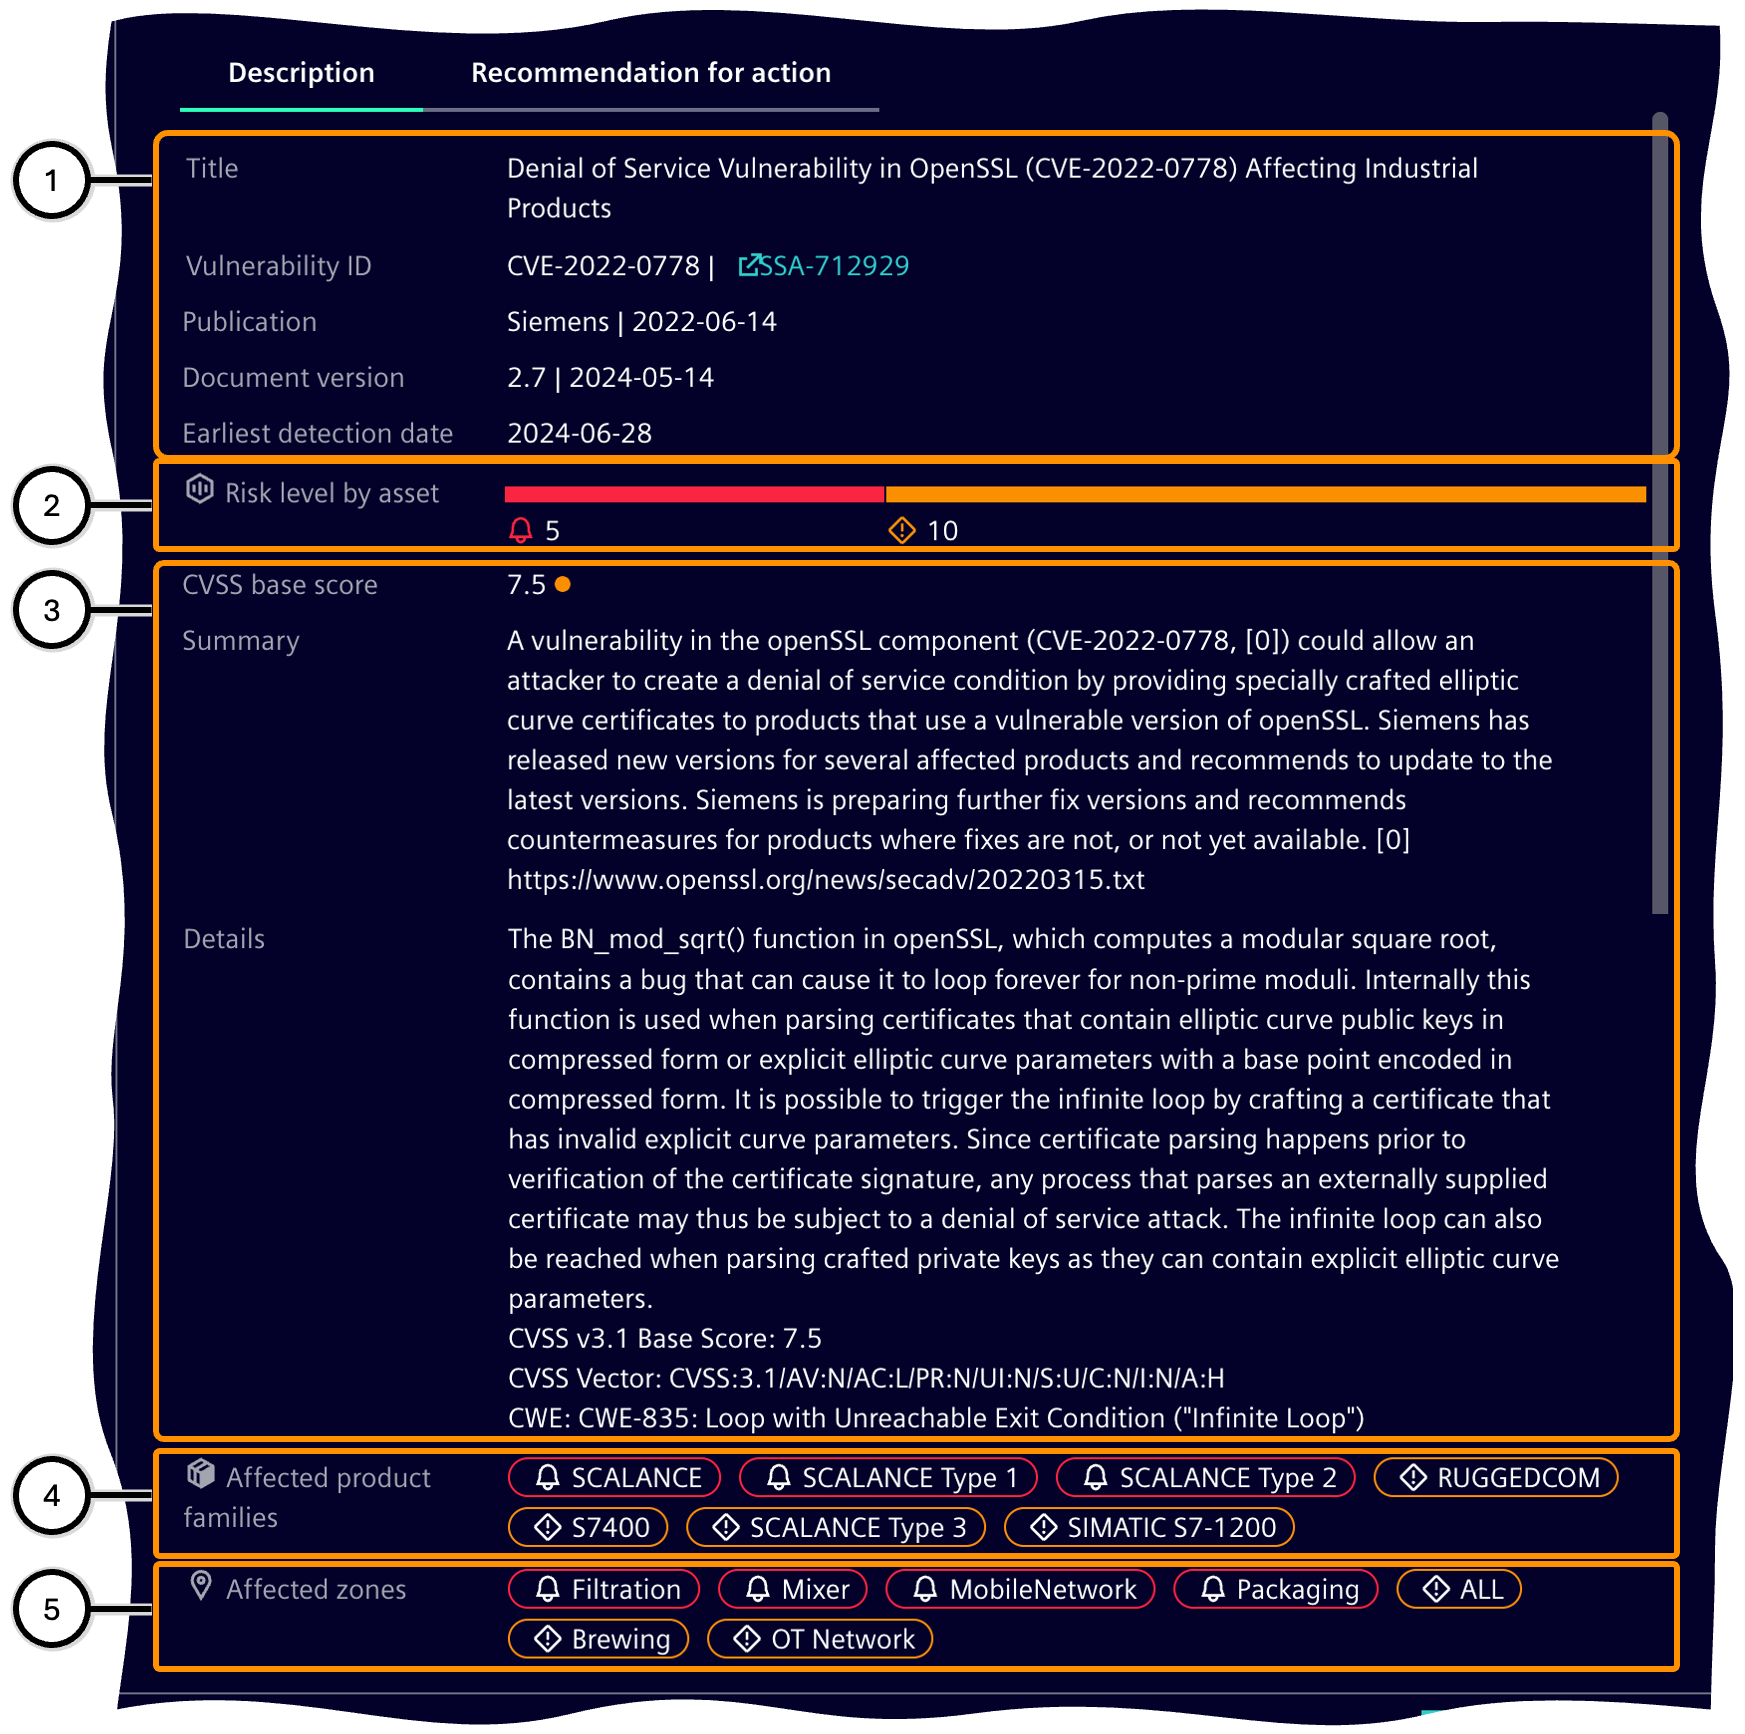
| Icon | Description |
|---|---|
| ① | Information on the origin of the vulnerability |
| ② | Distribution of the individual risk levels over all of the affected assets; see color bar for risk level. |
| ③ | Information on the effects of the vulnerability |
| ④ | Product families affected by the vulnerability |
| ⑤ | Zones affected by the vulnerability |
Recommended action
This area shows options to fix the vulnerability or at least to reduce its impact or to lessen the vulnerability.
The list of affected products and solutions describes each product with affected firmware versions and the corresponding solution; the link leads to the product page, from where a newer firmware version can be downloaded if necessary.
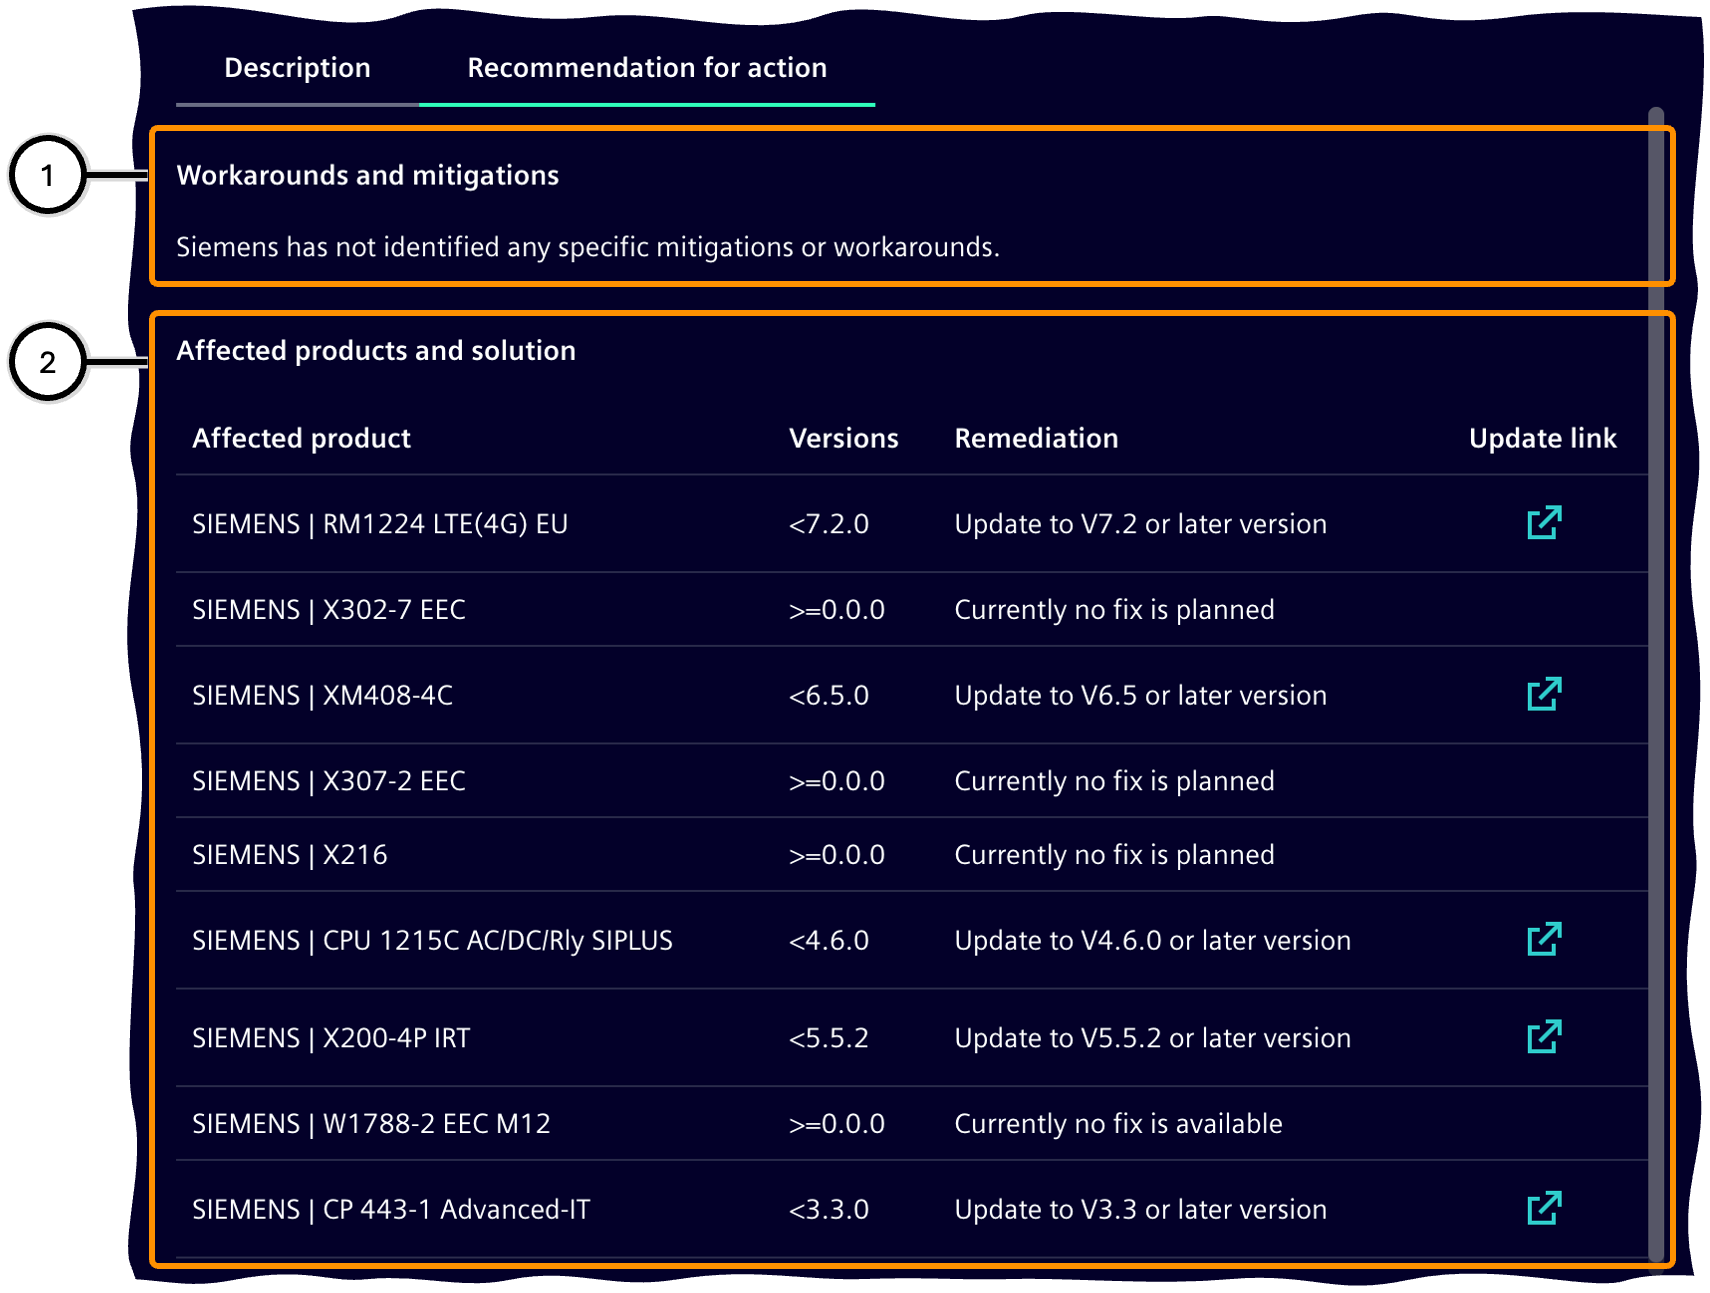
| Icon | Description |
|---|---|
| ① | Workarounds and mitigation |
| ② | List of affected products and solutions |
Asset focus
This area lists all zones, products, and assets from the inventory for which at least one vulnerability is known. Assets that are free of vulnerabilities are not displayed.
You can display all vulnerabilities of the selected asset and define appropriate tasks.
Zone overview
This area lists the zones affected by vulnerabilities ② and shows how they are affected ⑤. Clicking on a zone opens the 'Assets list'.
You can filter zones ① or adjust the sorting of zones ③.
Additional information is provided for each zone (④-⑦).
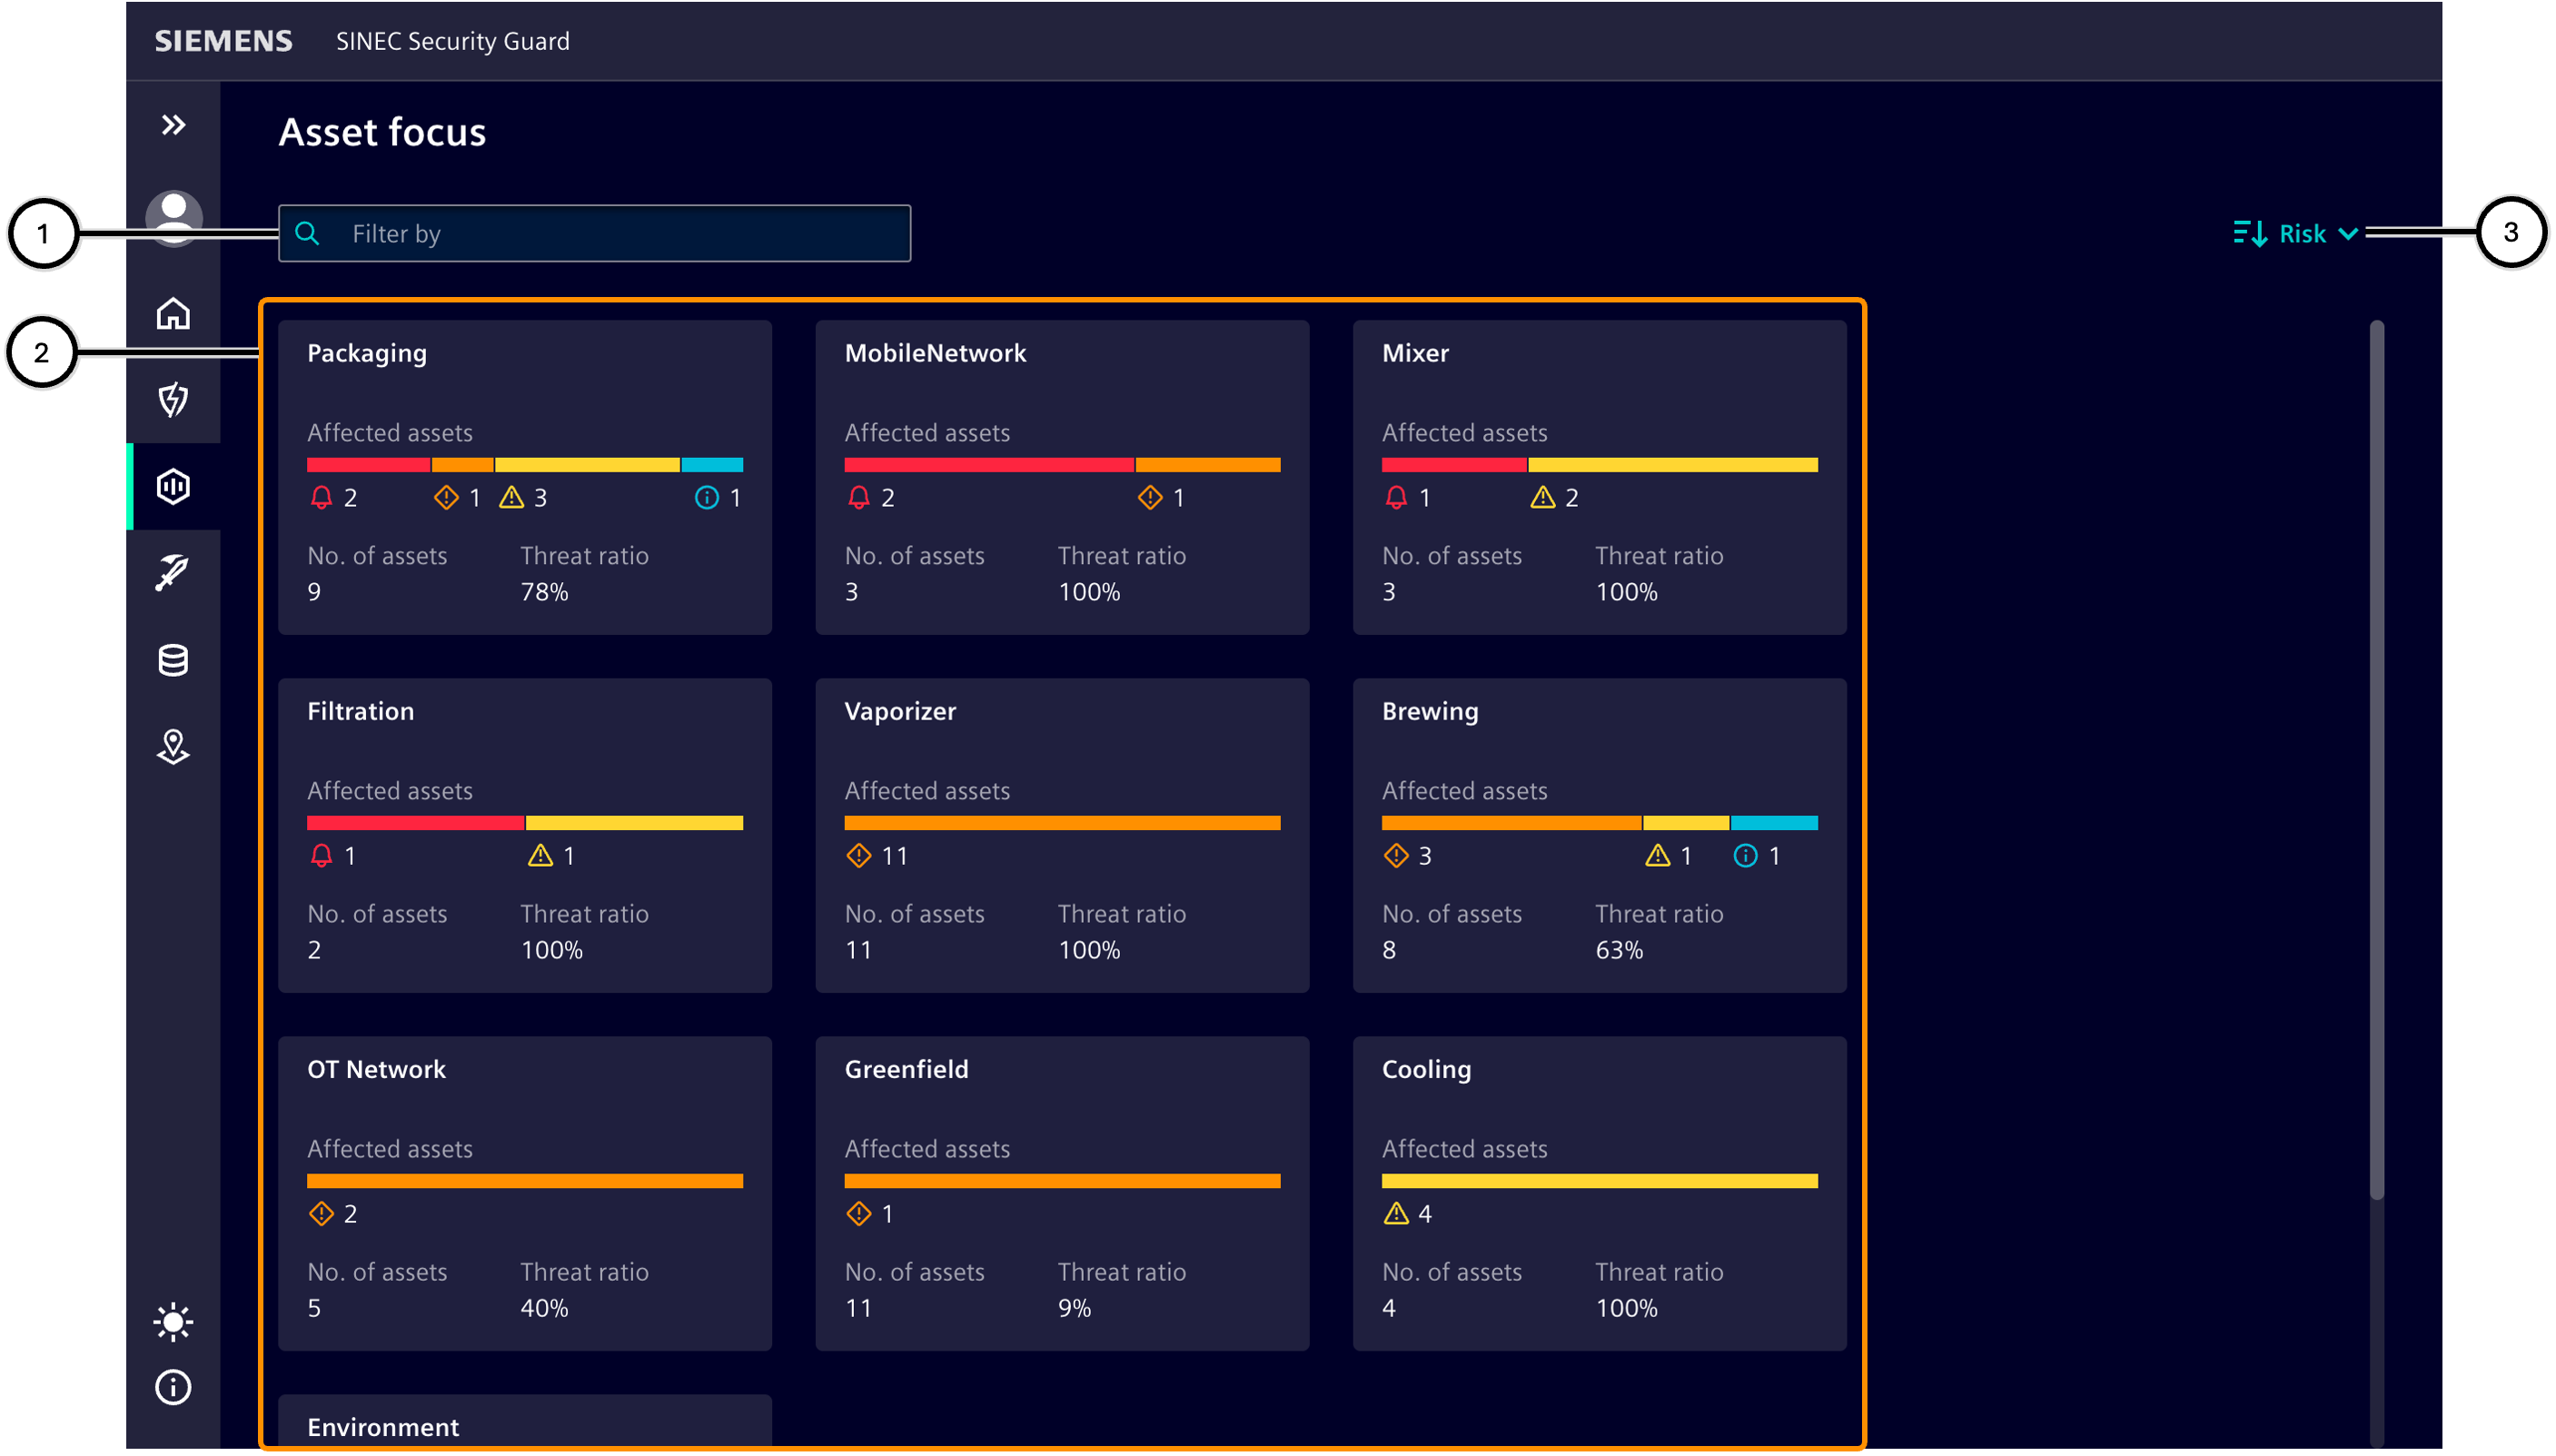
| Number | Description |
|---|---|
| ① | Input field for filtering the zones |
| ② | List of zones |
| ③ | Sort button |
| Number | Description |
|---|---|
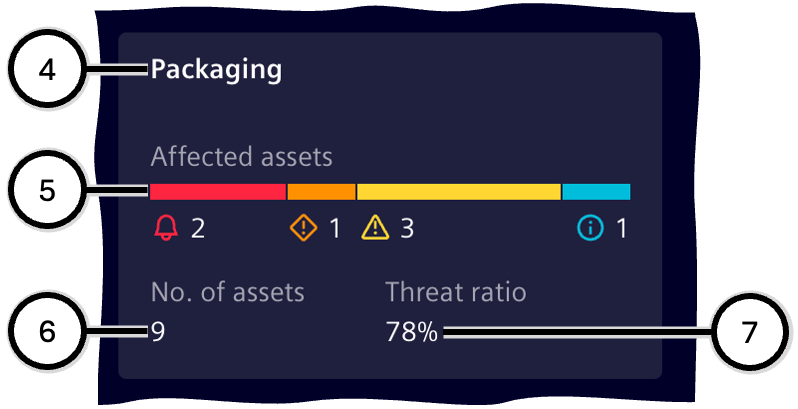
| ④ | Zone name |
| ⑤ | Distribution of the individual risk levels over all of the affected assets; see color bar for risk level. |
| ⑥ | Number of assets in this zone affected by at least one vulnerability. |
| ⑦ | Ratio between a) the total number of assets in this zone and b) the number of affected assets in this zone; at '100%', every asset contained in the zone is affected by at least one vulnerability. |
Asset list for zones
This area shows information about the selected zone as well as all products and assets in the inventory that are part of the zone and affected by at least one vulnerability.
Clicking the button ① takes you back to the 'Zone overview'.
The zone details ② show important information about the zone.
The list of products ③ shows products that contain at least one asset that is in the zone and is affected by a vulnerability. Clicking on it displays all affected assets ④. Details can be displayed for a selected asset - either perform a double-click on the asset's table row or use the button 'Threats and tasks' ⑥.
After you select an asset and then navigate to the 'Threats and tasks' area ⑥, all vulnerabilities of the selected asset can be viewed and appropriate tasks can be defined. For each affected asset, the greatest risk level due to the currently pending vulnerabilities ⑦ is shown, plus further information (⑩ - ⑭).
Note ⑬ and ⑭ are only shown if the application window is wide enough; they are not displayed in narrow window sizes and then also cannot be made visible by scrolling.
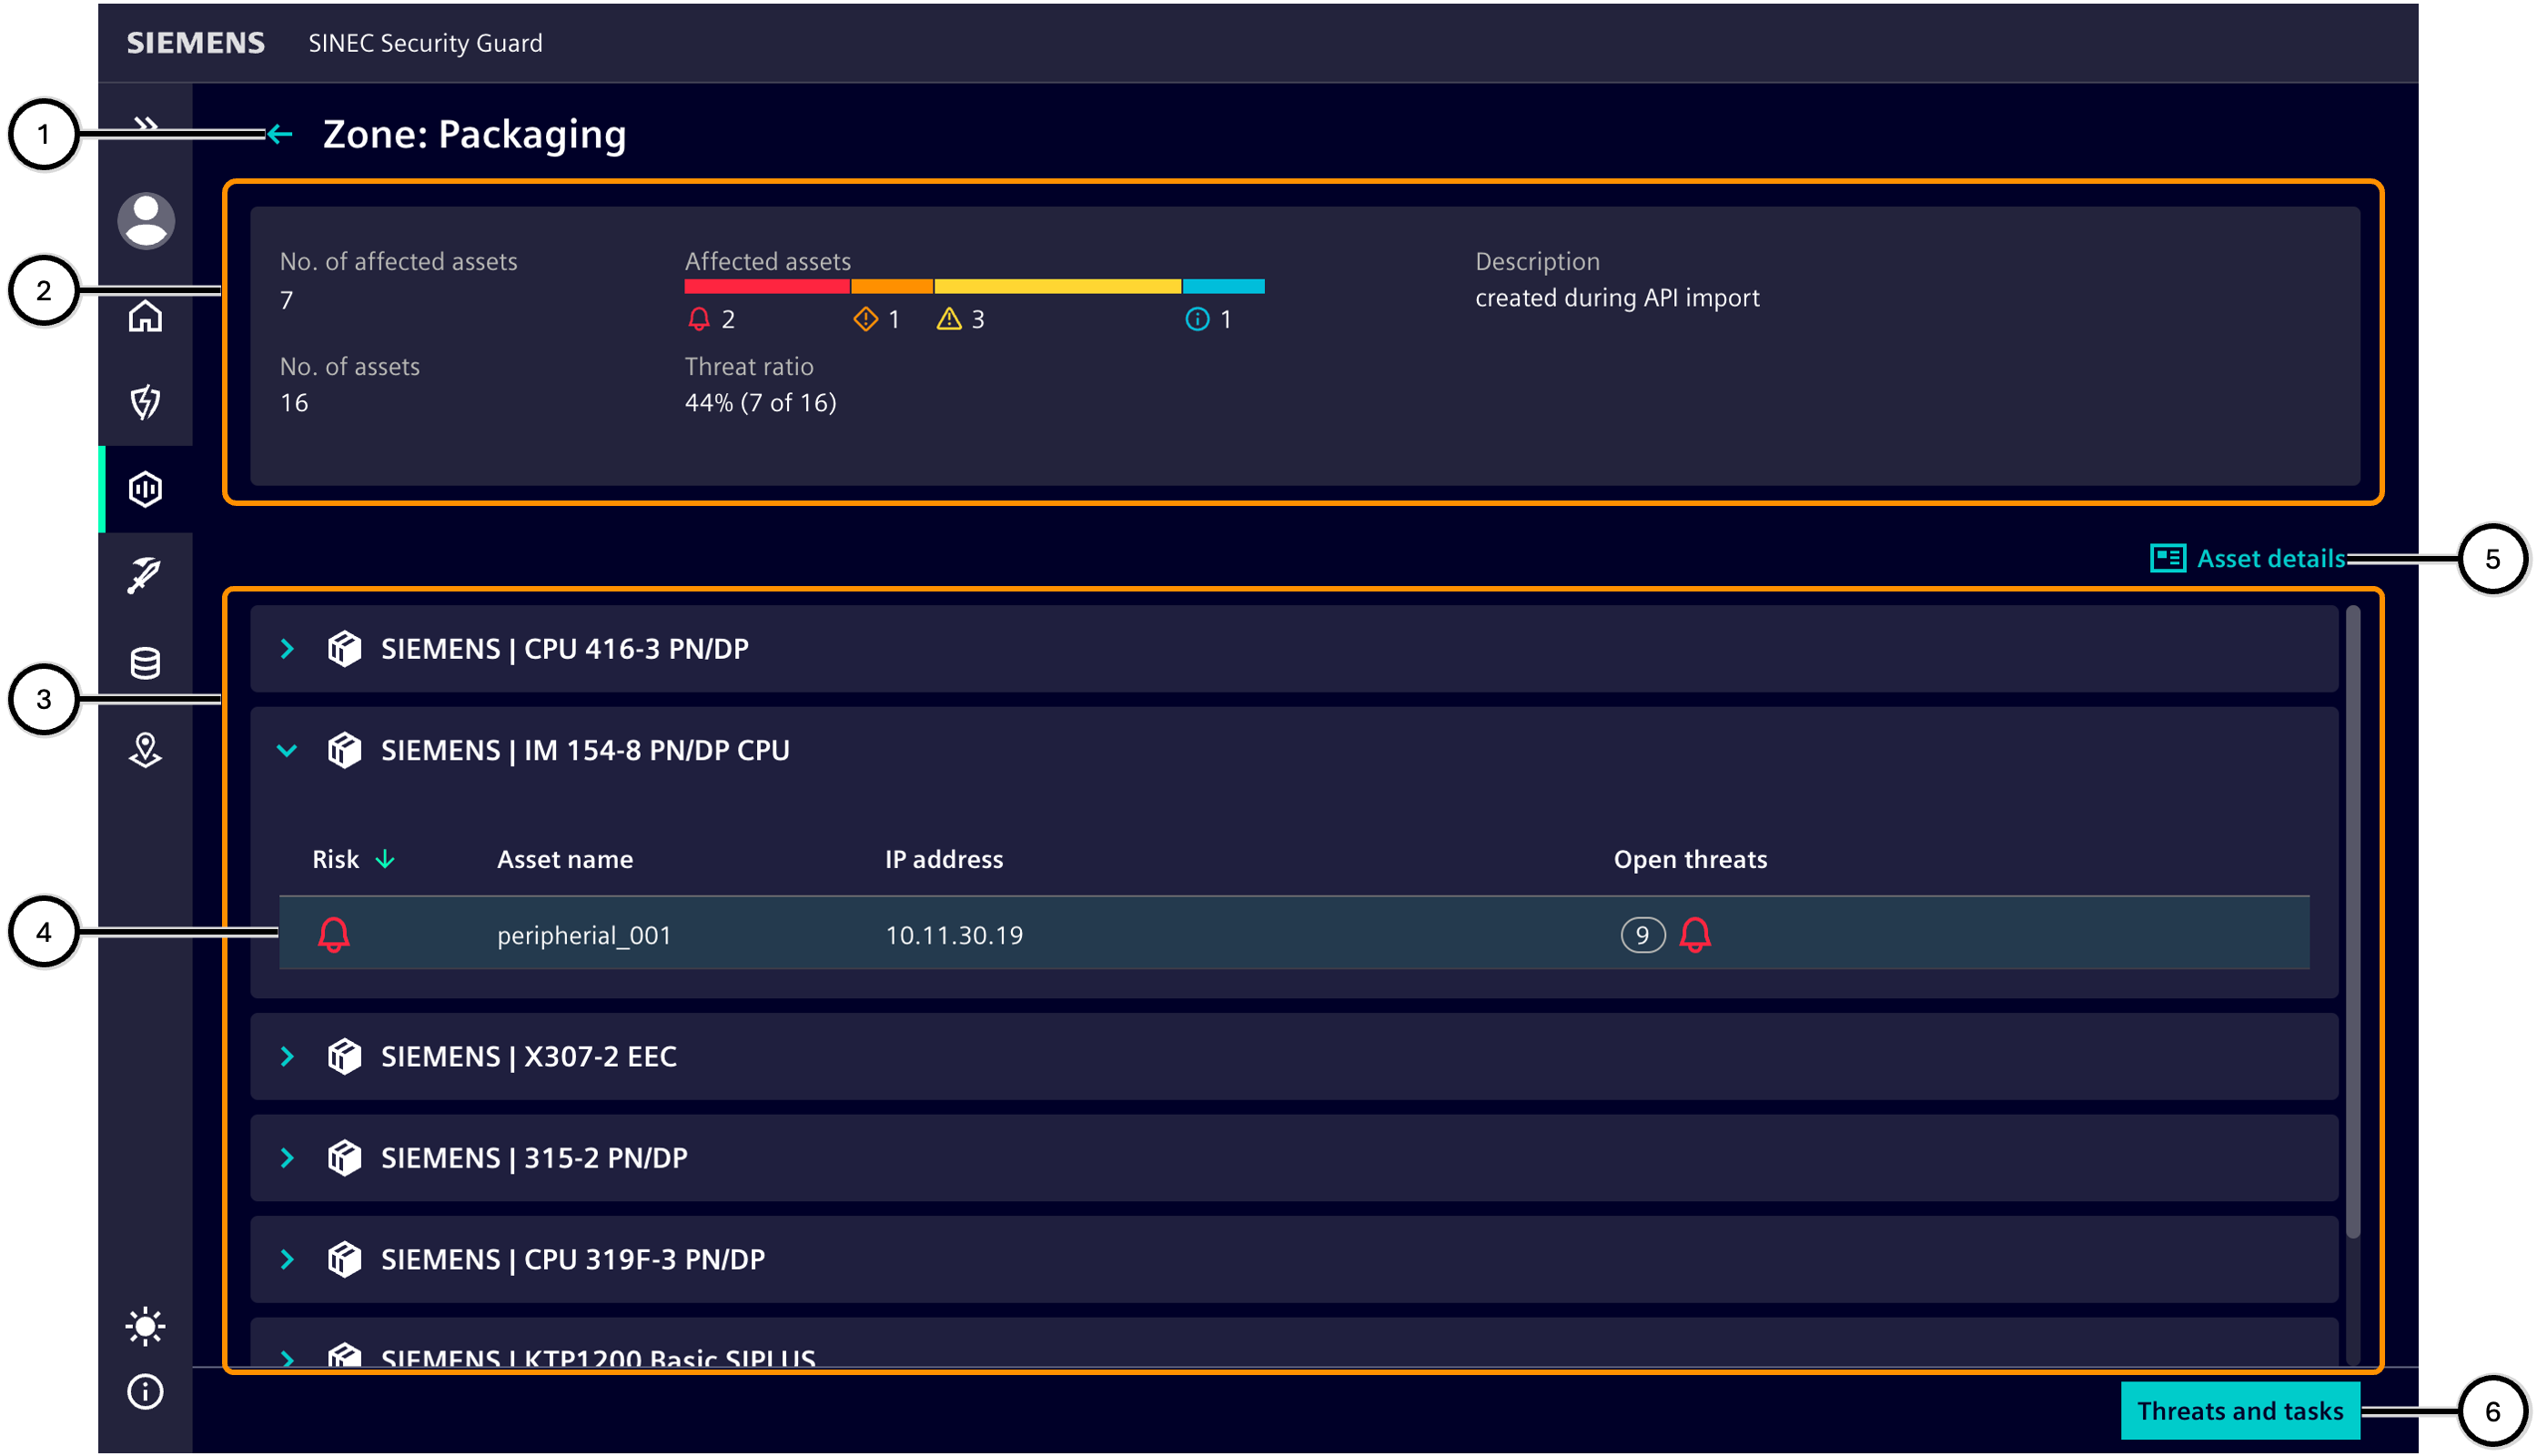
| Number | Description |
|---|---|
| ① | Name of the selected zone and navigation back to the 'Zone overview' |
| ② | Zone details display important information about the zone |
| ③ | List of products affected by vulnerabilities |
| ④ | Highest risk level of the assets of the respective product |
| ⑤ | Button to switch to 'Threats and tasks' |
| ⑥ | Display of asset details |

| Number | Description |
|---|---|
| ⑦ | Highest risk level due to an unfixed vulnerability on this asset |
| ⑧ | Asset name |
| ⑨ | IP address of the asset |
| ⑩ | Number and highest risk level of 'Open Threats' |
| ⑪ | Number of threats which are put on hold |
| ⑫ | Number of threats for which already tasks are planned |
| ⑬ | Number of threats for which it had been decided not to do anything |
| ⑭ | Number of threats which haven been fixed already |
Asset overview
Assets-tab ② in Asset focus shows all the vulnerable assets regardless of zone assignment. This view allows quick search for the specific asset.
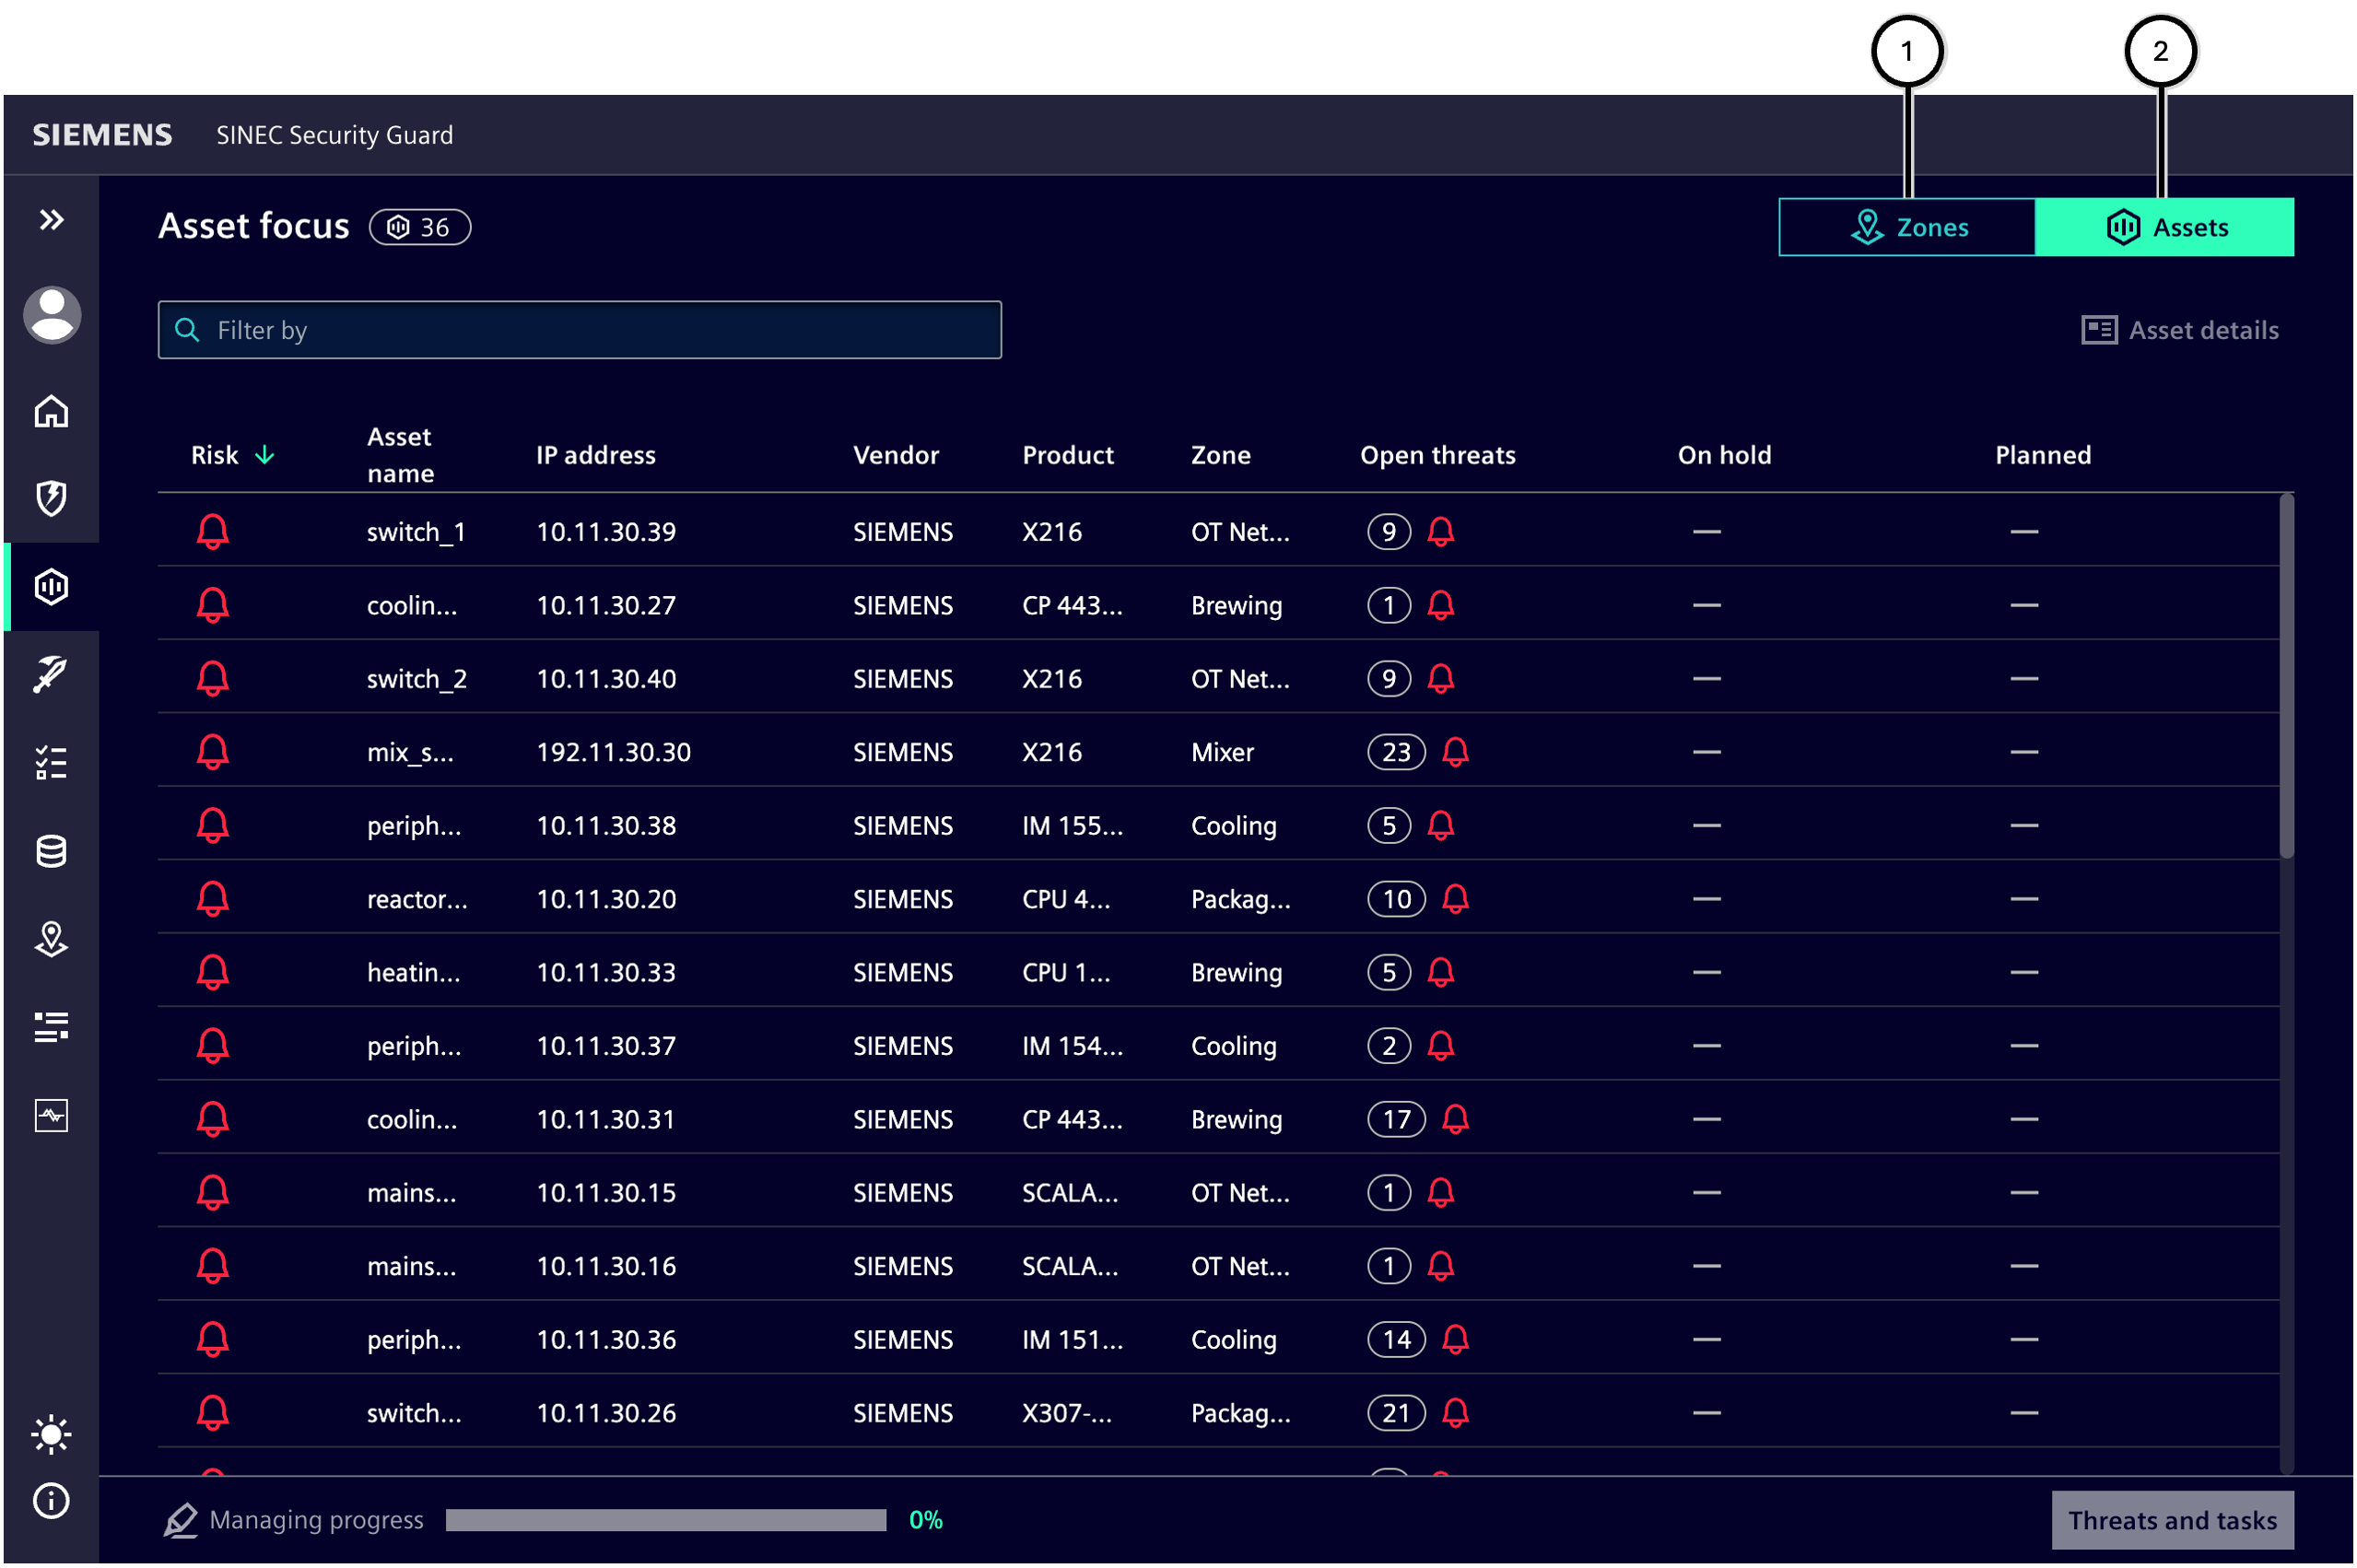
| Number | Description |
|---|---|
| ① | Zones-tab displays asset risk information grouped by zone |
| ② | Assets-tab displays all the assets affected by vulnerabilities in the system |
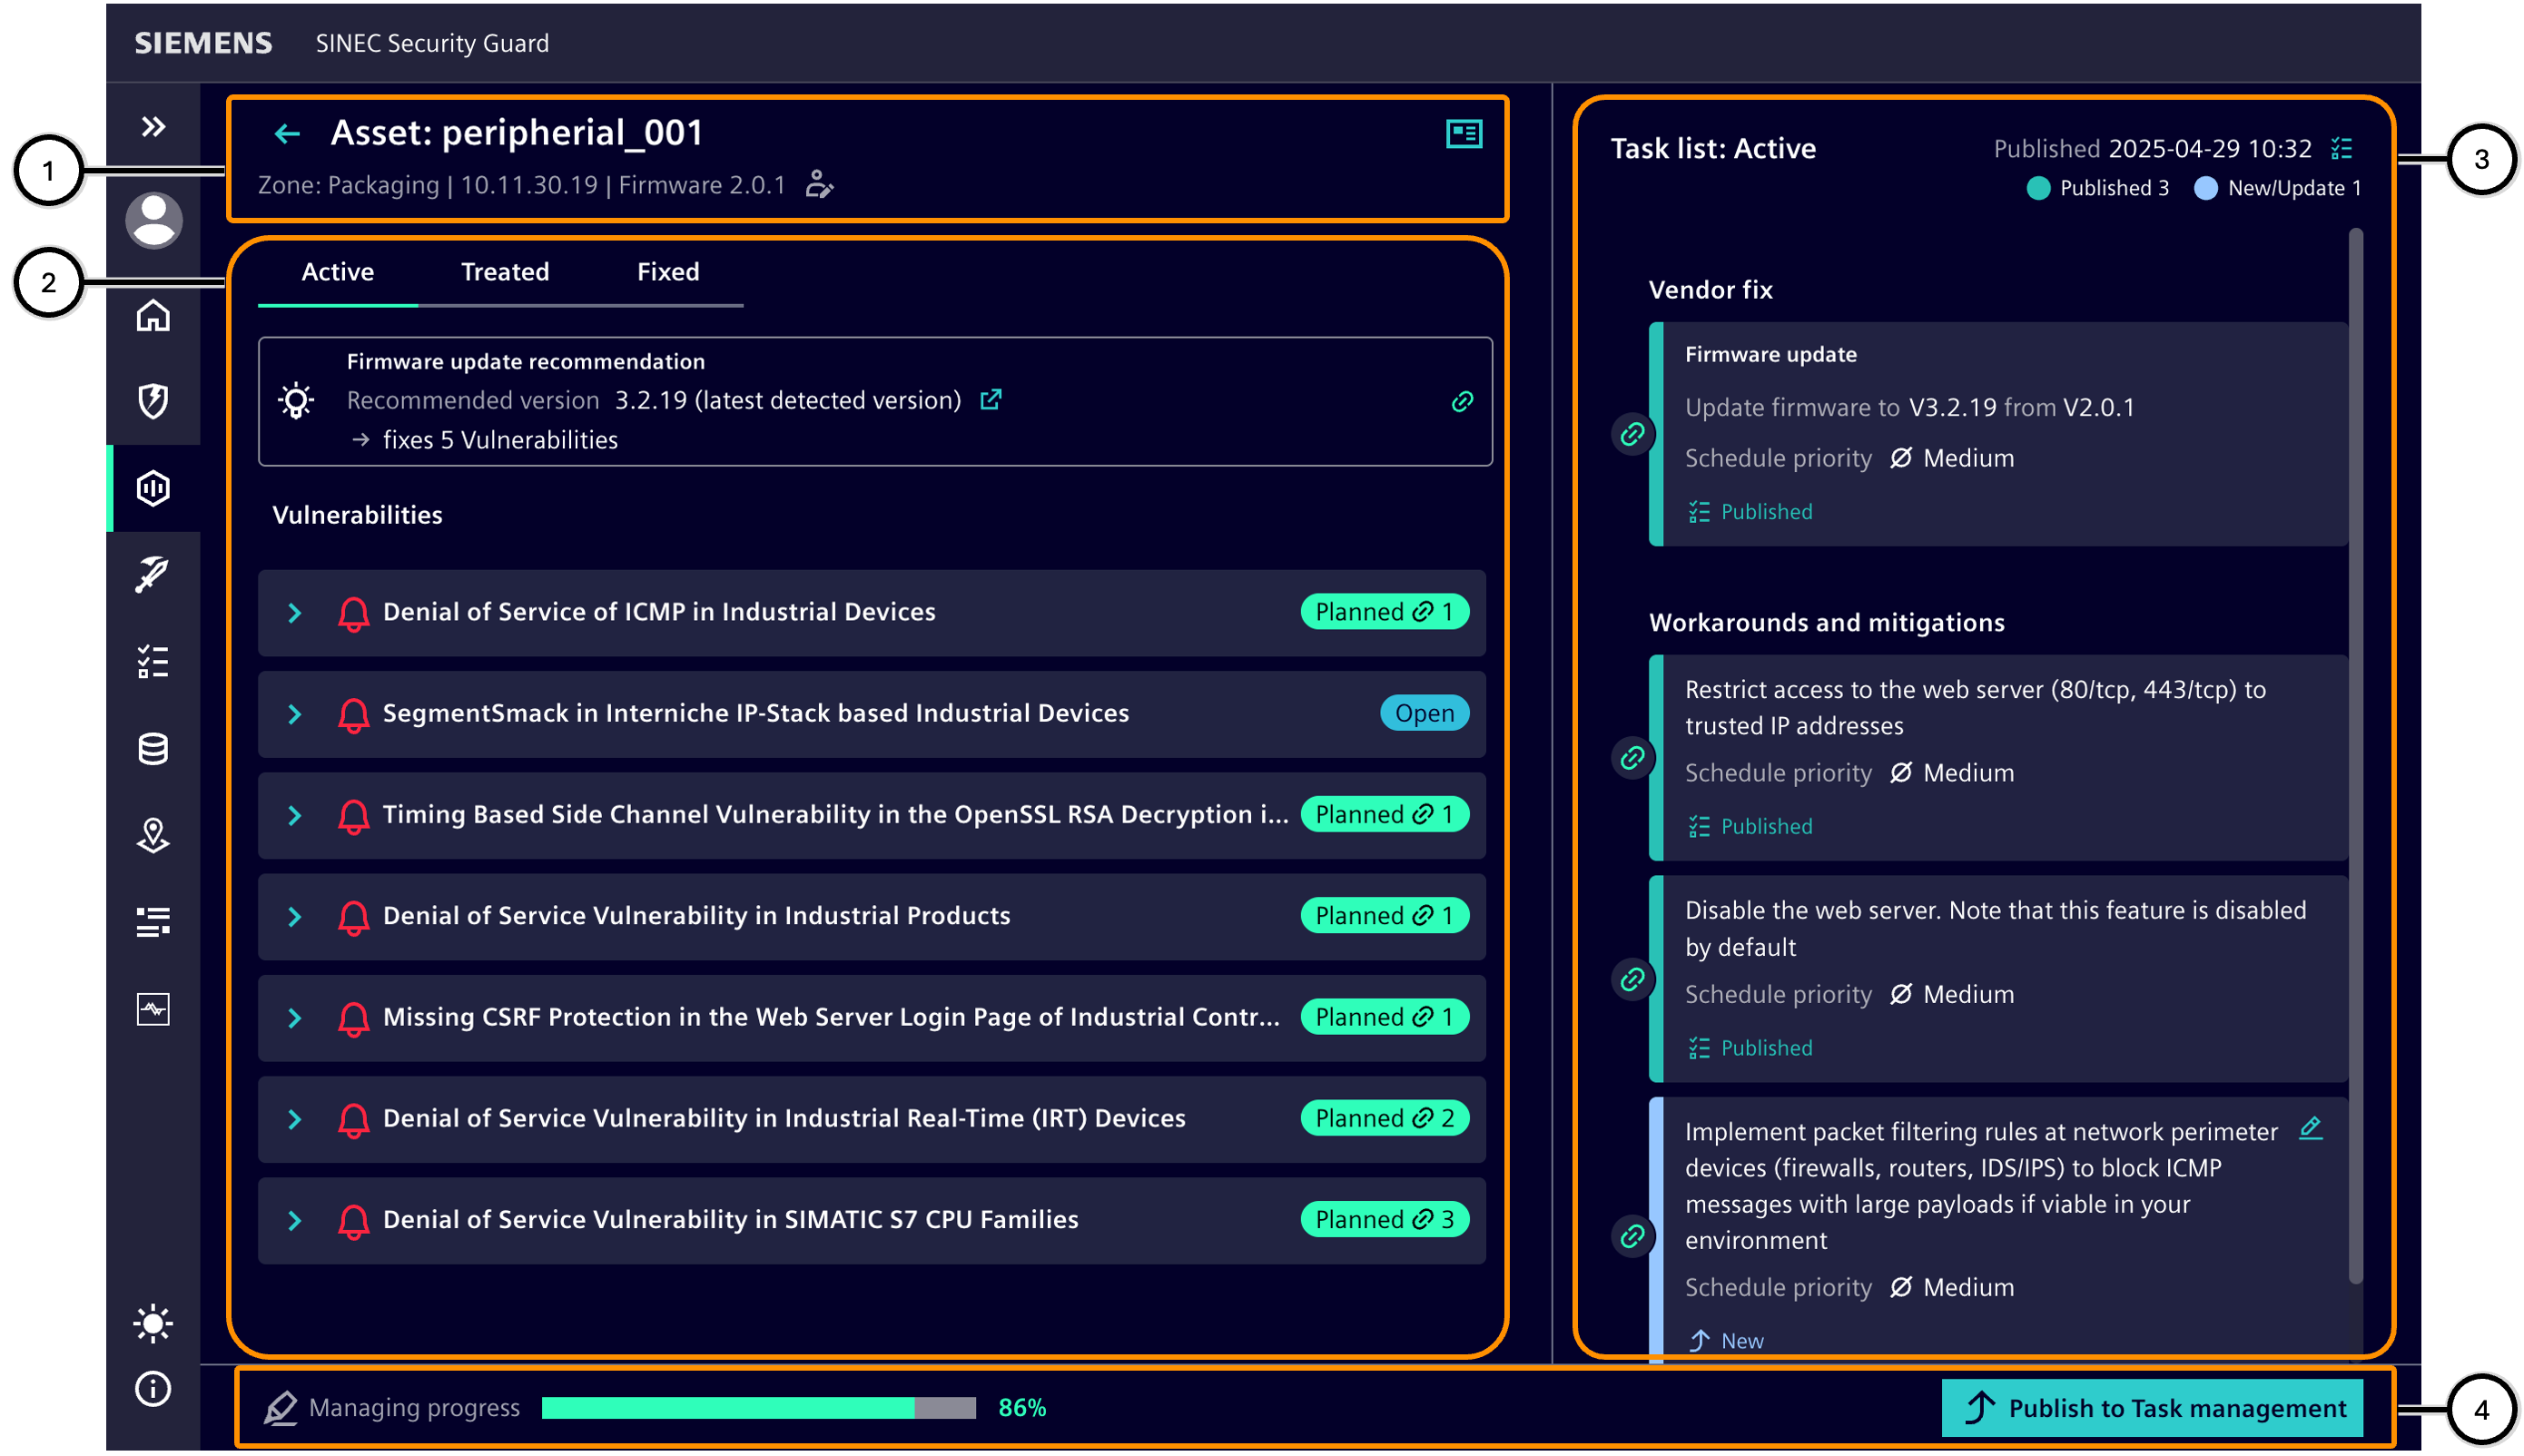
Threats and tasks
This section allows you to create tasks for a device based on the vulnerabilities it is exposed to. It is divided into four sections:
- Asset information ①,
- Vulnerabilities and Possible Countermeasures ②,
- Task list ③,
- Managing progress and additional functions ④.
To efficiently address the vulnerabilities of a device, the following steps are recommended:
- Review the device information ① to ensure the correct device is being processed.
- Examine the information in the 'Active' status group in the "Vulnerabilities and Possible Countermeasures" section ②: a. Firmware should always be up to date – many vulnerabilities can already be resolved by installing the latest firmware version. If the installed firmware is outdated, a corresponding task should be added to the Task list ③; all vulnerabilities that would be resolved by the firmware update will automatically be marked as 'Planned'. b. All untreated vulnerabilities should be reviewed one by one, and corresponding tasks to address the vulnerabilities should be added to the Task list ③. c. Once the status of a vulnerability changes from 'Open' to 'Planned', this will be reflected in all SSG statistics – such as in the progress ④ or on Home.
- Review all tasks in the Task list ③: a. Avoid conflicting tasks; if necessary, remove tasks and/or add a well-formulated custom task. b. Remove duplicate tasks. c. Edit tasks (e.g., adjust priority) until the entirety of the tasks in the Task list is meaningful. d. Link all tasks to all vulnerabilities they are needed to address, and adjust priority if necessary.
- Publish the Task list ④. This transfers all tasks in the list to the Task management – changing these tasks in the 'Vulnerabilities and Tasks' section is no longer possible.
- If necessary, navigate back to the device list in the device information ① to address the vulnerabilities of another device.
- Once all tasks are defined and published as desired, they can be further processed in the Task Management.
The overview illustrates a rough process:
- A device has untreated vulnerabilities for which no tasks have been defined yet; the progress is 0%.
- Tasks have been planned for some vulnerabilities, some of which have already been published; the progress is greater than 0% but not yet 100%.
- Tasks have been planned for as many vulnerabilities as possible, and all tasks are published; ideally, the progress is 100%, but sometimes it may be less.
- The Task management shows the published tasks. Here, they can be marked as 'Implemented' after completion. This marks the vulnerability as resolved.
| Number | Description |
|---|---|
| ① | Device information |
| ② | Vulnerabilities related to the device |
| ③ | Tasks planned for the device |
| ④ | Information on progress and additional functions |
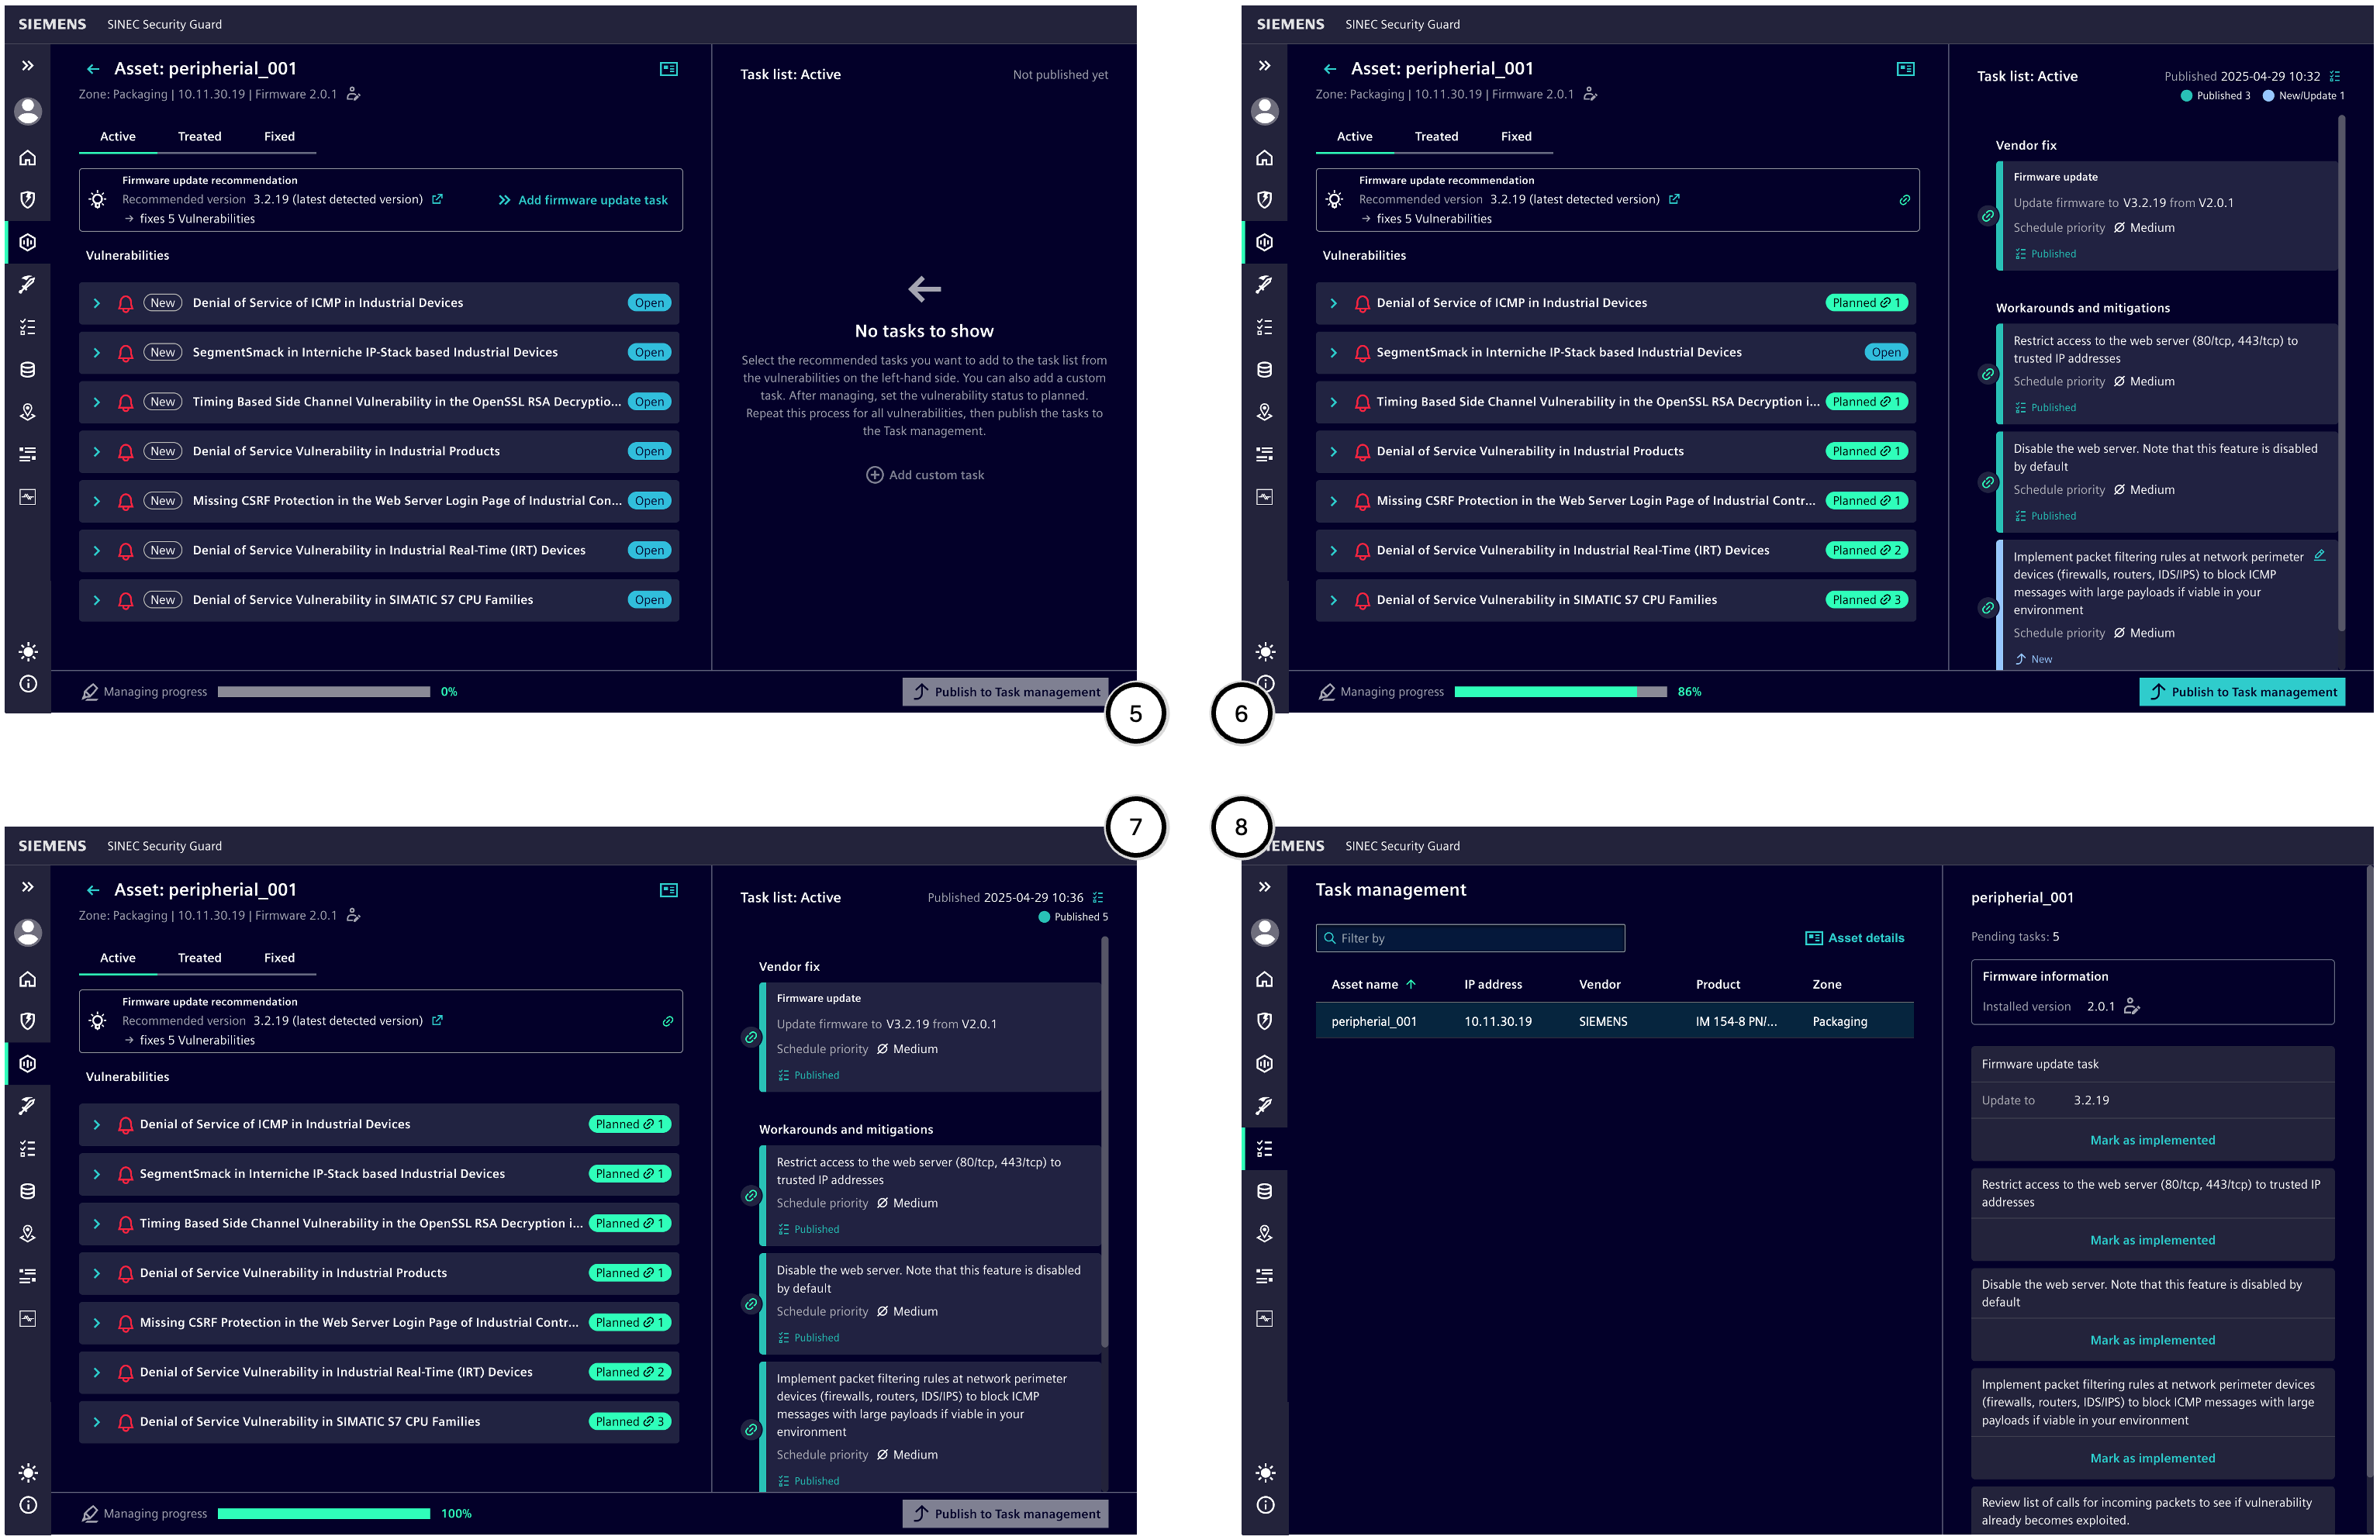
| Number | Description |
|---|---|
| ⑤ | Example state of a device in 'Vulnerabilities and Tasks' before processing |
| ⑥ | Example state after partial processing |
| ⑦ | Example state after complete processing |
| ⑧ | Example state of tasks for a device in 'Task Management' |
Asset information
This area provides information about the affected device and displays its name ②, the zone ④, the IP address ⑤, and the currently installed firmware version ⑥; if the firmware version of the device has been manually edited, this is indicated accordingly ⑦. Additional information is displayed with the 'Device details' button ③.
Clicking the back button ① navigates back to the device list.
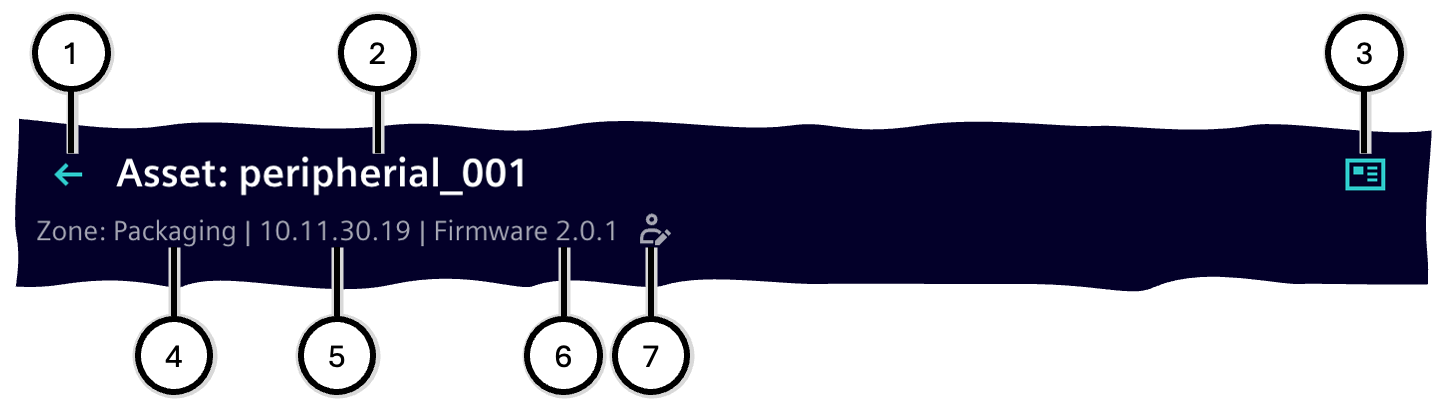
| Number | Description |
|---|---|
| ① | Button 'Back to device list' |
| ② | Device name |
| ③ | Button 'Device details' |
| ④ | Name of the device's zone |
| ⑤ | IP address |
| ⑥ | Version of the currently installed firmware |
| ⑦ | Optional note if the firmware version has been manually changed |
Vulnerabilities and possible countermeasures
This area provides information about vulnerabilities that compromise the security of the device and offers possible countermeasures to address them.
Status groups
The managing status of a vulnerability is defined by the evaluation of the vulnerability and the planning and execution of countermeasures. Status groups help to keep track of vulnerabilities: Each status group gathers vulnerabilities according to their respective managing status, allowing users to specifically display, for example, all vulnerabilities that still pose an acute threat.
Only those status groups additionally show the number of vulnerabilities they contain where the goal is an empty list.
| Status group | Managing status | Applied status |
|---|---|---|
| Active | Displays all vulnerabilities that have not yet been fully processed | 'Open', 'Planned' |
| On hold | Displays all vulnerabilities for which a temporary decision had been taken | 'Risk accepted till…', 'Remediation blocked', 'Asset removal planned', 'Postponed' |
| Treated | Displays all vulnerabilities for which the user has decided to take no action | 'Obsolete by Implementation', 'Not Relevant', 'Resolved' |
| Fixed | Displays all vulnerabilities whose tasks have already been completed | 'Fixed' |

| Number | Description |
|---|---|
| ① | Status group 'Active' with the number of vulnerabilities it contains |
| ② | Status group 'On hold' with the number of vulnerabilities it contains |
| ③ | Status group 'Treated' |
| ④ | Status group 'Fixed' |
Status group 'Active'
This status group displays vulnerabilities that are currently active. Tasks can be planned to address these vulnerabilities.
Planning tasks is only possible for vulnerabilities in the 'Active' status group.
# Firmware update
The 'Firmware Update' object displays information about the current firmware status of the device:
If a newer firmware version is available to address vulnerabilities than the currently installed one, the 'Firmware Update' object is displayed with the following information:
- Version of the latest firmware to address vulnerabilities ① with an optional download link ②
- Number of vulnerabilities resolved by this firmware ⑤
- The planning status of a corresponding firmware update task can be:
- Not yet planned ③; clicking the link adds the firmware update task to the Task list
- Planned ④; the corresponding task is listed at the top of the Task list
If no update recommendation is available ⑥, a firmware update task can still be created – for example, for a new firmware version that does not address vulnerabilities.
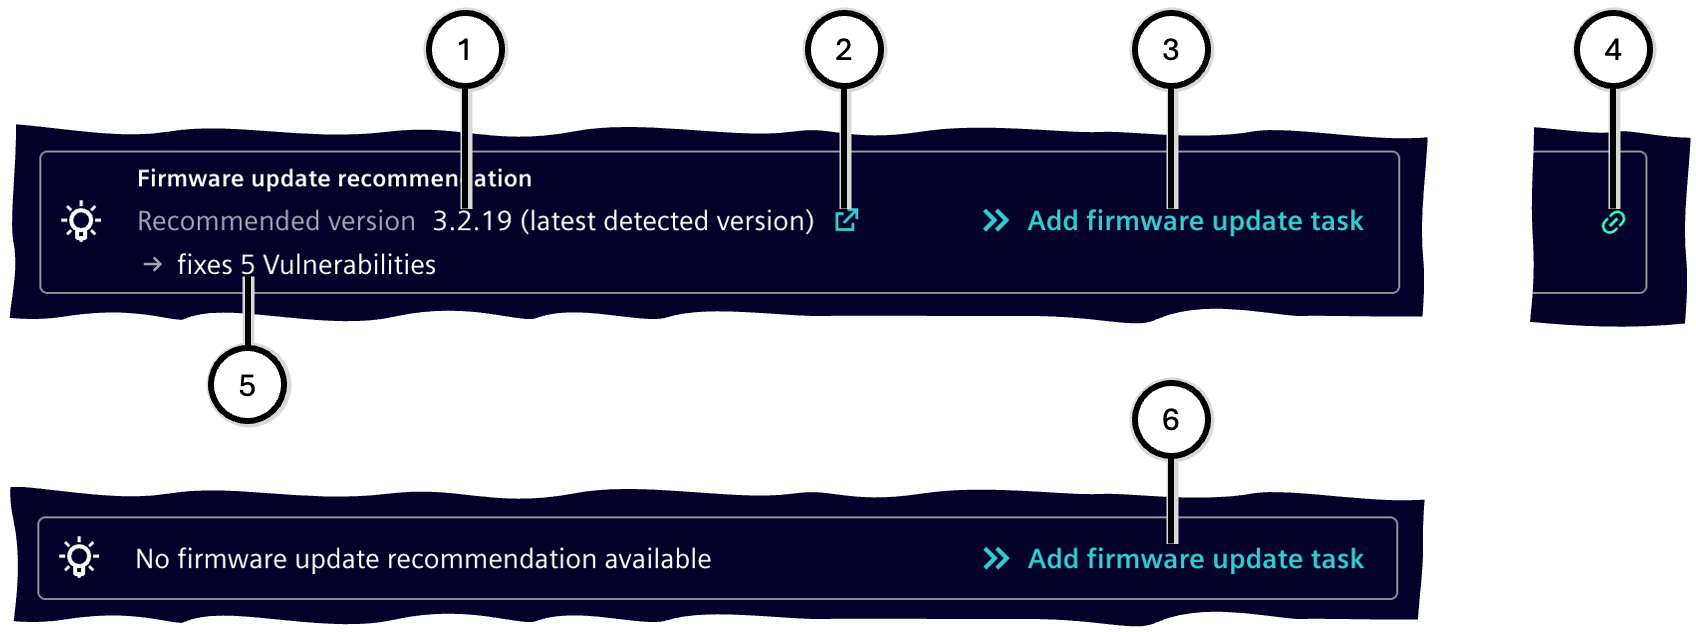
| Number | Description |
|---|---|
| ① | Version of the latest firmware |
| ② | Firmware update task is not yet planned |
| ③ | Optional: Link to the firmware download page |
| ④ | Firmware update task is planned |
| ⑤ | Number of vulnerabilities that can be resolved with this version |
| ⑥ | Representation in case no update recommendation is available |
# Vulnerability list
A vulnerability can have one of the following statuses:
| Vulnerability Status | Description | Linked to Tasks | Automatic Resubmission | Status Group |
|---|---|---|---|---|
| Open | No decision has been made regarding this vulnerability yet | No | No | Active |
| Planned | At least one task is linked to this vulnerability | Yes | No | Active |
| Risk accepted till | The impact of this vulnerability is known and accepted | No | Yes | On hold |
| Remediation blocked | The vulnerability cannot be resolved due to current circumstances | No | Yes | On hold |
| Asset removal planned | The device is planned to be removed from the facility | No | No | On hold |
| Not relevant | This vulnerability cannot affect operations | No | Yes | Treated |
| Obsolete by implementation | This vulnerability is resolved through other planned tasks | No | No | Treated |
| Mitigated | This vulnerability has been mitigated through countermeasures | Yes | No | Treated |
| Fixed | This vulnerability has been resolved according to the manufacturer's recommendation | Yes | No | Fixed |
Each vulnerability can be expanded or collapsed.
When collapsed, it displays the following information:
- Button to expand ①
- Risk level of the vulnerability ② for the selected device – see Risk Level
- If the vulnerability is newly added since the last task publication ('New' ③) or if the publisher has updated the vulnerability description ('Updated' – e.g., from CVE version 1.2 to 1.3), this is indicated.
- Title of the vulnerability ④
- Current processing status of the vulnerability ⑤
When expanded, it displays the following information:
- All information from the collapsed view (the previous expand button is replaced by the collapse button ⑨)
- Publisher of the security advisory ⑥, vulnerability identifier ⑦ (clicking opens the vulnerability description in a sidebar), and the identifier of the security advisory ⑧ (clicking opens the advisory in a separate browser window).
- Description of the vulnerability ⑩
- Detection date on the device ⑬ and last update of the vulnerability ⑭
- Recommendations according to the vulnerability description, which may include 'Manufacturer's update recommendation' ⑪ (optionally with a link to the resource) and 'Workarounds and countermeasures' ⑫. Using button ⑯, a specific task can be created from a recommendation in the Task List< section and linked to this vulnerability; in this case, the button is replaced by a link symbol ⑮. If identical recommendations appear in other vulnerabilities of this device, they are automatically linked to the task as well, and the vulnerability status is set to "Planned."
For recently published vulnerabilities, it may happen that no recommendations are available – this is indicated accordingly ⑰ ⑱. Manufacturers often provide these later. For very outdated devices, it must be expected that they are no longer supported by the manufacturer.
The risk originating from a vulnerability can be accepted in order to temporarily remove it from vulnerability views and main statistics. An accepted risk is not remedied by that and may lead to exploiting the vulnerability or otherwise causing negative effects on the system. It's recommended to fix vulnerabilities and not accepting risks. After using the button to accept a risk ⑳, a justification for that ㉑ needs to be entered. Then the related vulnerability becomes moved into the status group 'On hold' ㉔. A vulnerability listed there shows the justification entered ㉕. The vulnerability can become reactivated ㉖, which moves it into the status group 'Active' ⑲ again.

| Number | Description |
|---|---|
| ① | Button to expand the vulnerability information |
| ② | Risk level of the vulnerability for this device |
| ③ | Optional: Indication of changes since the last task publication |
| ④ | Title of the vulnerability |
| ⑤ | Processing status of the vulnerability |
| ⑥ | Publisher of the security advisory |
| ⑦ | Description of the vulnerability |
| ⑧ | Manufacturer's update recommendation |
| ⑨ | Button to collapse the vulnerability information |
| ⑩ | Description of the vulnerability |
| ⑪ | Manufacturer's update recommendation |
| ⑫ | Workarounds and countermeasures |
| ⑬ | Detection date on the device |
| ⑭ | Last update of the vulnerability |
| ⑮ | Indication that a corresponding task for this measure has already been created in the task area |
| ⑯ | Button to create a corresponding task in the task area |
| ⑰ | Representation in case no manufacturer's update recommendation is available |
| ⑱ | Representation in case no workarounds or countermeasures are available |
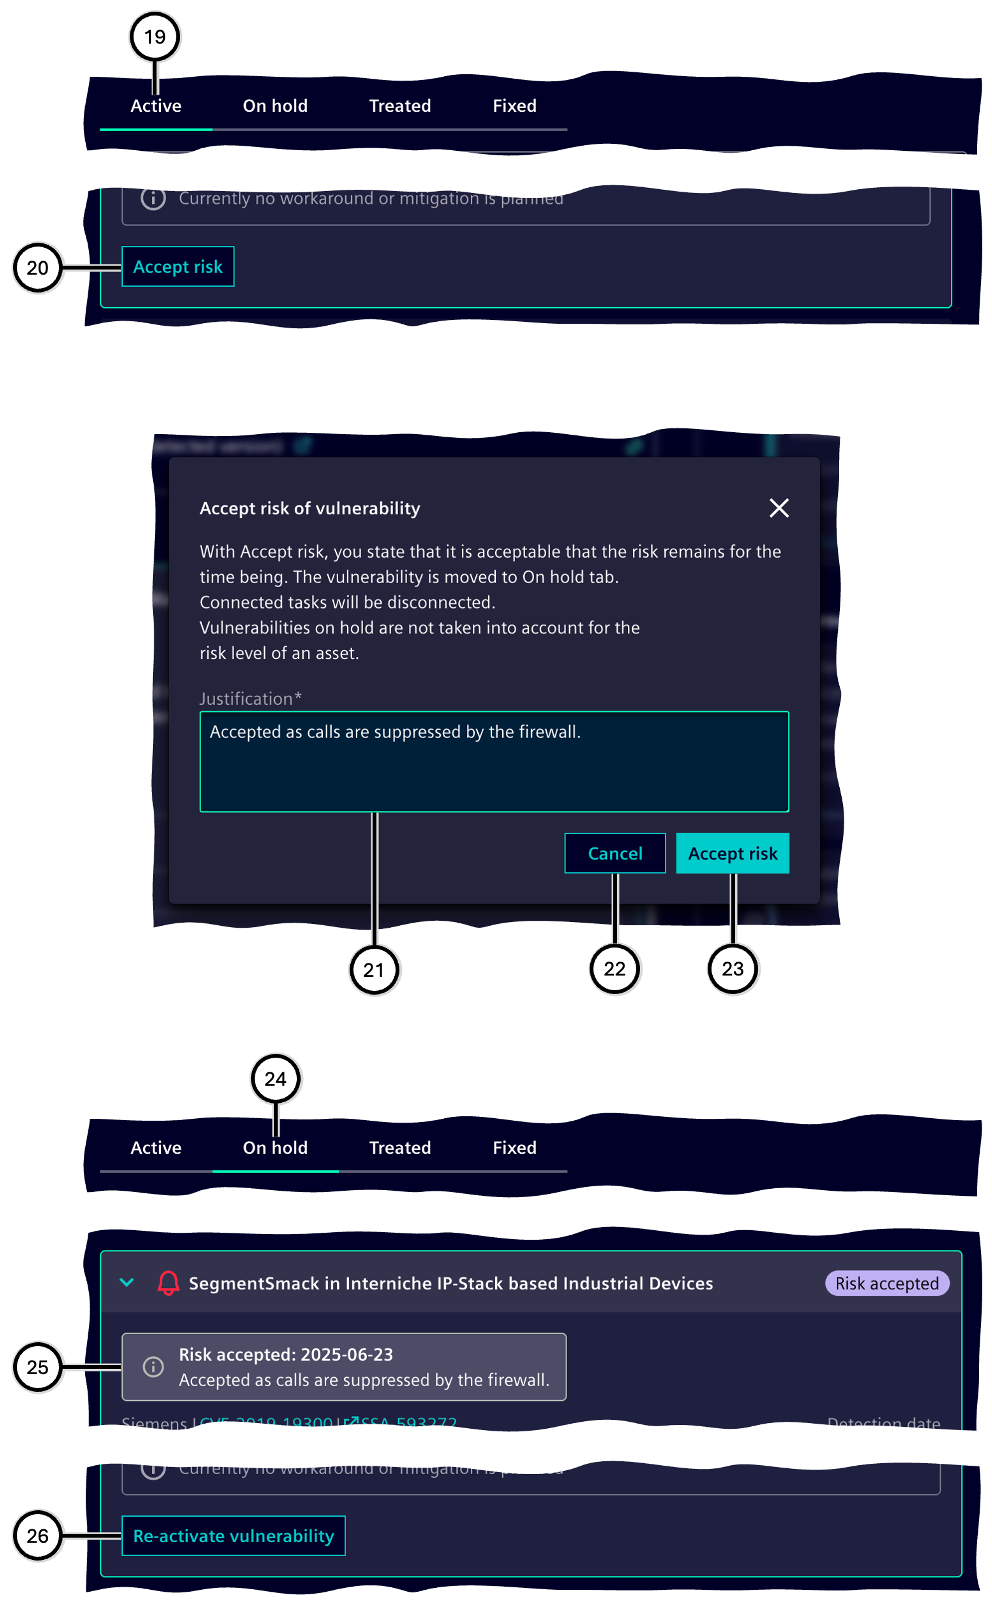
| Number | Description |
|---|---|
| ⑲ | Status group 'Active' chosen |
| ⑳ | Button 'Risk accepted' |
| ㉑ | Input field vor justification |
| ㉒ | Button to cancel |
| ㉓ | Button to accept the risk |
| ㉔ | Status group 'On hold' chosen |
| ㉕ | Hint on status change and reasoning |
| ㉖ | Button to reactivate the vulnerability |
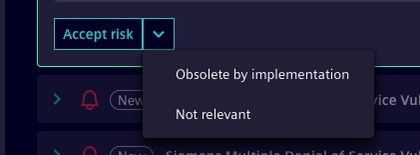
Vulnerability can be marked as "Not relevant" if it is not applicable to the device, for example, because the device does not support the affected protocol or service. In this case, the vulnerability is moved to the status group 'Treated' and will no longer be displayed in the 'Active' status group.
Vulnerability can be marked as "Obsolete by implementation" if it is resolved by other tasks that have already been implemented. In this case, the vulnerability is moved to the status group 'Treated' and will no longer be displayed in the 'Active' status group.
Status group 'On hold'
This status group displays vulnerabilities for which just temporary decisions had been taken.
The functionality and operation largely follow the description of the 'Active' status group, with the following differences:
- The 'Firmware Update' object is not displayed.
- Tasks cannot be created.
- A vulnerability can be reactivated.
Status group 'Treated'
This status group displays vulnerabilities for which all associated 'Workarounds and Countermeasures' tasks have been implemented.
The functionality and operation largely follow the description of the 'Active' status group, with the following differences:
- The 'Firmware Update' object is not displayed.
- Tasks cannot be created.
- A vulnerability can be reactivated.
Status group 'Fixed'
This status group displays vulnerabilities for which the manufacturer's update recommendation has been implemented.
The functionality and operation largely follow the description of the 'Active' status group, with the following differences:
- The 'Firmware Update' object is not displayed.
- Tasks cannot be created.
- A vulnerability can no longer be reactivated.
Task list
This section displays all tasks defined for the affected device (see Asset information<). For each task, the vulnerabilities it is linked to are shown. Additionally, custom tasks ④ can be created here. Messages ⑤ inform about important information, and can be closed ⑥.
Four different types of tasks are possible:
| Number | Task Type | Content | Options |
|---|---|---|---|
| 1 | Firmware Update ① | Version of the firmware to be installed; the latest security-relevant version is preselected | Selection of the firmware version to be installed |
| 2 | Manufacturer's Update Recommendation ② | Corresponding text according to the vulnerability description | - |
| 3 | Workarounds and Countermeasures ③ | Corresponding text according to the vulnerability description | - |
| 4 | Custom Task ④ | Description of the custom task | Text input; the task cannot be added without text |
There can only be none or one task of task type 1 in the Task list; tasks of types 2, 3, and 4 can be included in any number.
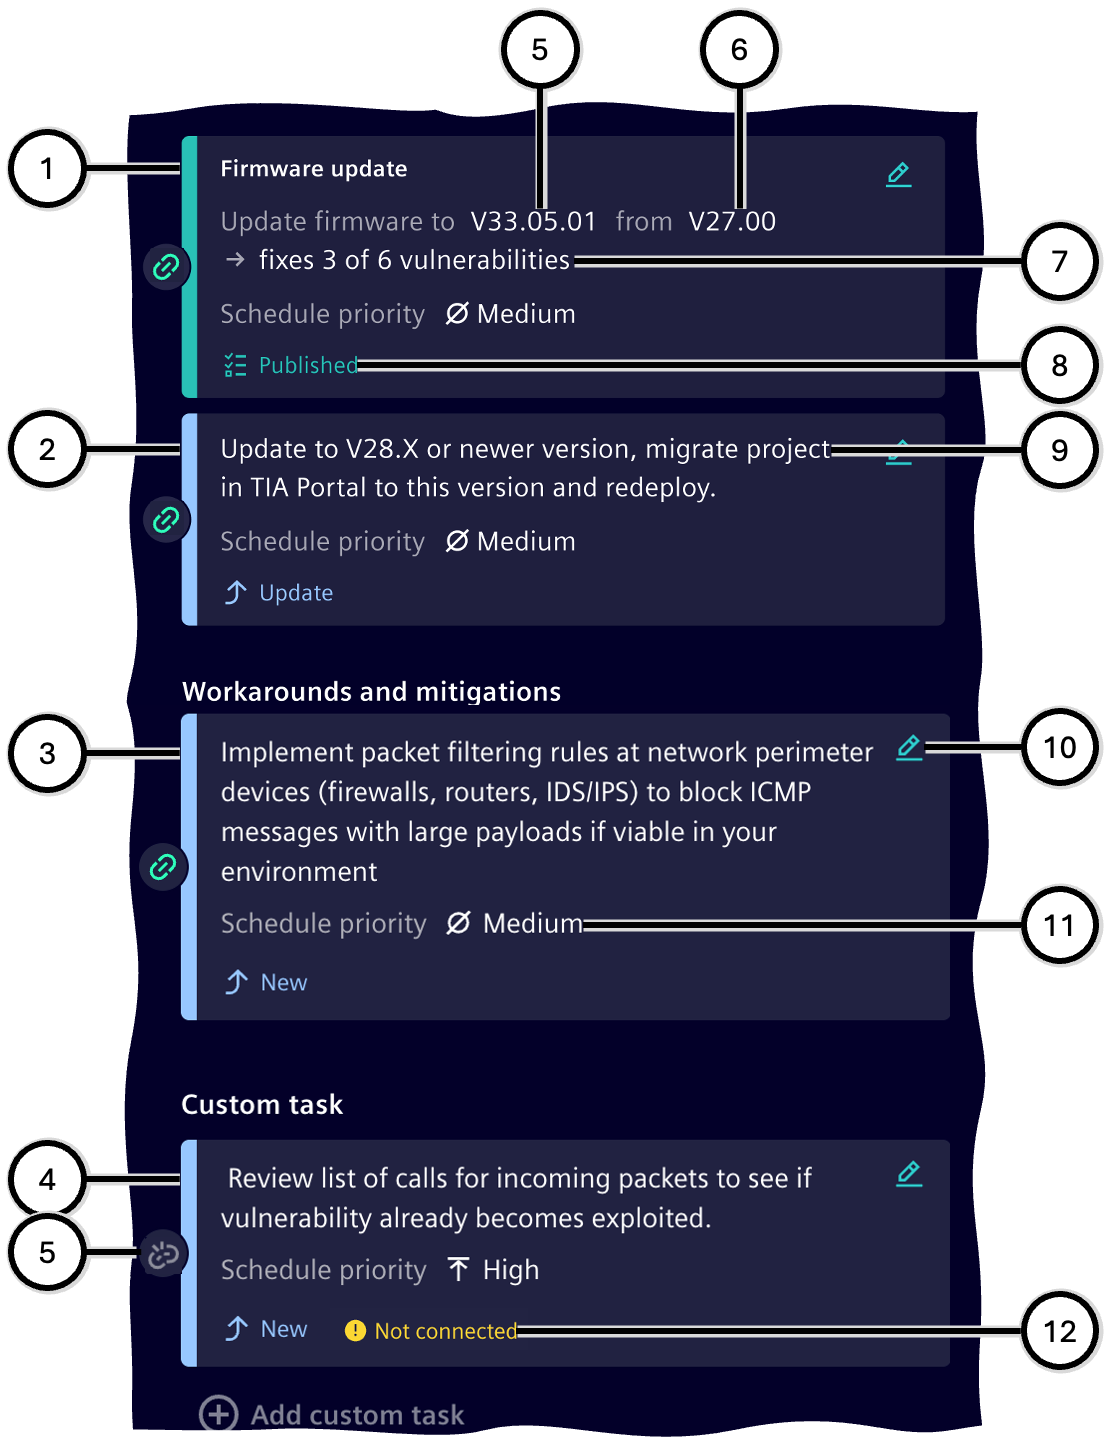
| Number | Description |
|---|---|
| ① | Task of type 'Firmware update' |
| ② | Task of type 'Manufacturer's update recommendation' |
| ③ | Task of type 'Workarounds and mitigations' |
| ④ | Task of type 'Custom task' |
| ⑤ | Optional: Notice about the blocking of tasks for this device in Task management |
| ⑥ | Optional: Button to remove the notice |
| ⑦ | Button to edit the task |
| ⑧ | Optional: Labels for the firmware version to be installed and the previous version |
| ⑨ | Publication status of the task |
| ⑩ | Description of the task |
| ⑪ | Selected scheduling priority |
| ⑫ | Connection status of the task with the selected vulnerability |
| ⑬ | Optional: Notice that the task is not connected to any vulnerability |
Editing tasks
A newly created task is in edit mode. Here, the priority ⑫ can be set, or the task can be removed ⑬. Depending on the task type, data from a predefined list can be selected, or free text can be entered or modified.
Once the task's contents are set as desired ①/⑥, clicking outside the task exits the edit mode and saves the changes ②/⑦.
By using button ⑭, the edit mode can be reopened.
Tasks with the status "New" are only visible in the Task list, but not in the Task Management. Tasks in status "Update" still - in the Task Management - contain the last published data. To transfer the now modified data to the Task Management, it has to become published again. As long as data becomes edited in the Task list and has not yet been published to the Task Management, tasks of this asset cannot be shown in Task Management; a message in both Task list ⑨ and Task Management points that out. This message can temporarily become removed ⑩.
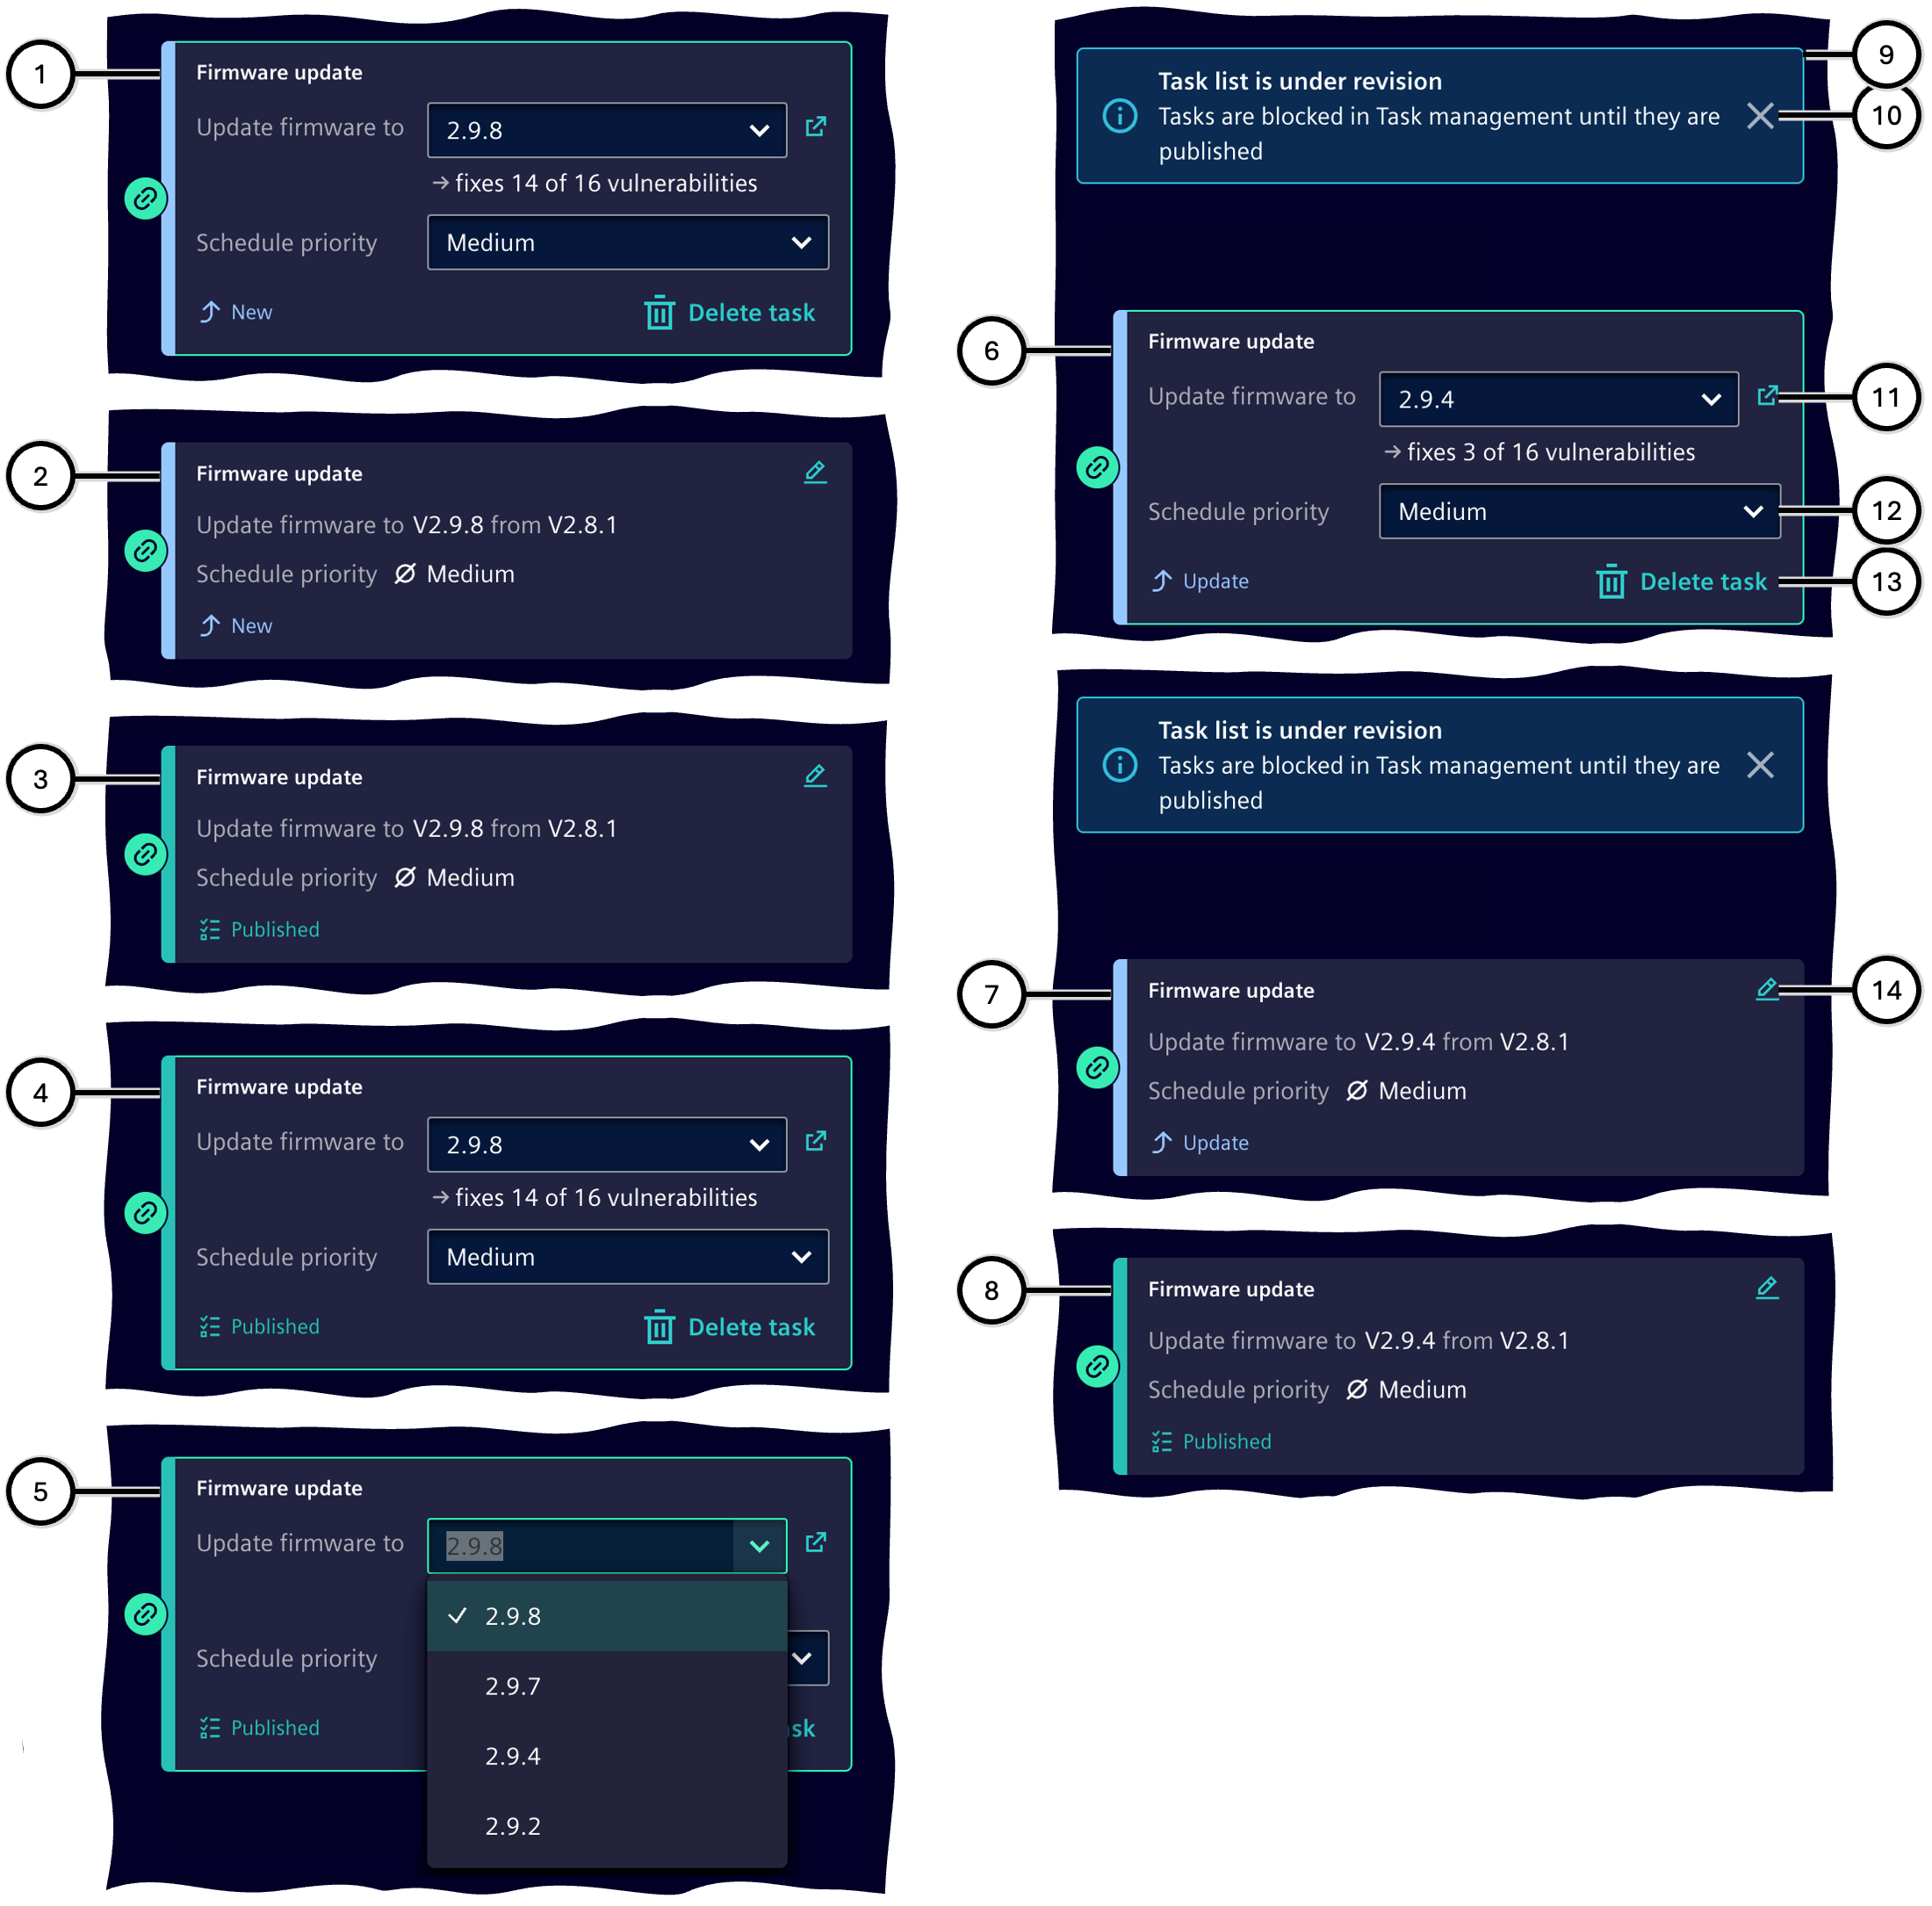
| Number | Description | Status in Task list | Task data in Task list | Task data in Task Management |
|---|---|---|---|---|
| ① | New task in edit mode | New | As shown | (Not available) |
| ② | Created task | New | Like ① | (Not available) |
| ③ | Published task | Published | Like ① | Like in Task list ① |
| ④ | Previously created task, reopened in edit mode | Published | Like ① | Like in Task list ① |
| ⑤ | Previously created task, reopened in edit mode; e.g., selection options | Published | Like ① | Like in Task list ① |
| ⑥ | Previously created task, reopened in edit mode – unpublished changes | Update | As shown | Like in Task list ① |
| ⑦ | Edited task – unpublished changes | Update | Like ⑥ | Like in Task list ① |
| ⑧ | Published task | Published | Like ⑥ | Like in Task list ⑥ |
| ⑨ | Optional: Notice about task blocking for this device in Task Management | - | - | - |
| ⑩ | Optional: Button to remove the notice | - | - | - |
| ⑪ | Optional: Button to display additional information | - | - | - |
| ⑫ | Selection field for task priority | - | - | - |
| ⑬ | Button to delete the task | - | - | - |
| ⑭ | Button to edit the task |
Selecting priority
The priority of a task is important for further processing and planning in Task Management. Every newly created task is automatically assigned a medium priority, which can then be adjusted as needed. To select the priority of a task, switch to the task's edit mode, open the priority menu, and choose the desired priority.
Removing a task
A task that is no longer needed can be removed from the Task list. It will no longer contribute to the processing of vulnerabilities, which may affect the status of vulnerabilities and the Managing status. To remove a task, switch to the task's edit mode and select the button to delete it.
Connecting vulnerabilities and tasks
Connecting vulnerabilities and tasks ensures that the implementation of a task can be checked to determine whether the vulnerability has been resolved. A vulnerability is considered...
- treated, when all 'Workarounds and mitigations' tasks linked to the vulnerability have been implemented.
- fixed, when the manufacturer's update recommendation has been implemented.
Connecting is managed as follows:
- A vulnerability must always be selected to create a task.
- When adding a 'Manufacturer's Update Recommendation' or a 'Workaround and mitigations' from a vulnerability description (see Vulnerability List<), the connection between the vulnerability and the task is automatically established.
- Manually creating a task is only possible if a vulnerability is selected; the manually created task is then automatically connected to this vulnerability.
- Clicking the connection indicator ①/②/③/④ toggles between the connection states 'connected' ①/② and 'not connected' ③/④; any connections to other vulnerabilities remain unaffected.
Note
The connection status can be changed without entering edit mode.
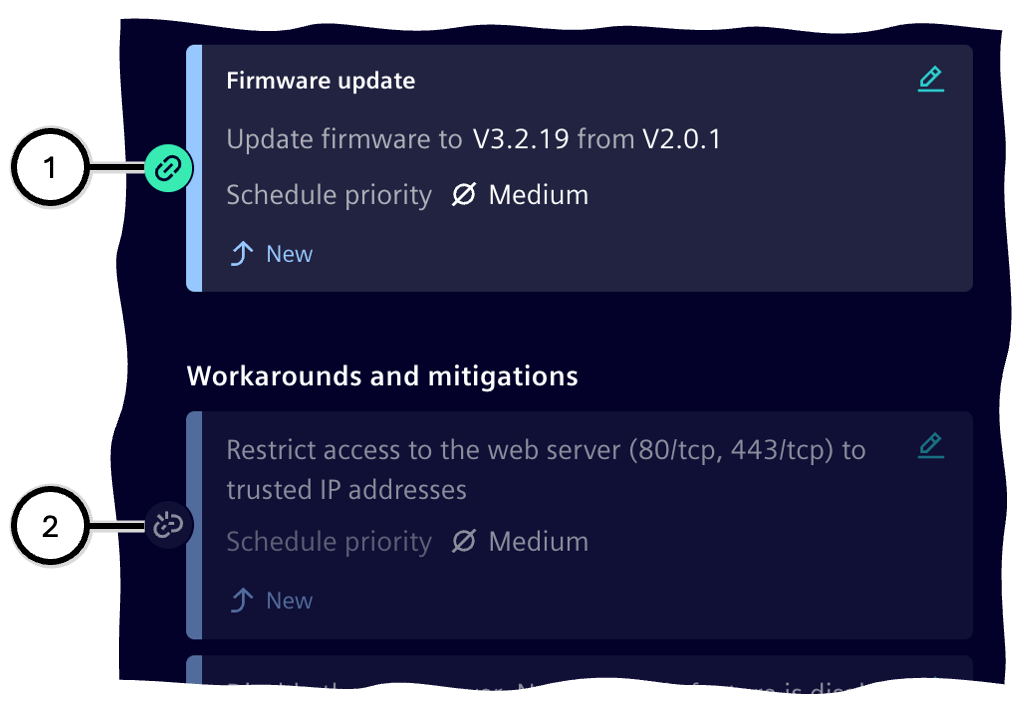
| Number | Connection Status | Description |
|---|---|---|
| ① | Connected | Task is connected to the currently selected vulnerability |
| ② | Connected | No vulnerability is currently selected; the task is connected to at least one vulnerability |
| ③ | Not connected | Task is not connected to to the currently selected vulnerability, but to another vulnerability |
| ④ | Not connected | Task is not connected to any vulnerability |
Task publication status and overview
Tasks can have one of these statuses:
| Task Publication Status | Representation | Meaning | Task Editable | Task Visible in Task Management |
|---|---|---|---|---|
| New | Task has been defined but not yet published | Yes | No | |
| Published | Task has been published and is now visible in Task Management | Yes | Yes | |
| Updated | Already published task has been modified; the change must be published to be visible in Task Management | Yes | No | |
| Implemented | Already published task has been executed | No | No | |
| Not connected | Task is not connected to a vulnerability | Yes | No |
In the 'Active' status group, a summary aggregates tasks by status: the number of new or updated tasks ③, which only take effect after publication, and the number of already published tasks ④.
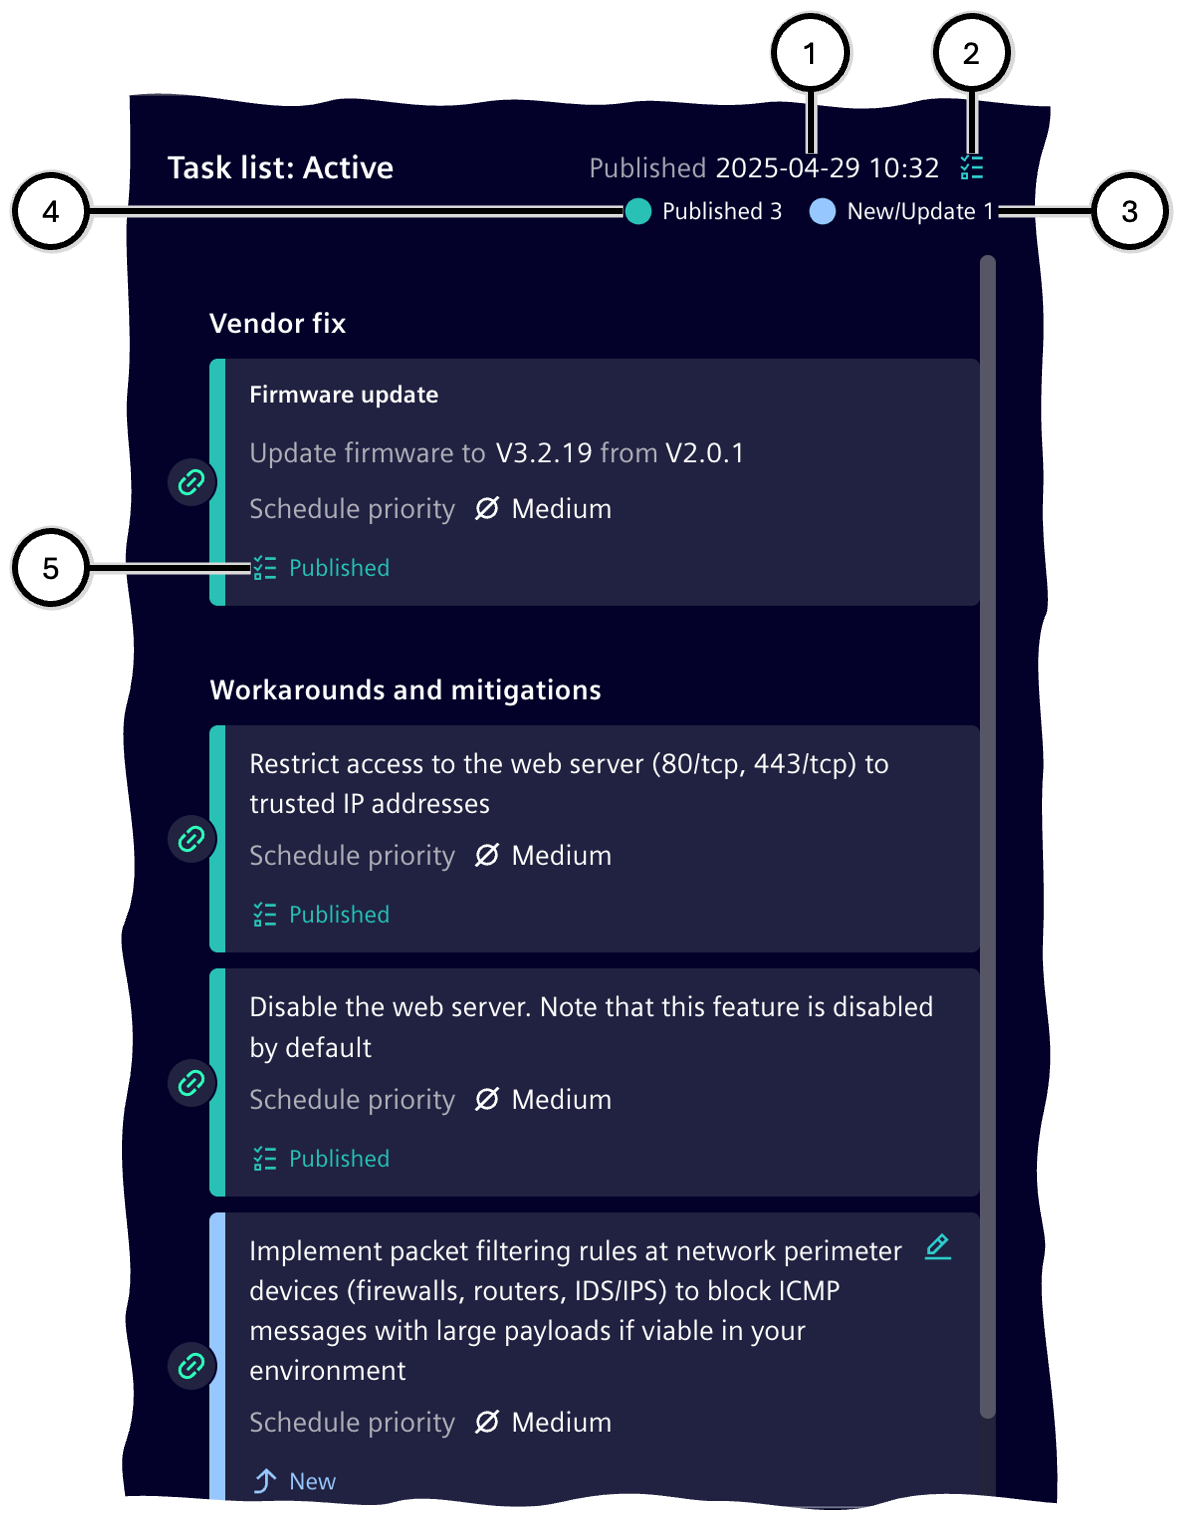
| Number | Description |
|---|---|
| ① | Date of the most recent publication of tasks in this Task list |
| ② | Button to switch to Task Management |
| ③ | Number of tasks not yet published |
| ④ | Number of published tasks |
| ⑤ | Publication status of the task |
Managing progress and additional functions
The Managing progress ① shows the ratio between vulnerabilities in the 'Planned' state and those in the 'Open' state. All other vulnerabilities are no longer considered here, as they have already been resolved or addressed by other solutions.
The button ② is used to publish all tasks and, if applicable, creation, update, and deletion requests for tasks in Task management. At this point, all necessary tasks for this device are considered defined and can no longer be changed. The further procedure with these tasks is described in the chapter Task Management. Unpublished tasks are not found in Task management and therefore cannot be completed.
Note If the device for which tasks are being processed in the Device focus is simultaneously viewed in Task management – for example, by other users – the task area in Task management will be locked. Only when task processing in the device focus is completed will the tasks in Task management be released for use again.

| Number | Description |
|---|---|
| ① | Managing progress of all vulnerabilities for this device |
| ② | Button to publish all tasks in the Task list |
Task management
Note When using SINEC Security Guard in combination with ServiceNow®, additionally refer to Usage with ServiceNow®.
The Task management section provides an overview of all assets with defined tasks, which can be specified via Threats and tasks in the Asset focus (①). Each asset's entry includes the number of pending tasks and firmware information (③). Detailed information for each asset can also be accessed via Asset details (②).
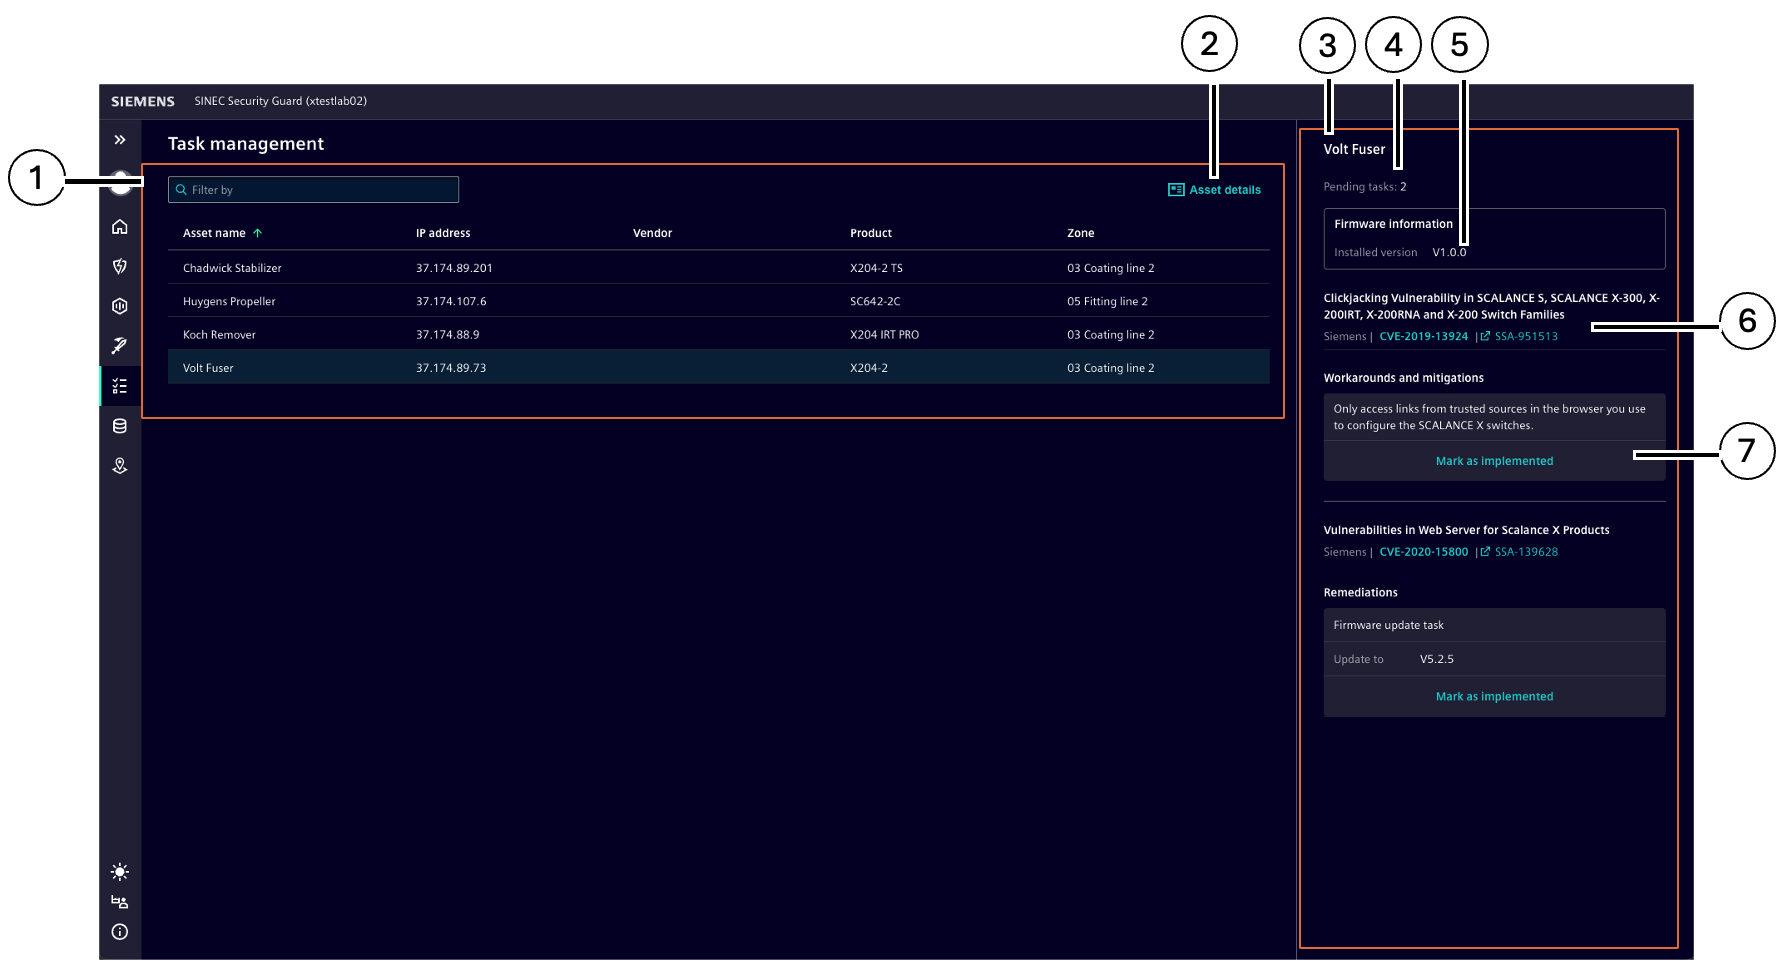
| Number | Description |
|---|---|
| ① | List of all assets for which tasks are defined |
| ② | Asset details |
| ③ | Task overview |
| ④ | Number of pending tasks for this asset |
| ⑤ | Firmware version information |
| ⑥ | Mark as implemented |
To set a task to implemented, users can click the “Mark as implemented” button. Implemented tasks will not be shown after reload.
Note All implemented tasks are shown in the "Implemented tasks" report.
Reporting
This area provides available reports that help you monitor and share the state of your assets, vulnerabilities, and compliance with security requirements. These report types are available:
- "Compliance report on asset vulnerabilities": all data necessary to evaluate compliance with the Cyber Resilience Act (CRA); this report is designed to help machine builders meet CRA compliance requirements by providing a comprehensive log of asset vulnerability events
- "Asset overview": lists all assets as listed in the Inventory, including their main properties and the status of their vulnerabilities (open, planned, on hold, treated, and fixed)
- "Vulnerability overview": lists all vulnerabilities that currently apply to the system, as shown in Threat Focus – including their details and statistics on how many assets are affected by each vulnerability.
- "Implemented tasks": lists all tasks that have been marked as implemented by this customer in this system via 'Mark as implemented' since the system was set up for this customer
- "Zone overview": lists all zones currently defined in Zone Management – including their properties, the number of assets per zone, of individually rates assets, of IP ranges in that zone, and information on unassigned and ignored zones.
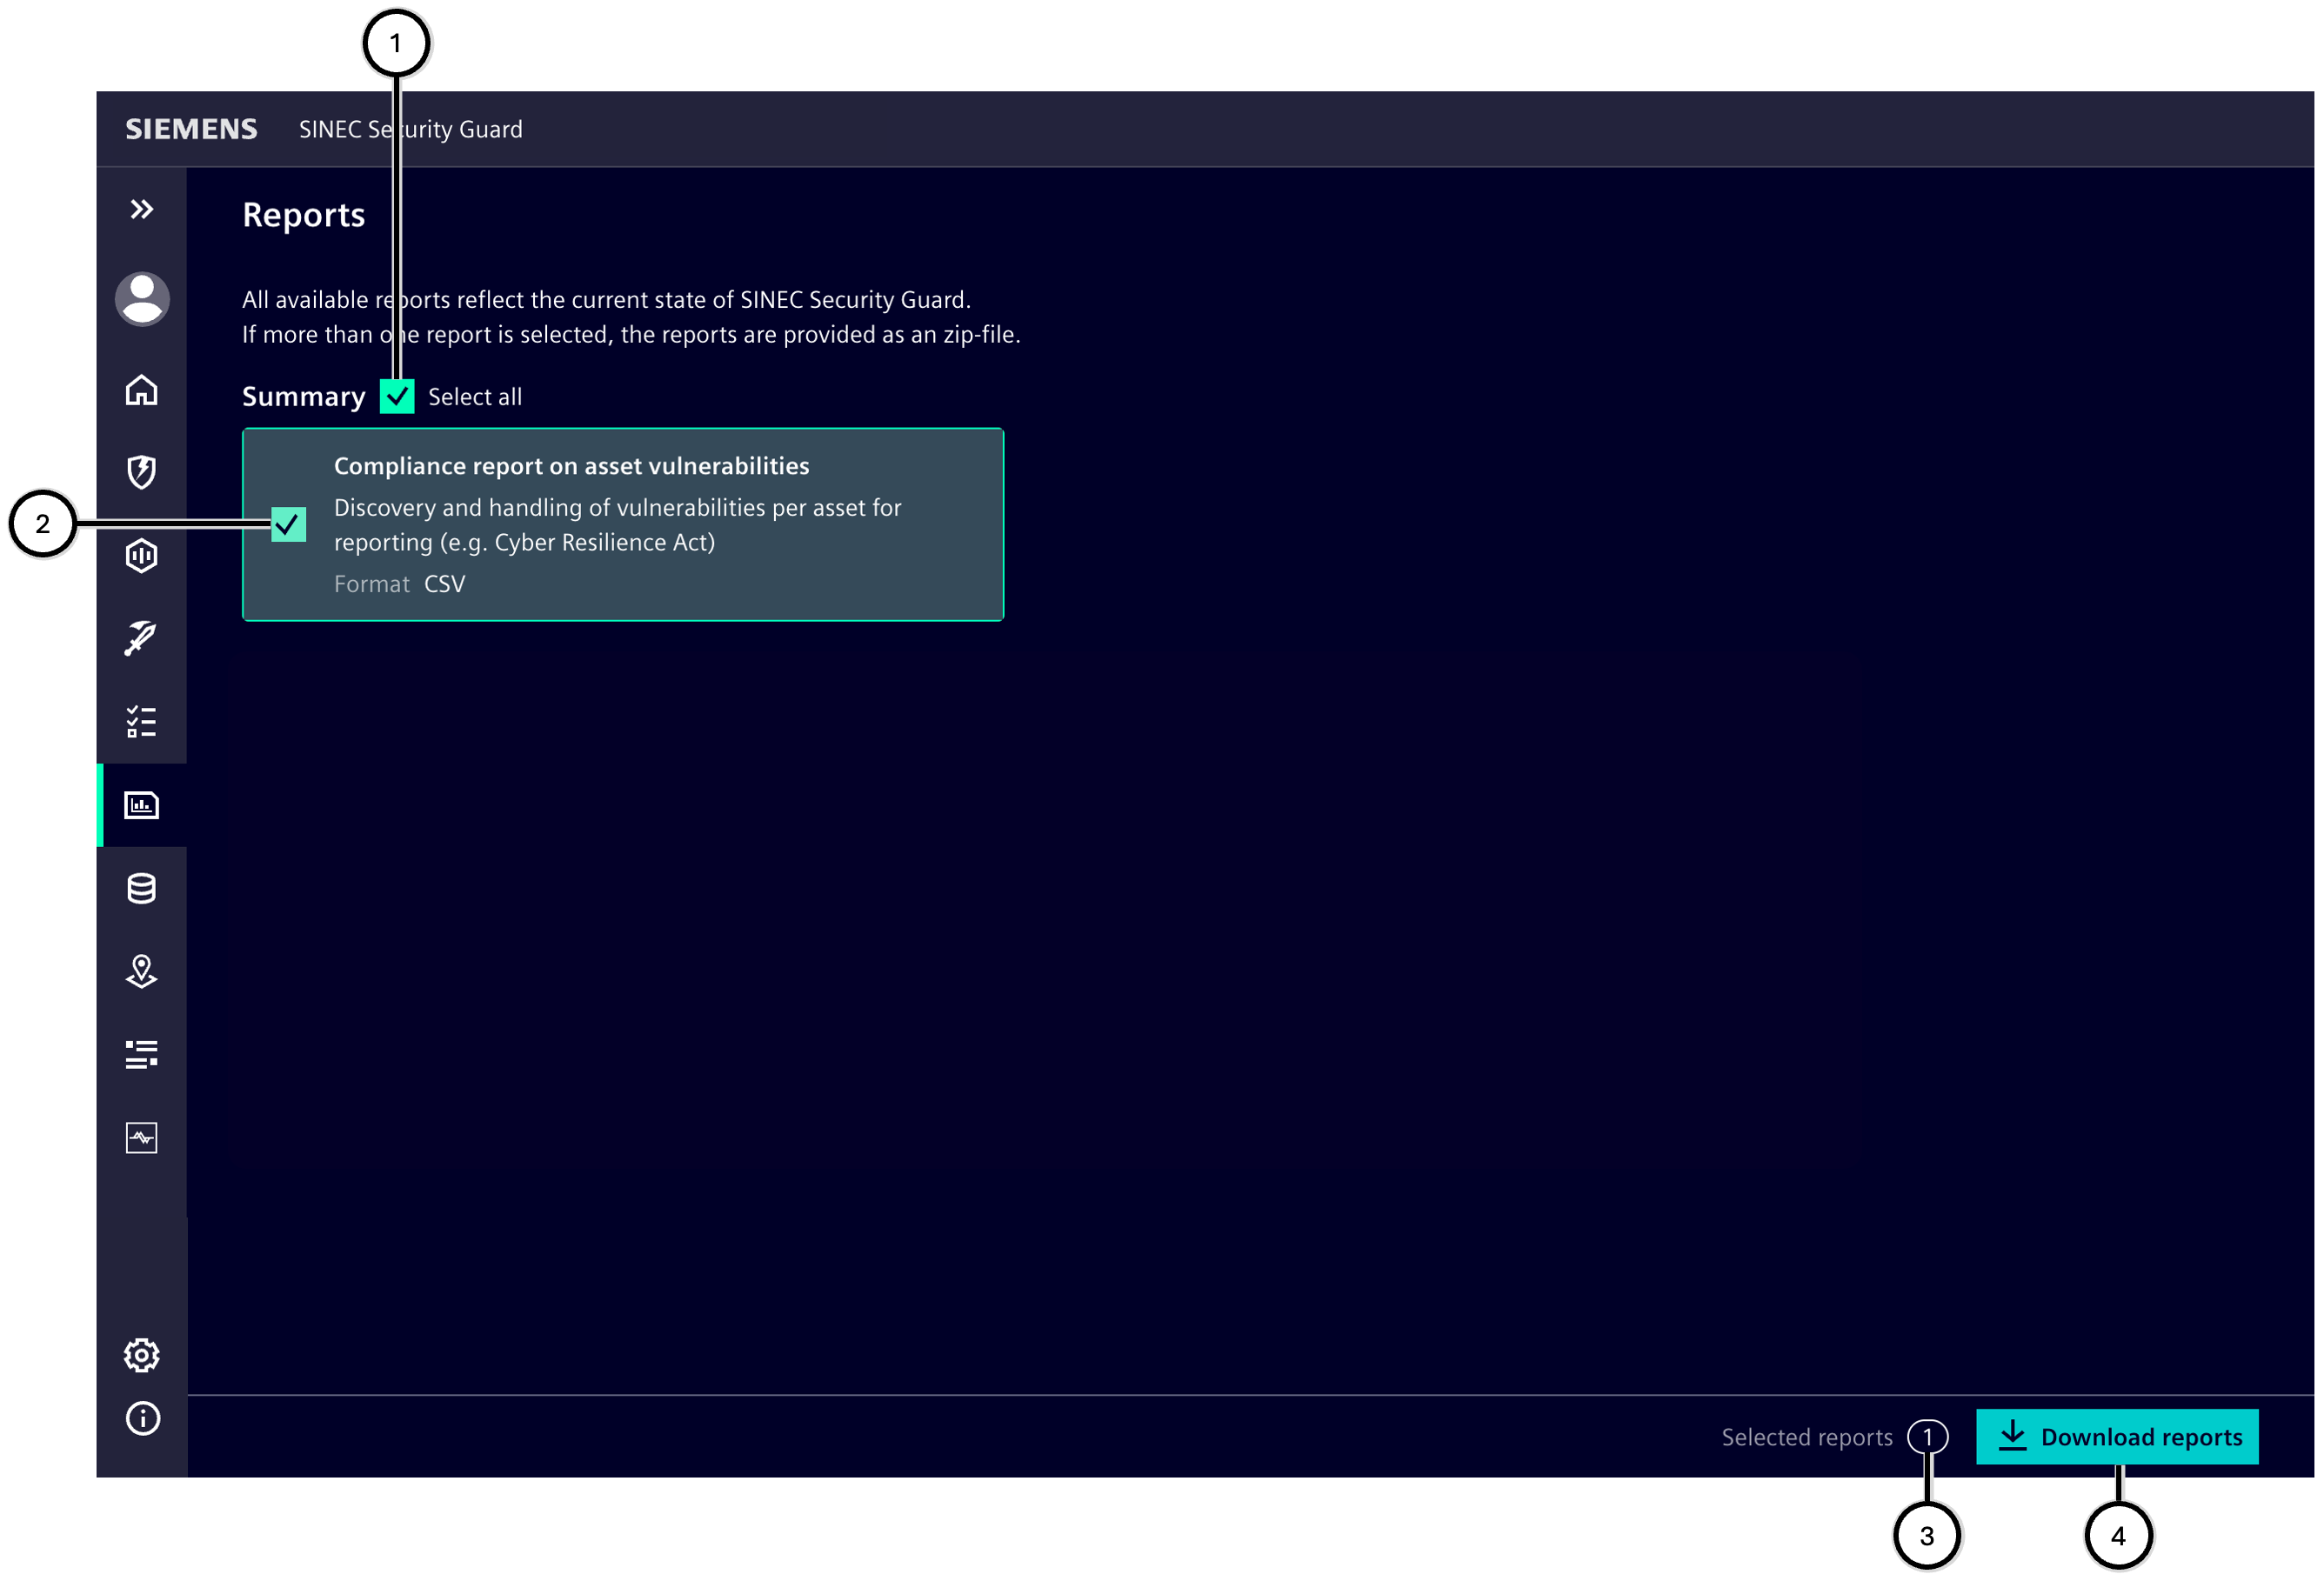
| Number | Description |
|---|---|
| ① | Button to select all report types of Detailed data |
| ② | Button to select the respective single report |
| ③ | Display of the number of selected reports |
| ④ | Button to download all selected reports |
Inventory
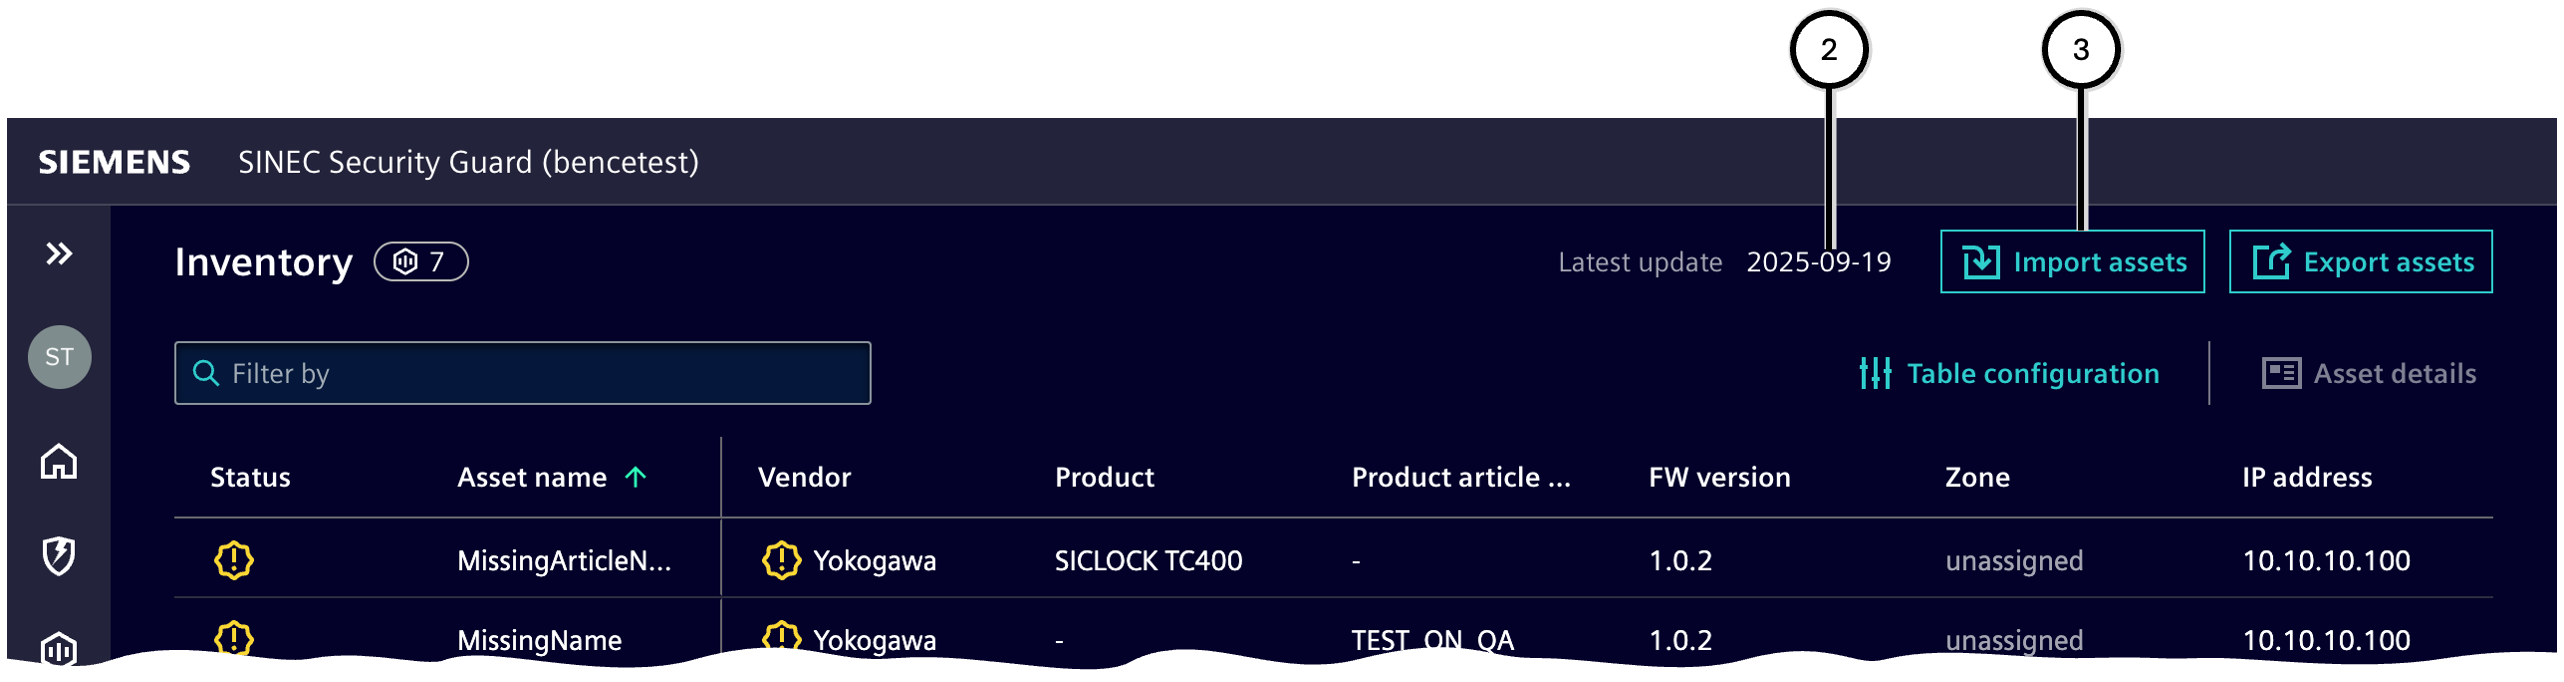
This area lists all assets that have been transferred from an update source (frequent synchronization with Siemens Industrial Asset Hub or import from a .CSV file) to SINEC Security Guard. Their total number ① is displayed separately.
Note The parallel use of both update sources (Siemens Industrial Asset Hub and .CSV file) is not possible.
The inventory lists assets which are transferred from the update source; the status of an asset is shown in the inventory - see column 'Status' ⑧.
| Status | Icon | Description | Remediation |
|---|---|---|---|
| Missing mandatory matching data |  |
Data which is required to identify the product is missing | Complete the data in the source |
| Missing vulnerability feed |  |
For this product there is no vulnerability feed known to retrieve vulnerability information from | Add the vulnerability feed of the asset's vendor |
| Matching data complete |  |
All data looks fine, but there is no vulnerabiliy detected for this product | None; as soon as a vulnerability becomes published for this product via the vulnerability feed, the data becomes validated automatically |
| Matching data validated |  |
Product and vulnerability feed data are fine | None |
Asset details ⑥ can be displayed for a selected asset.
The list of assets can be exported in a .CSV file for use in other systems ⑤.
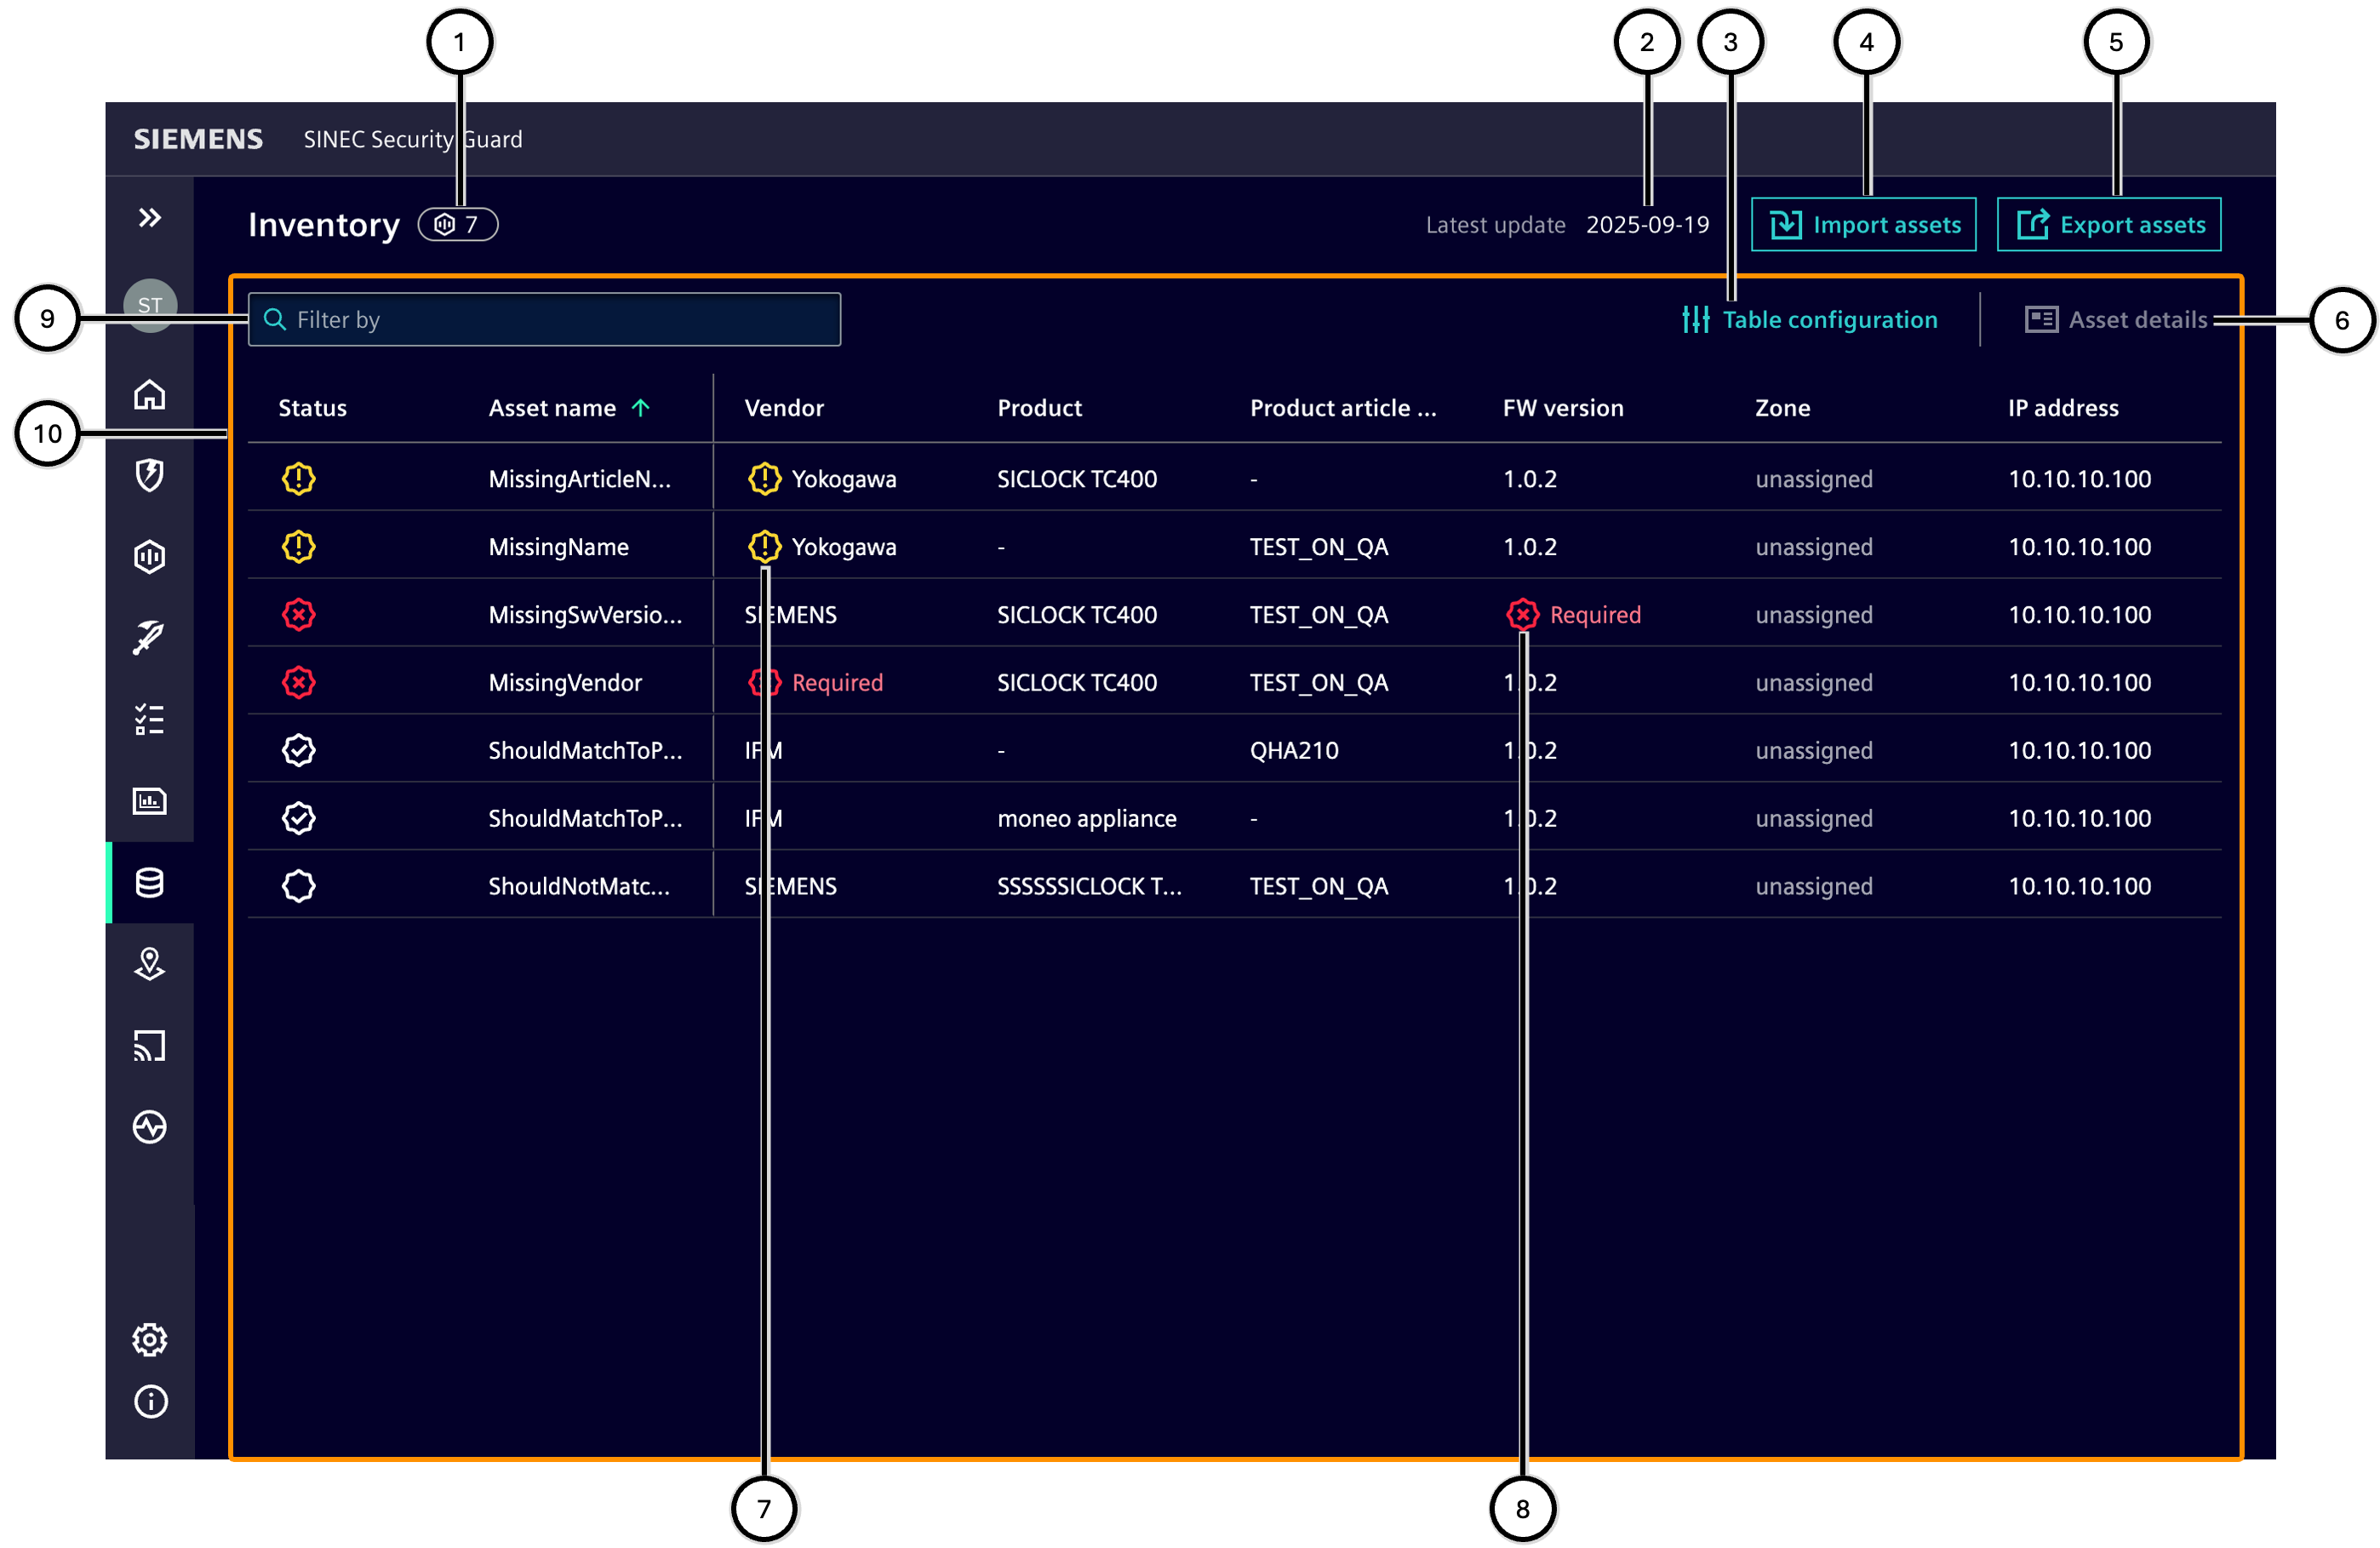
| Number | Description |
|---|---|
| ① | Total number of supported and unsupported assets in the inventory |
| ② | Point of time of last inventory update |
| ③ | 'Table configuration' button |
| ④ | 'Import assets' button |
| ⑤ | 'Export assets' button |
| ⑥ | 'Show asset details' button |
| ⑦ | Cell with missing vulnerabiliy feed information |
| ⑧ | Cell with missing matching data |
| ⑨ | Input field for filtering the assets |
| ⑩ | List of assets |
Configuration of the table
It can be defined for the table, which columns are displayed in which order:
- Only these columns will be displayed which are selected in the configuration dialogue ②; single columns are selected and may not be deselected ①.
- The position of a column can be changed by dragging and dropping the column header to the desired position.
- With the reset button ③ one can go back to the standards configuration of the table.
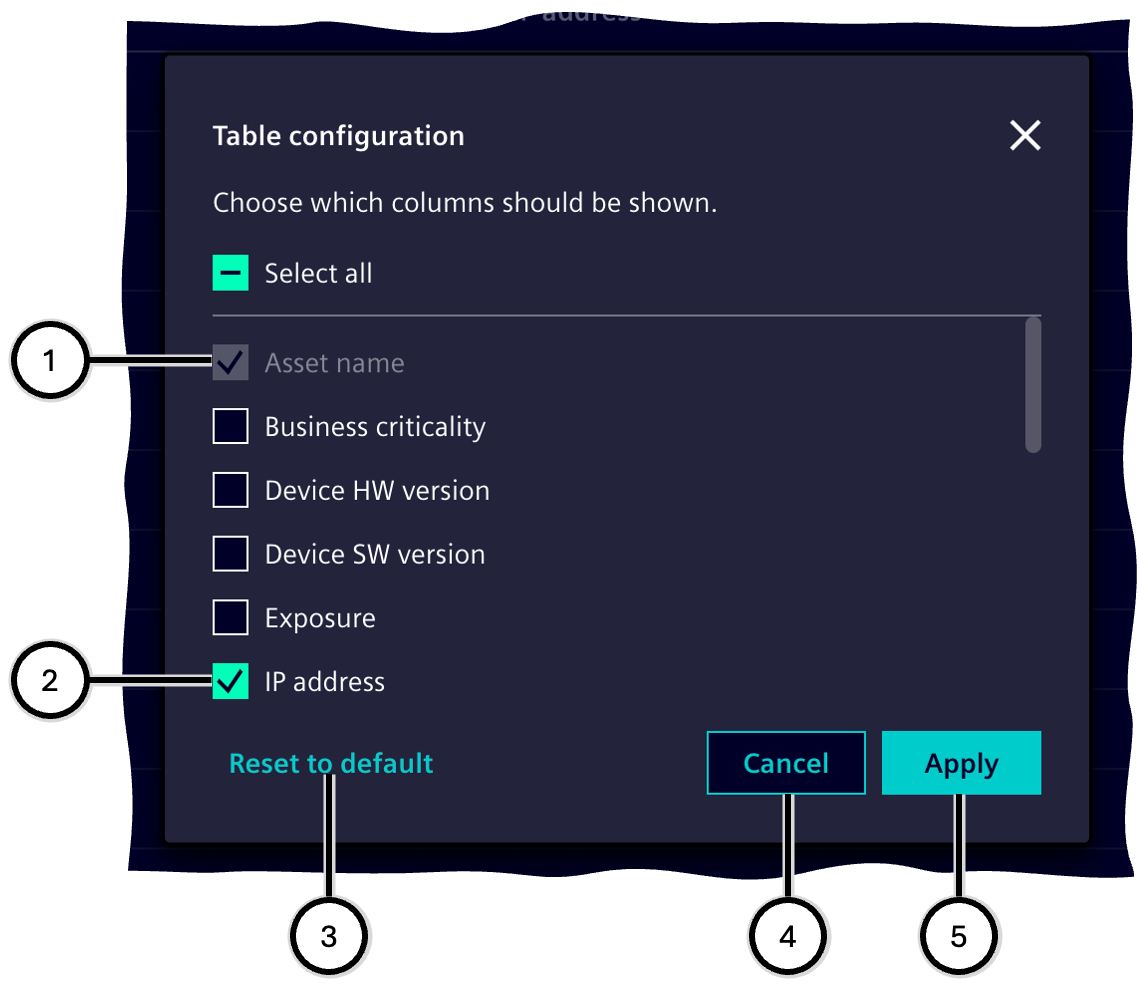
| Number | Description |
|---|---|
| ① | Selected column (locked) |
| ② | Selected column |
| ③ | 'Reset to default' button |
| ④ | 'Cancel' button |
| ⑤ | 'Apply' button |
Necessity and impact of updates
During the update, the data from the update source replaces the previous inventory. The data is not added to the existing inventory.
During an update, the data for all assets in the future inventory must always be transferred together. Assets that are not present in the update source are removed from the inventory.
It is necessary to update the inventory if something changes in the hardware, firmware or configuration used, e.g. due to the replacement of assets, the installation of a firmware update or a changed IP address.
Per asset, a successful update has the following effect on new existing inventory:
| Asset exists in the previous inventory | Same asset exists in the update source (IAH or .CSV) | Effect on the new inventory |
|---|---|---|
| Yes | Yes | Asset data is replaced |
| Yes | No | Asset and all associated data and tasks are removed |
| No | Yes | Asset is newly added |
An update from a .CSV file fails if the file or its data structure is corrupt or if there is a problem with any given 'id' (either that any 'id' is missing or that any 'id' appears more than once). If an update from a .CSV file fails, nothing will be updated and the up-to-now existing inventory will remain untouched.
Synchronization with Siemens Industrial Asset Hub
Note The use of the update source Siemens Industrial Asset Hub is described here; importing from a .CSV file is then not possible. Contact Siemens Support if you have any questions.
The inventory automatically synchronizes with the Siemens Industrial Asset Hub in the background several times a day. Changes to assets or asset data in the Siemens Industrial Asset Hub are synchronized with SINEC Security Guard in a timely manner.
Import from a .CSV file
Note The use of the update source .CSV is described here; synchronization with Siemens Industrial Asset Hub is then not possible. Contact Siemens Support if you have any questions.
If an inventory is present in SINEC Security Guard, a note ② shows the age of the most recent import.
The import process is initiated via a button:
-
① shows the button in the event that there is no inventory;
-
③ shows the button in the event that an inventory is already present.
To import from a file, all asset data must be stored in a .CSV file in a defined structure. The necessary structure of the file is specified in the current template file, which you can download using a corresponding button ④. Always use the structure of the latest template version: Using a structure unlike the current template file leads to an error, and the already existing inventory in SINEC Security Guard remains untouched.
Files to be uploaded must meet the following criteria:
| Criterion | Description |
|---|---|
| File Format | .CSV (Comma Separated Values) UTF8 |
| Content Structure | as current template file |
| Maximum File Size | 150MB |
| Maximum Number of Records | 6000 |
| A unique 'id' per record | Each record must contain a unique value in the 'id' column; any record with either no value for 'id' or one that is used more than once in this file will lead to a failure and aborts the entire import process |
After the corresponding file has been selected ⑤ and the import has been initiated ⑥, these criteria are checked. If criteria are not met, the import is aborted and a corresponding error message is displayed in the status area ⑧; the already existing inventory remains untouched.
Note The structures of an exported .CSV file and of the template to import inventory data into SINEC Security Guard are identical, so an exported .CSV file may be used to later import the inventory into SINEC Security Guard again.
![]()
| Number | Function |
|---|---|
| ① | Button to import asset data from a .CSV file |
| Number | Function |
|---|---|
| ② | Age of the most recent import |
| ③ | Button to import asset data from a .CSV file |
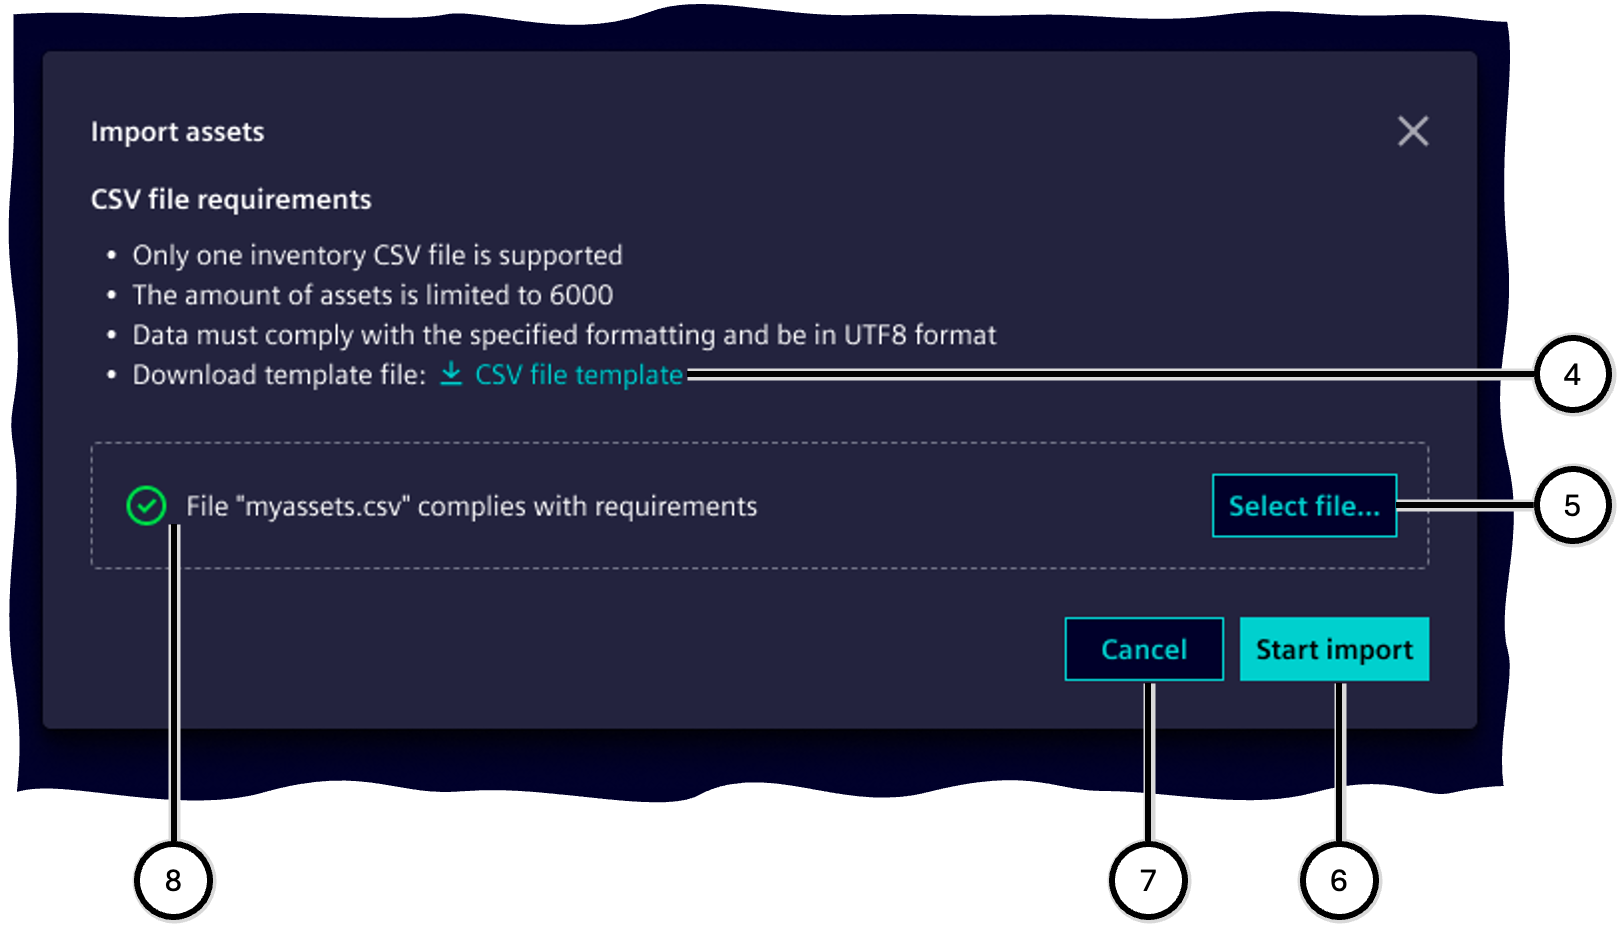
| Number | Description |
|---|---|
| ④ | Button to download the current .CSV template |
| ⑤ | Button to select the .CSV file with asset data |
| ⑥ | Button to start the import process |
| ⑦ | Button to cancel the import process |
| ⑧ | Status display of the import process |
Data in .CSV file
Note The structure of the .CSV file may change over time. Siemens recommends to always download the latest version of the .CSV file. You may edit the file with any text editor or spreadsheet editor. Formatting and column separation work according to the CSV standard.
The .CSV file's first row shows the column headers. Each further row contains the data of one asset (= one record). The order of the columns is arbitrary.
The table below informs about the structure of the .CSV file; the table contains this information:
- Column: Each column in the .CSV file represents one parameter that adds data to each asset. If the file contains other columns, they and their data will be ignored.
- Description: Meaning of the parameter.
- Required for import process: 'Yes' means that the .CSV file must contain the column with this header, and also data per record. 'No' means that an import will also run if no data is given here.
- Asset processing: Parameters which are marked as 'Yes' are used to process the asset's data for the SINEC Security Guard purpose; when the record does not contain data here, processing of this asset in means of SINEC Security Guard is not possible.
| Column | Description | Required for import process | Asset processing |
|---|---|---|---|
| asset_id | Unique ID of the asset (freely chosen) | Yes | No |
| asset_name | Name of the asset | No | No |
| serial_number | Serial number of the asset | No | No |
| hardware_version | Hardware version of the asset | No | No |
| firmware_version | Version of the firmware that is currently installed on the asset | No | Yes |
| network_name | Name of the network the asset is part of | No | No |
| ip | IP address of the asset (V4 or V6) | No | No |
| mac | MAC address of the asset | No | No |
| product_name | Name of the product - often used for non-Siemens assets | No | Yes. Only required if product_article_number is empty. |
| product_article_number | Article number of the asset, to be retrieved from the vendor | No | Yes. If empty, the product_name will be used. |
| product_vendor | Name of the company that has produced this asset | No | Yes |
| note | Leave any note here | No | No |
| zone_name | Name of the zone the asset belongs to | No | No. If empty: The asset gets applied to 'Unassigned assets'. If not empty: The asset gets applied to the zone of this name; if the zone doesn't yet exist, it becomes created. |
| new_asset_id | New unique identifier of the asset in case the identifier stated in asset_id shall be changed |
No | No |
Migrate the CSV imported data to the new format
- Export your current SINEC Security Guard -inventory into a .CSV file
- Keep the data in the column
asset_iduntouched (no changes, no removal) - In case you want to change
asset_idvalues: In the .CSV file, add a new column with the headernew_asset_id; this column will not show up in the template .CSV file or export .CSV file but has to be created manually when identifier shall be changed. - For rows you want to keep the identifier as given in the
asset_idcell: leave empty the respective cell in columnnew_asset_id - For rows you want to change the identifier: enter the desired new identifier into the column
new_asset_id, and take care that it is unique for both columnsasset_idandnew_asset_id - Save this file and import it into SINEC Security Guard
When importing a file with the column new_asset_id:
- All rows where the
new_asset_idcell is changed: The respective asset and all its remaining tasks will not be available anymore; an asset with the edited identifier becomes created and does not yet contain any tasks. - All rows where the
asset_idcell remains untouched and thenew_asset_idcell will keep their known identifier of the columnasset_id. - All rows where the
asset_idcell remains untouched and thenew_asset_idcell contains a value will use the new identifier instead of their known identifier and will update all relations inside SINEC Security Guard accordingly.
This process ensures that all data relations between the assets and their tasks are kept for both the assets which keep their identifier and the assets which get a newly defined identifier.
Export
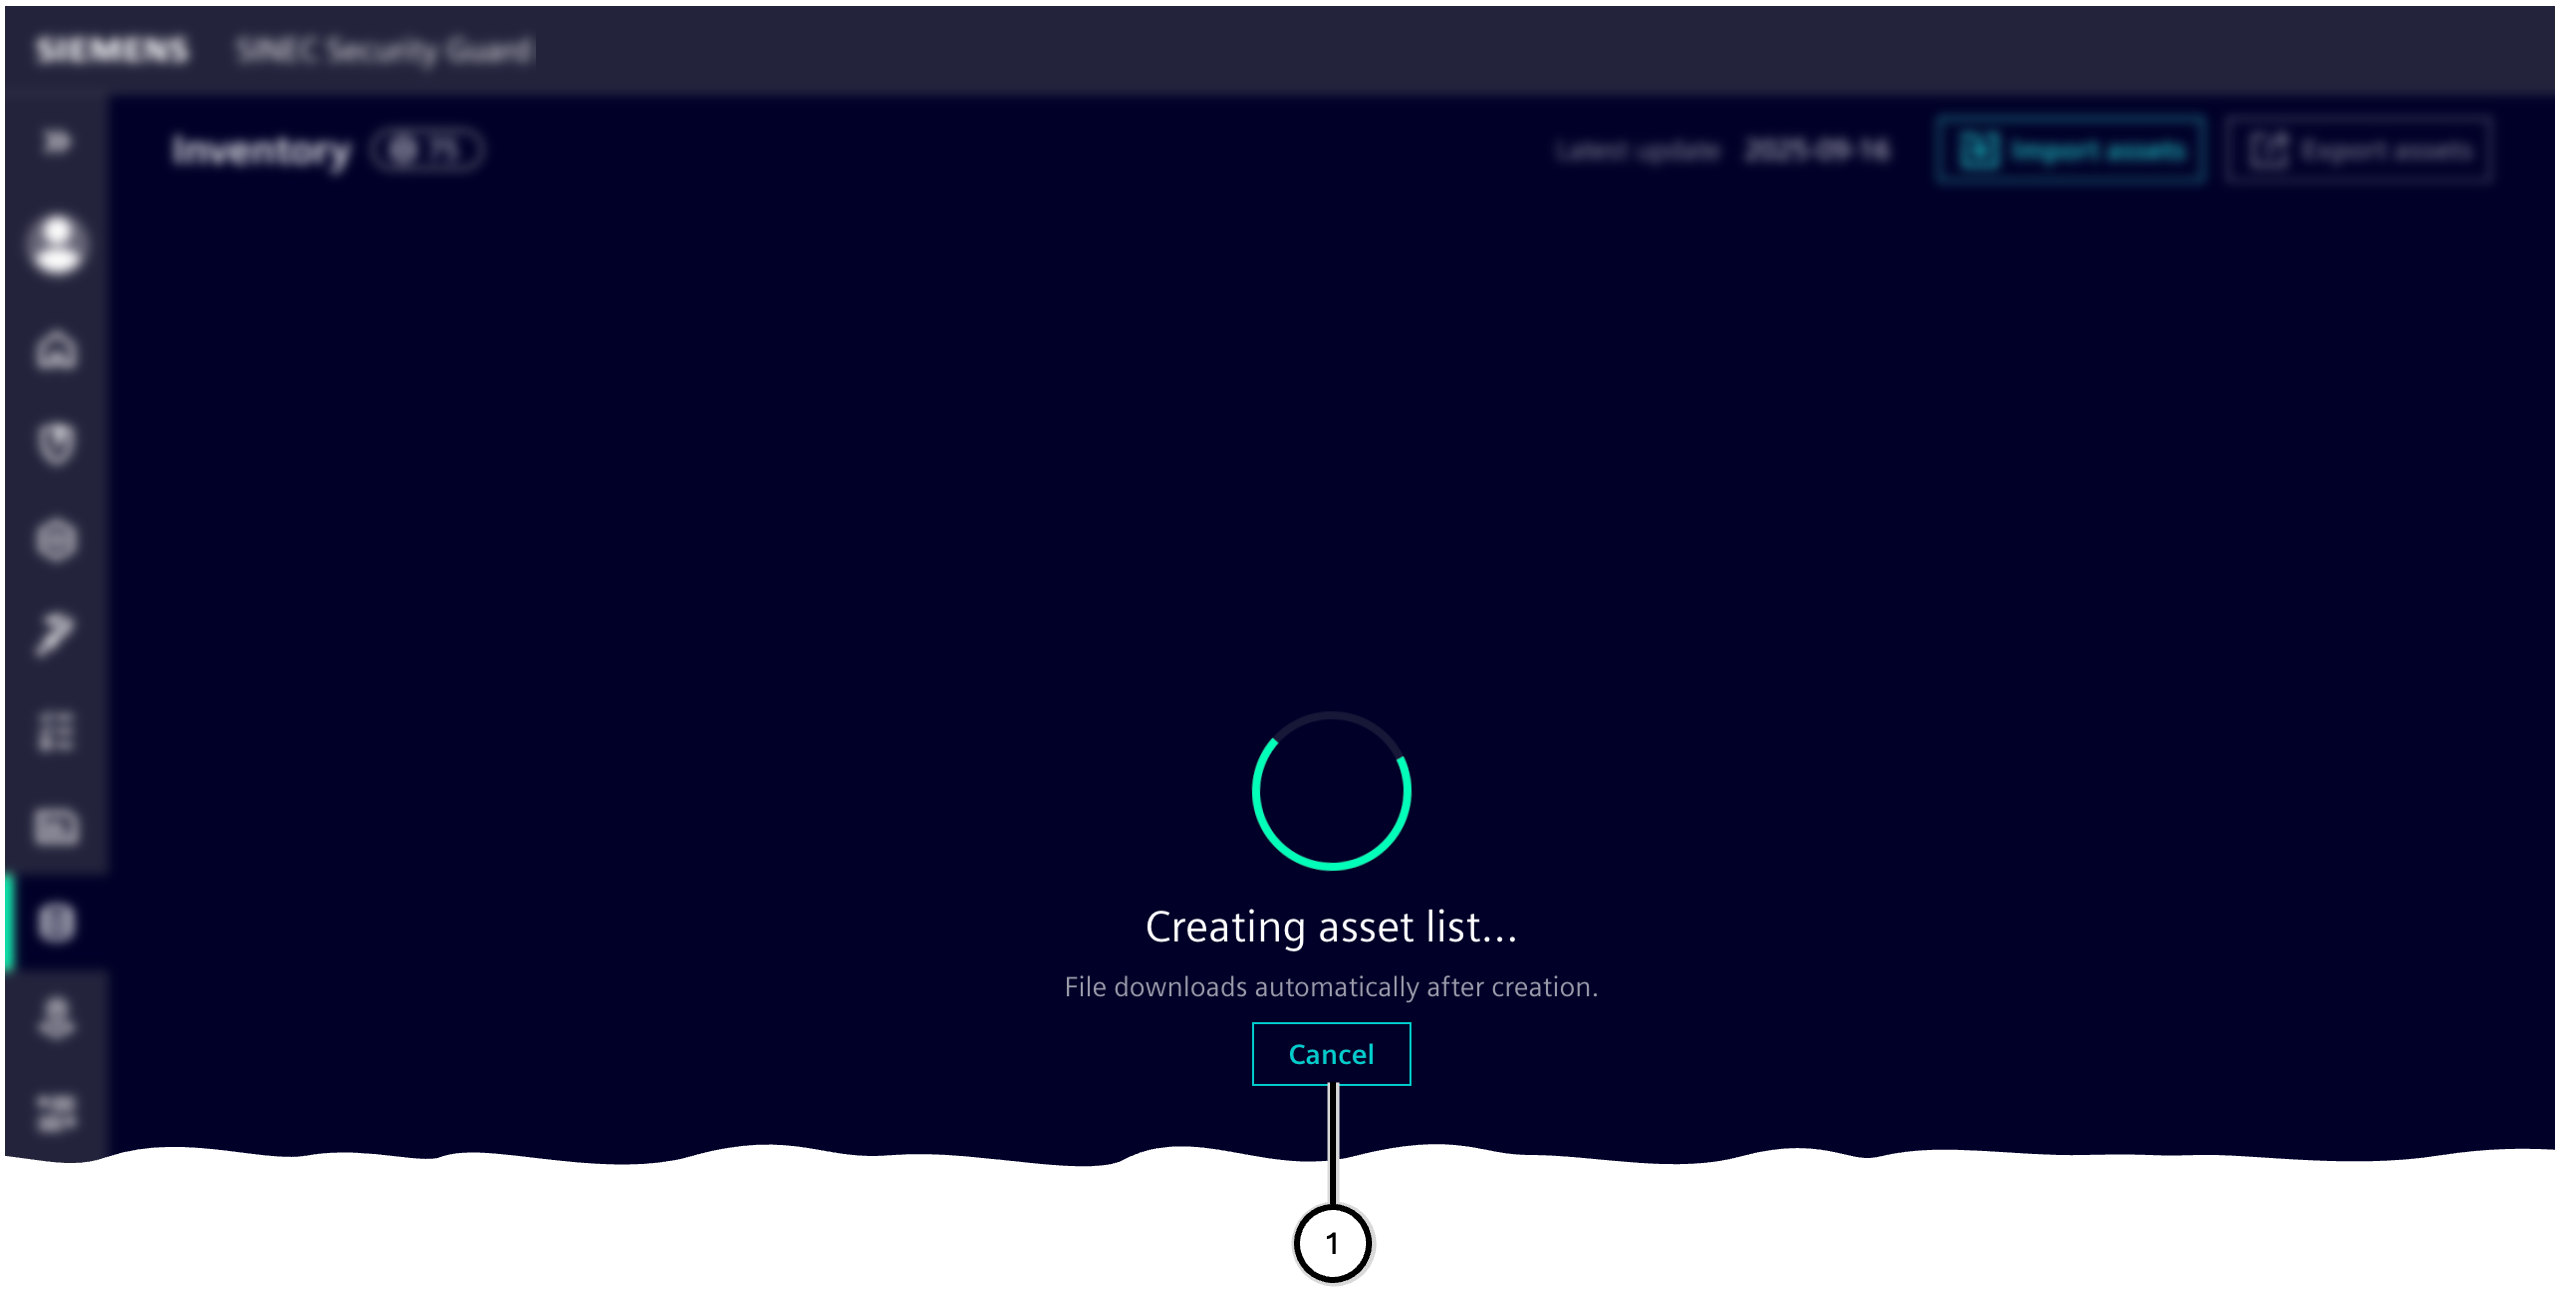
The records of the inventory can be exported to a .CSV file. This file may be used to work with the data in other applications and systems. When starting the export, the .CSV file becomes created and downloaded to your system - consult the settings of the browser and the operating system you use to see where to find the file.
Depending on the internet connection and the number of records, the export process may take some time. As long as the process continues, SINEC Security Guard cannot be used otherwise. The export process can be cancelled ①. The name of the .CSV file contains date and time of the export.
Note Currently the structures of an exported .CSV file and the template to import data into SINEC Security Guard differ. To import data from an exported .CSV file one needs to apply the data to the structure of the import template file.
| Number | Description |
|---|---|
| ① | Button to cancel the export process |
Zone management
The Zone management section provides an overview over all zones and their assets and allows to edit and assign assets to zones.
Zones are freely definable logical units, such as 'Brewing', 'Cooling', 'Environment', 'OT Network', etc.
Each asset can be assigned to a zone, and a zone can contain any number of assets. Its zone-specific values 'Business criticality' and 'Exposure' can be set for each zone.
All assets contained in a zone then adopt their zone values as their own values. On this basis, SINEC Security Guard can later calculate a risk level for each asset and vulnerability:
If, for example, Asset A is located in the 'chemical reactor' zone ('high business criticality', 'high exposure') and an identical Asset B is located in the 'shipping' zone ('low business criticality', 'medium exposure'), the risk level for Asset A will be higher than that for Asset B.
Zone-specific values
The following values of a zone occur in several places:
-
Number of assets
Counts all assets assigned to the zone.
-
Business criticality
Expresses how bad ('Negligible', 'Moderate', 'Critical', 'Disastrous') a failure or unsafe operation of the zone and its assets would be for the operation of the plant or the achievement of the production result.
-
Exposure
Expresses how much the zone and its components are exposed to external access. Consider all potential attack vectors (physical access, network access, etc.) and choose the lowest applicable degree of protection.
-
Individually rated
Number of assets that deviate from the zone default with respect to 'Business criticality' and/or 'Exposure'.
-
IP ranges
Number of different IP ranges created for this zone in step 2 of the Zone wizard.
-
Description
Free text to better identify the respective zone or to distinguish it from other zones.
Zone overview
The zone overview displays tiles for 'Unassigned assets' ①, 'Disregarded assets' ②, and manually created zones ⑦. The 'Zone wizard' allows for the creation of new zones ⑤ and modification of existing ones.
| Tile | Place for assets that... | Risk level... |
|---|---|---|
| 'Unassigned assets' ① | … have been newly added to the inventory or removed from 'Disregarded assets' or a zone | … is 'Undefined' for each asset, as 'Business criticality' and 'Exposure' cannot be determined |
| 'Disregarded assets' ② | … should be excluded from calculations and not considered in reports and KPIs/counters | … is not calculated, as the assets are meant to be ignored |
| Manually created zone ⑦ | … are part of a logical group within the facility and are often viewed and managed together | … is calculated and can be either 'Low', 'Medium', 'High', or 'Critical' |
Important values for each zone are displayed on the front and back of the respective tile (accessible via the buttons 'Flip view' ⑫ and 'Flip all' ④).
| Number | Element |
|---|---|
| ① | 'Unassigned assets' tile |
| ② | 'Disregarded assets' tile |
| ③ | Sort order selection button |
| ④ | 'Flip all' button |
| ⑤ | 'Create zone' button |
| ⑥ | Input field for filtering the zones |
| ⑦ | Area with manually created zones |
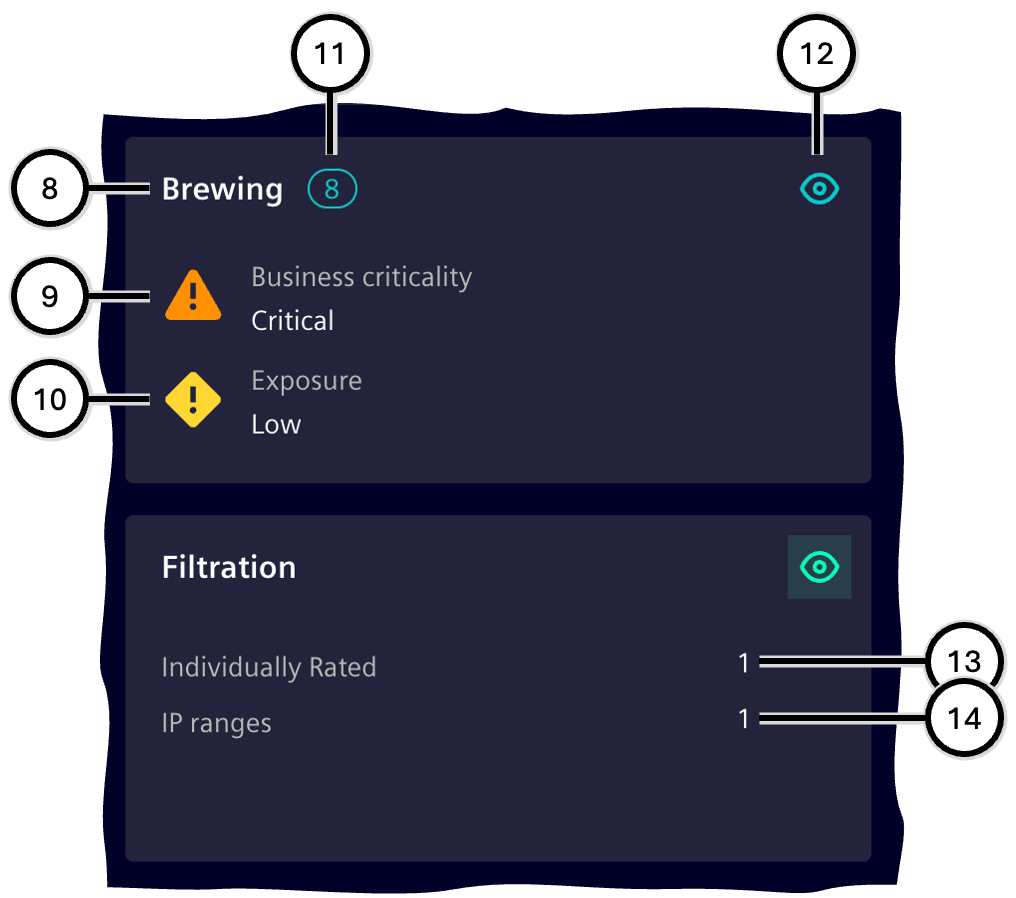
| Number | Element |
|---|---|
| ⑧ | Name of the zone |
| ⑨ | 'Business criticality' of the zone |
| ⑩ | 'Exposure' of the zone |
| ⑪ | Number of assets in this zone |
| ⑫ | 'Flip view' button |
| ⑬ | Individually rated |
| ⑭ | Number of 'IP ranges' |
Zone details
Zone details contain all zone-related values and offer functions to change the state of the zone. Clicking the button ① takes you back to the 'Zone overview'. The asset list ⑧ includes assets assigned to the zone.
The value 'Zone default' indicates that the asset adheres to the respective default value defined for the zone ⑥. An entry other than 'Zone default' means that a different value has been specified for this asset, counting it as 'Individually rated'. To better identify such non-default assets and, if necessary, reequip them with default settings, the 'Individually rated' button filters out assets with two default values.
A manually created zone can be modified via the 'Edit zone' button ④ and removed via the 'Delete zone' button ⑤.
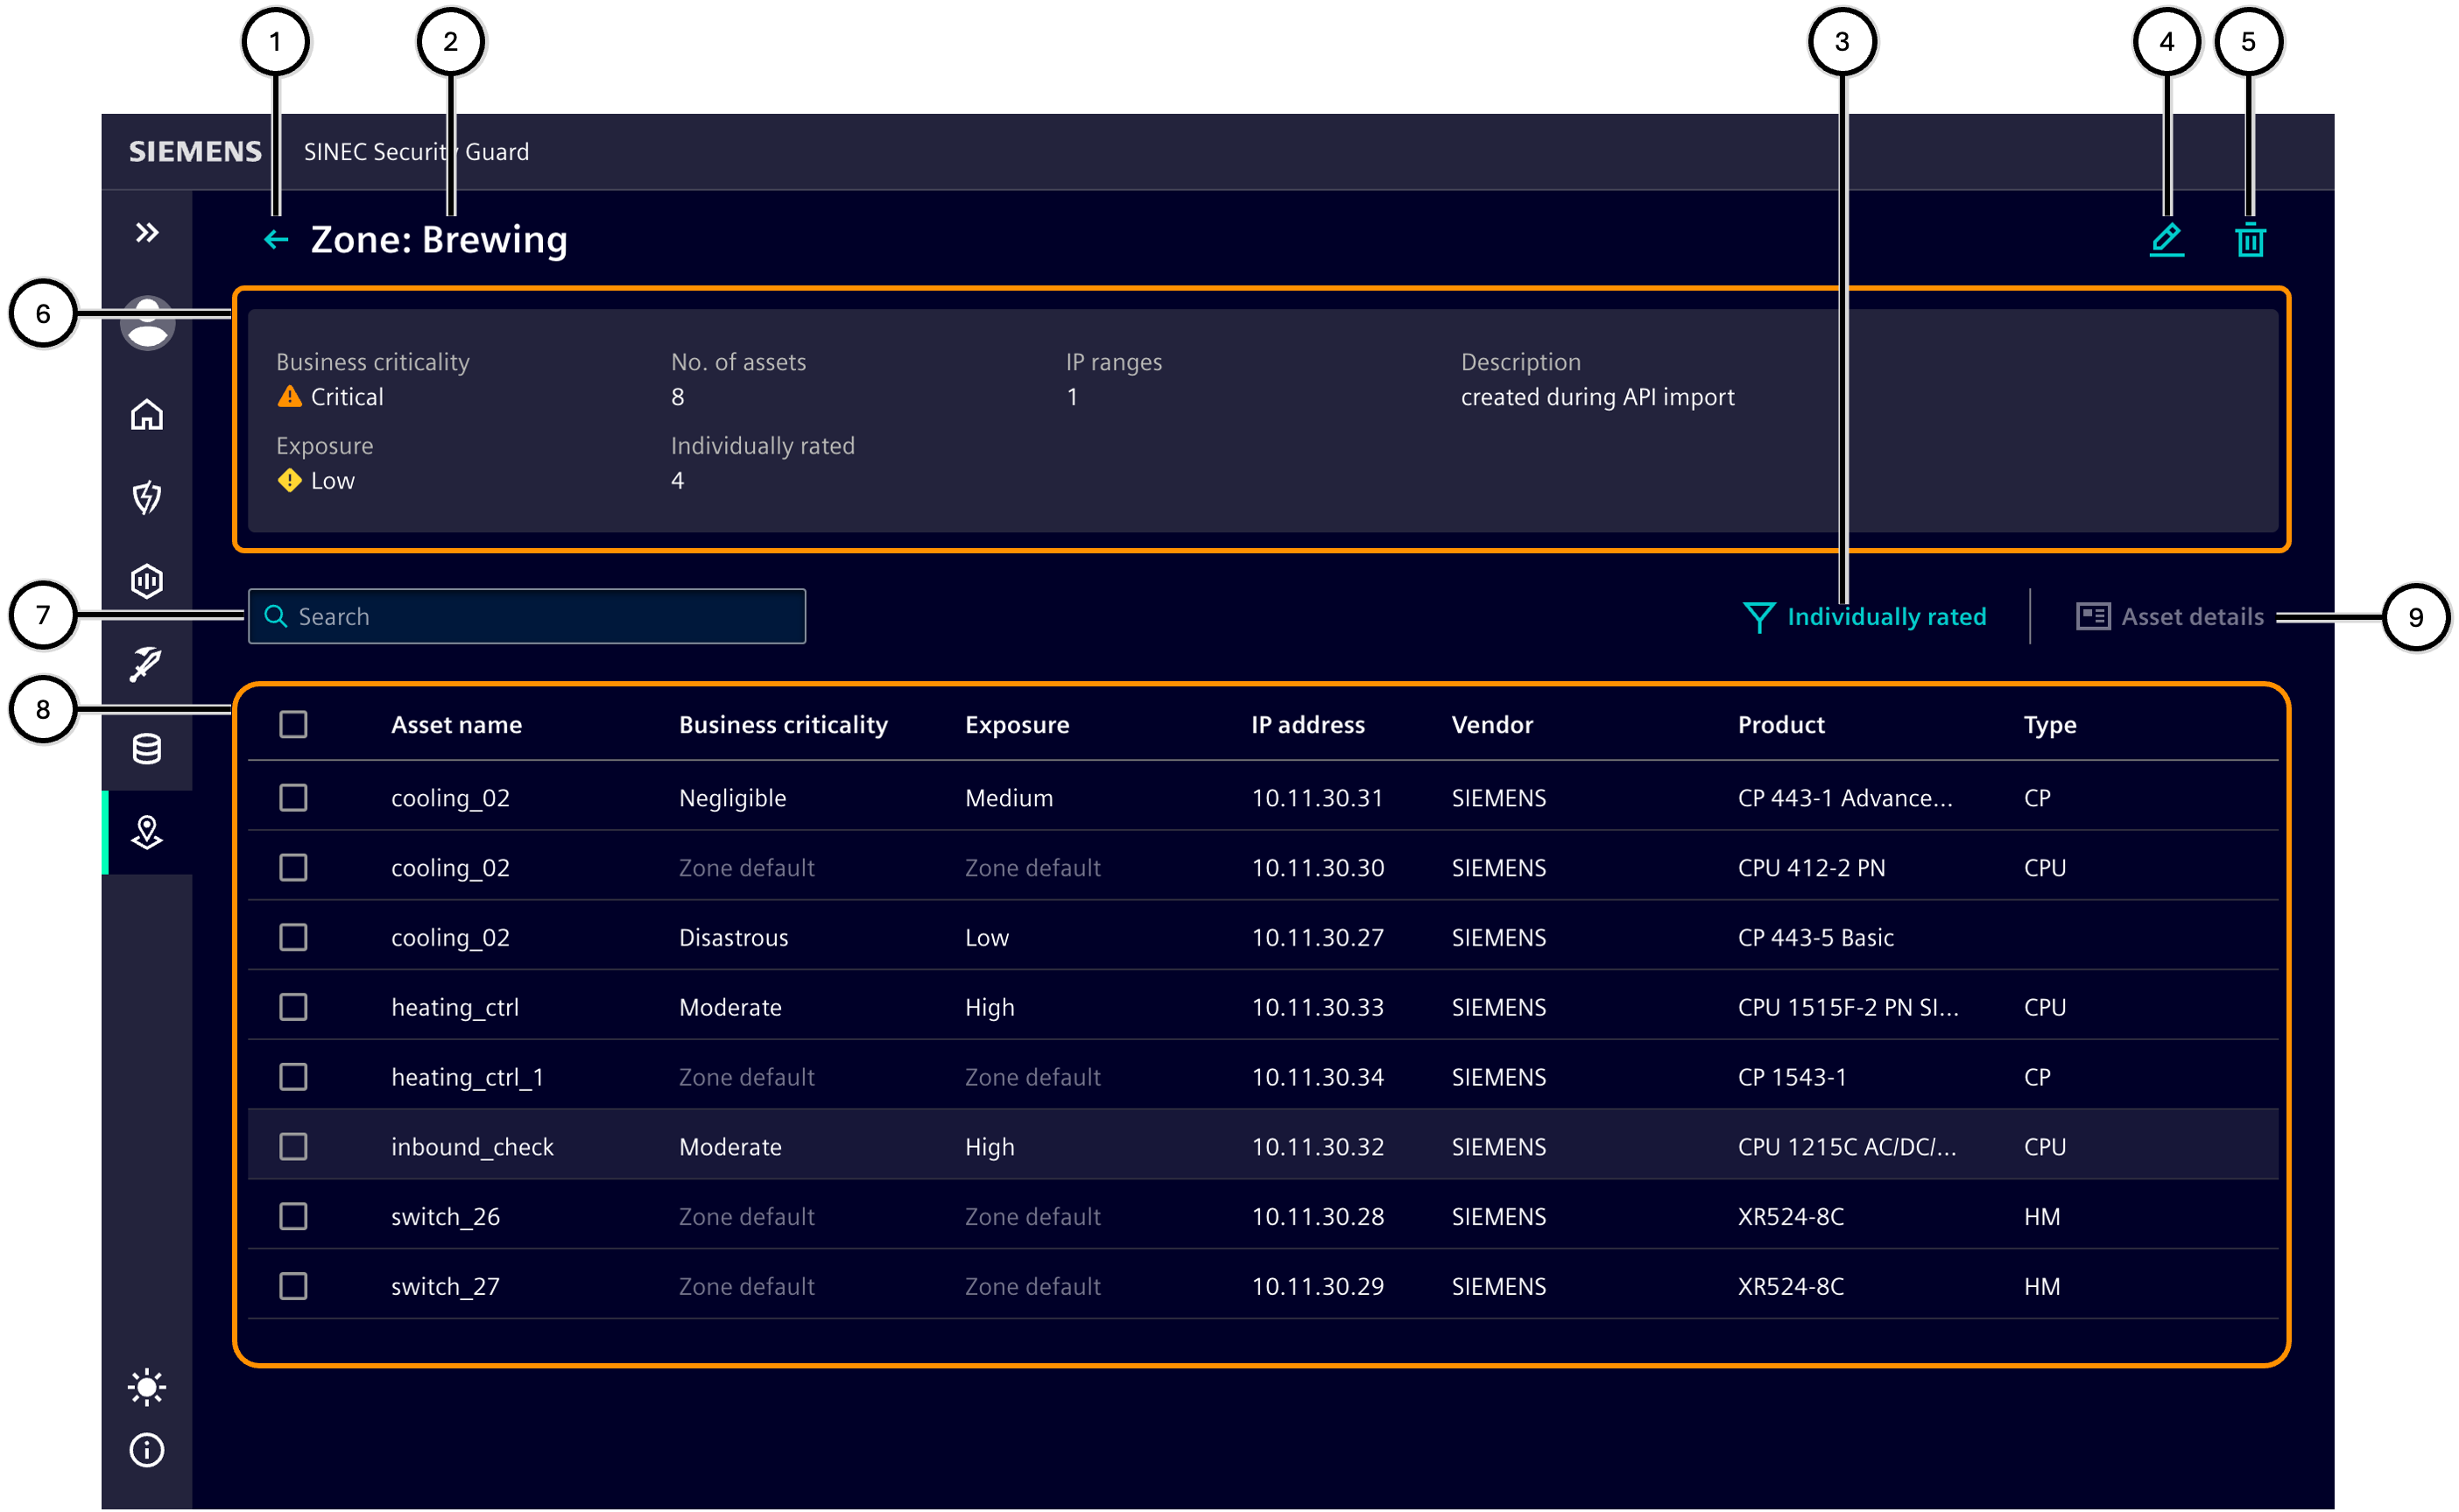
| Number | Element |
|---|---|
| ① | Button for navigation to the 'Zone overview' |
| ② | Name of the selected zone |
| ③ | Button to display only those assets that are individually rated |
| ④ | 'Edit zone' button |
| ⑤ | 'Delete zone' button |
| ⑥ | Zone information |
| ⑦ | Input field for filtering assets |
| ⑧ | List of assets in the selected zone |
| ⑨ | Display of asset details |
Zone wizard
The 'Zone wizard' guides you through all the necessary steps when manually creating a new zone and also when editing an existing zone. You can switch to the respective step by clicking on a step or using the navigation buttons (⑥, ⑦):
-
Zone definition
-
IP range
-
Individual assets
-
Summary
The status of each step is displayed as follows (here using the example of the 'IP range' step: top row in 'unselected' status, bottom row in 'selected' status):
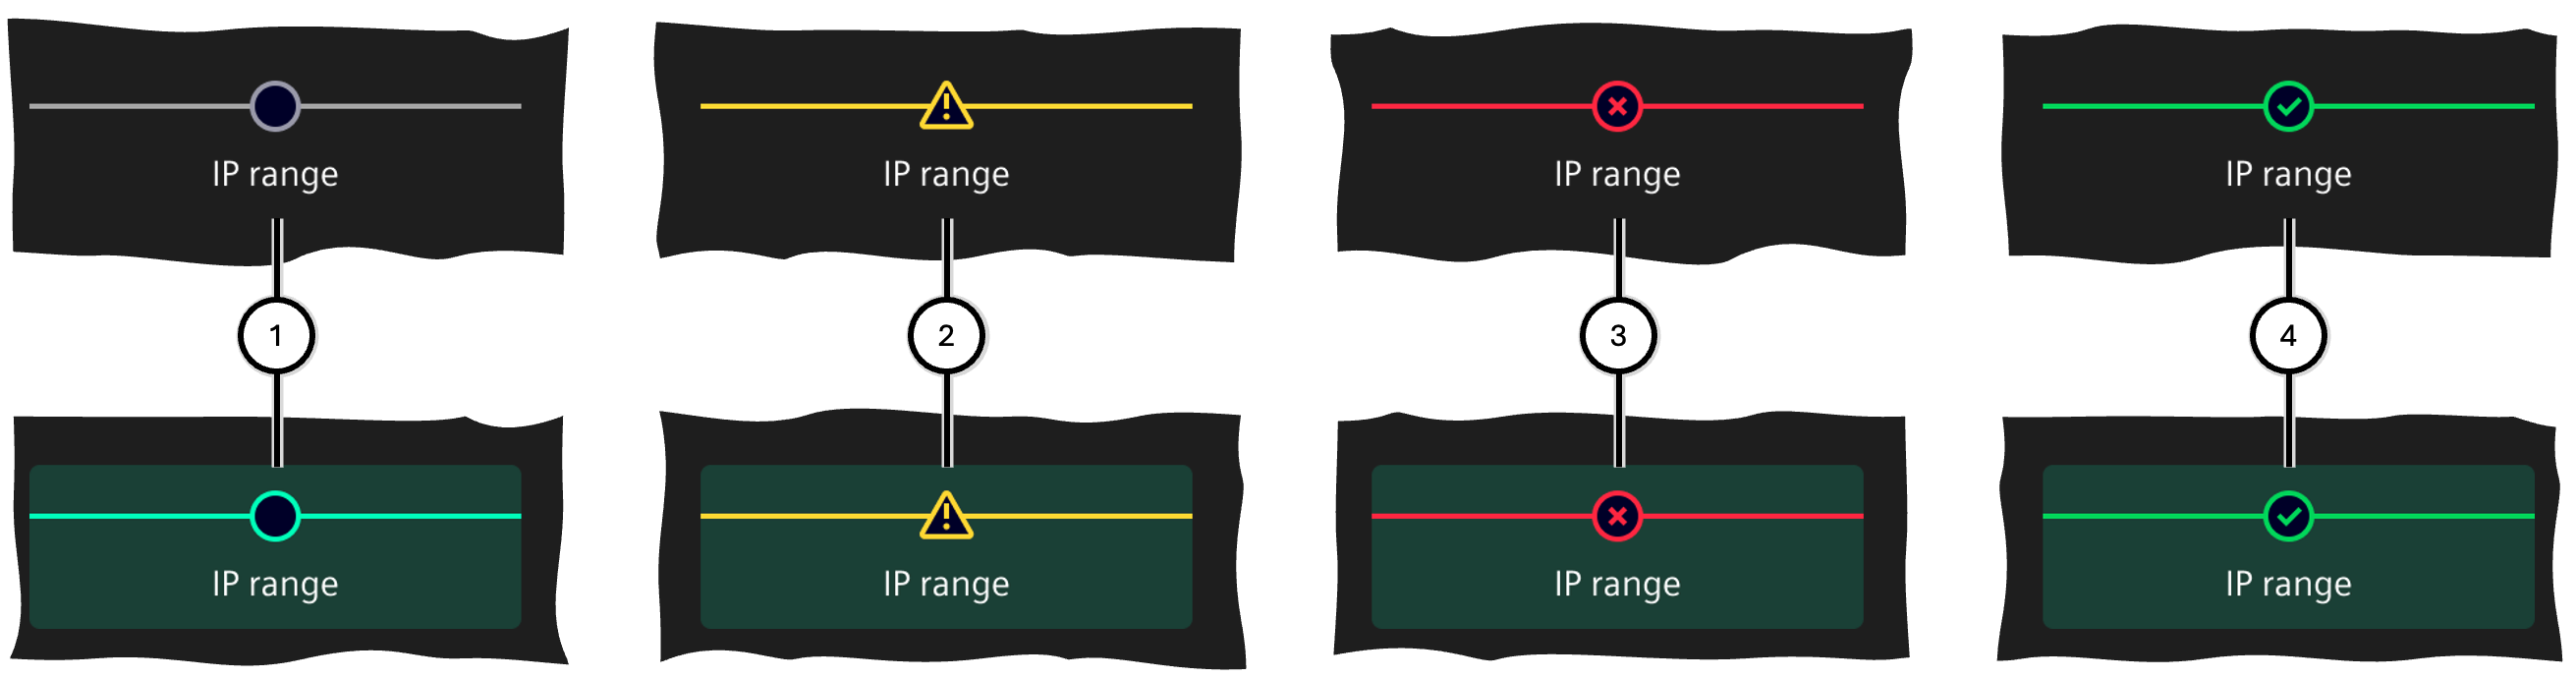
| Number | Status | Description |
|---|---|---|
| ① | Open | This step has not yet been processed |
| ② | Warning | This step contains data that needs attention |
| ③ | Error | This step contains one or more errors and prevents the wizard from completing |
| ④ | Successful | This step has been successfully completed |
The buttons for navigating through the 'Zone wizard' support you in step-by-step editing.
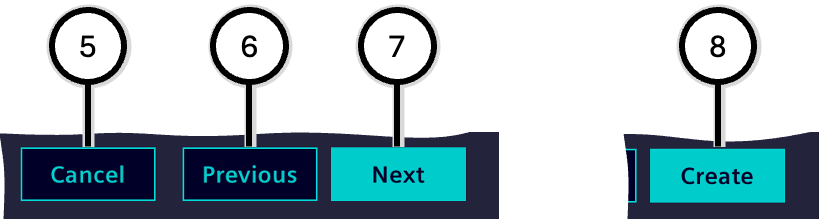
| Number | Action | Description |
|---|---|---|
| ⑤ | Cancel | Ends the 'Zone wizard' without creating a new zone; entered data will be discarded |
| ⑥ | Previous | Moves to the previous step (available from step 2 onwards) |
| ⑦ | Next | Moves to the following step (available until the penultimate step) |
| ⑧ | Create | Ends the 'Zone wizard' and creates a new zone with the entered data (only available in the last step) |
Zone definition
In this step, basic information about the zone is defined:
-
Zone name ②
The name of the zone. At least one character must be entered, and the zone name must not already be assigned to another zone.
-
Business criticality (③ - 'Negligible', 'Moderate', 'Critical', 'Disastrous')
Expresses how bad a failure or insecure operation of the zone and its assets would be for the operation of the facility or the achievement of the production outcome.
-
Exposure (④ - 'Low', 'Medium', 'High')
Expresses how much the zone and its components are exposed to external access; all possible attack vectors (physical access, network access, etc.) should be considered and the absolutely lowest applicable protection level should be entered.
-
Description ⑤
A text that explains the characteristics of the zone.
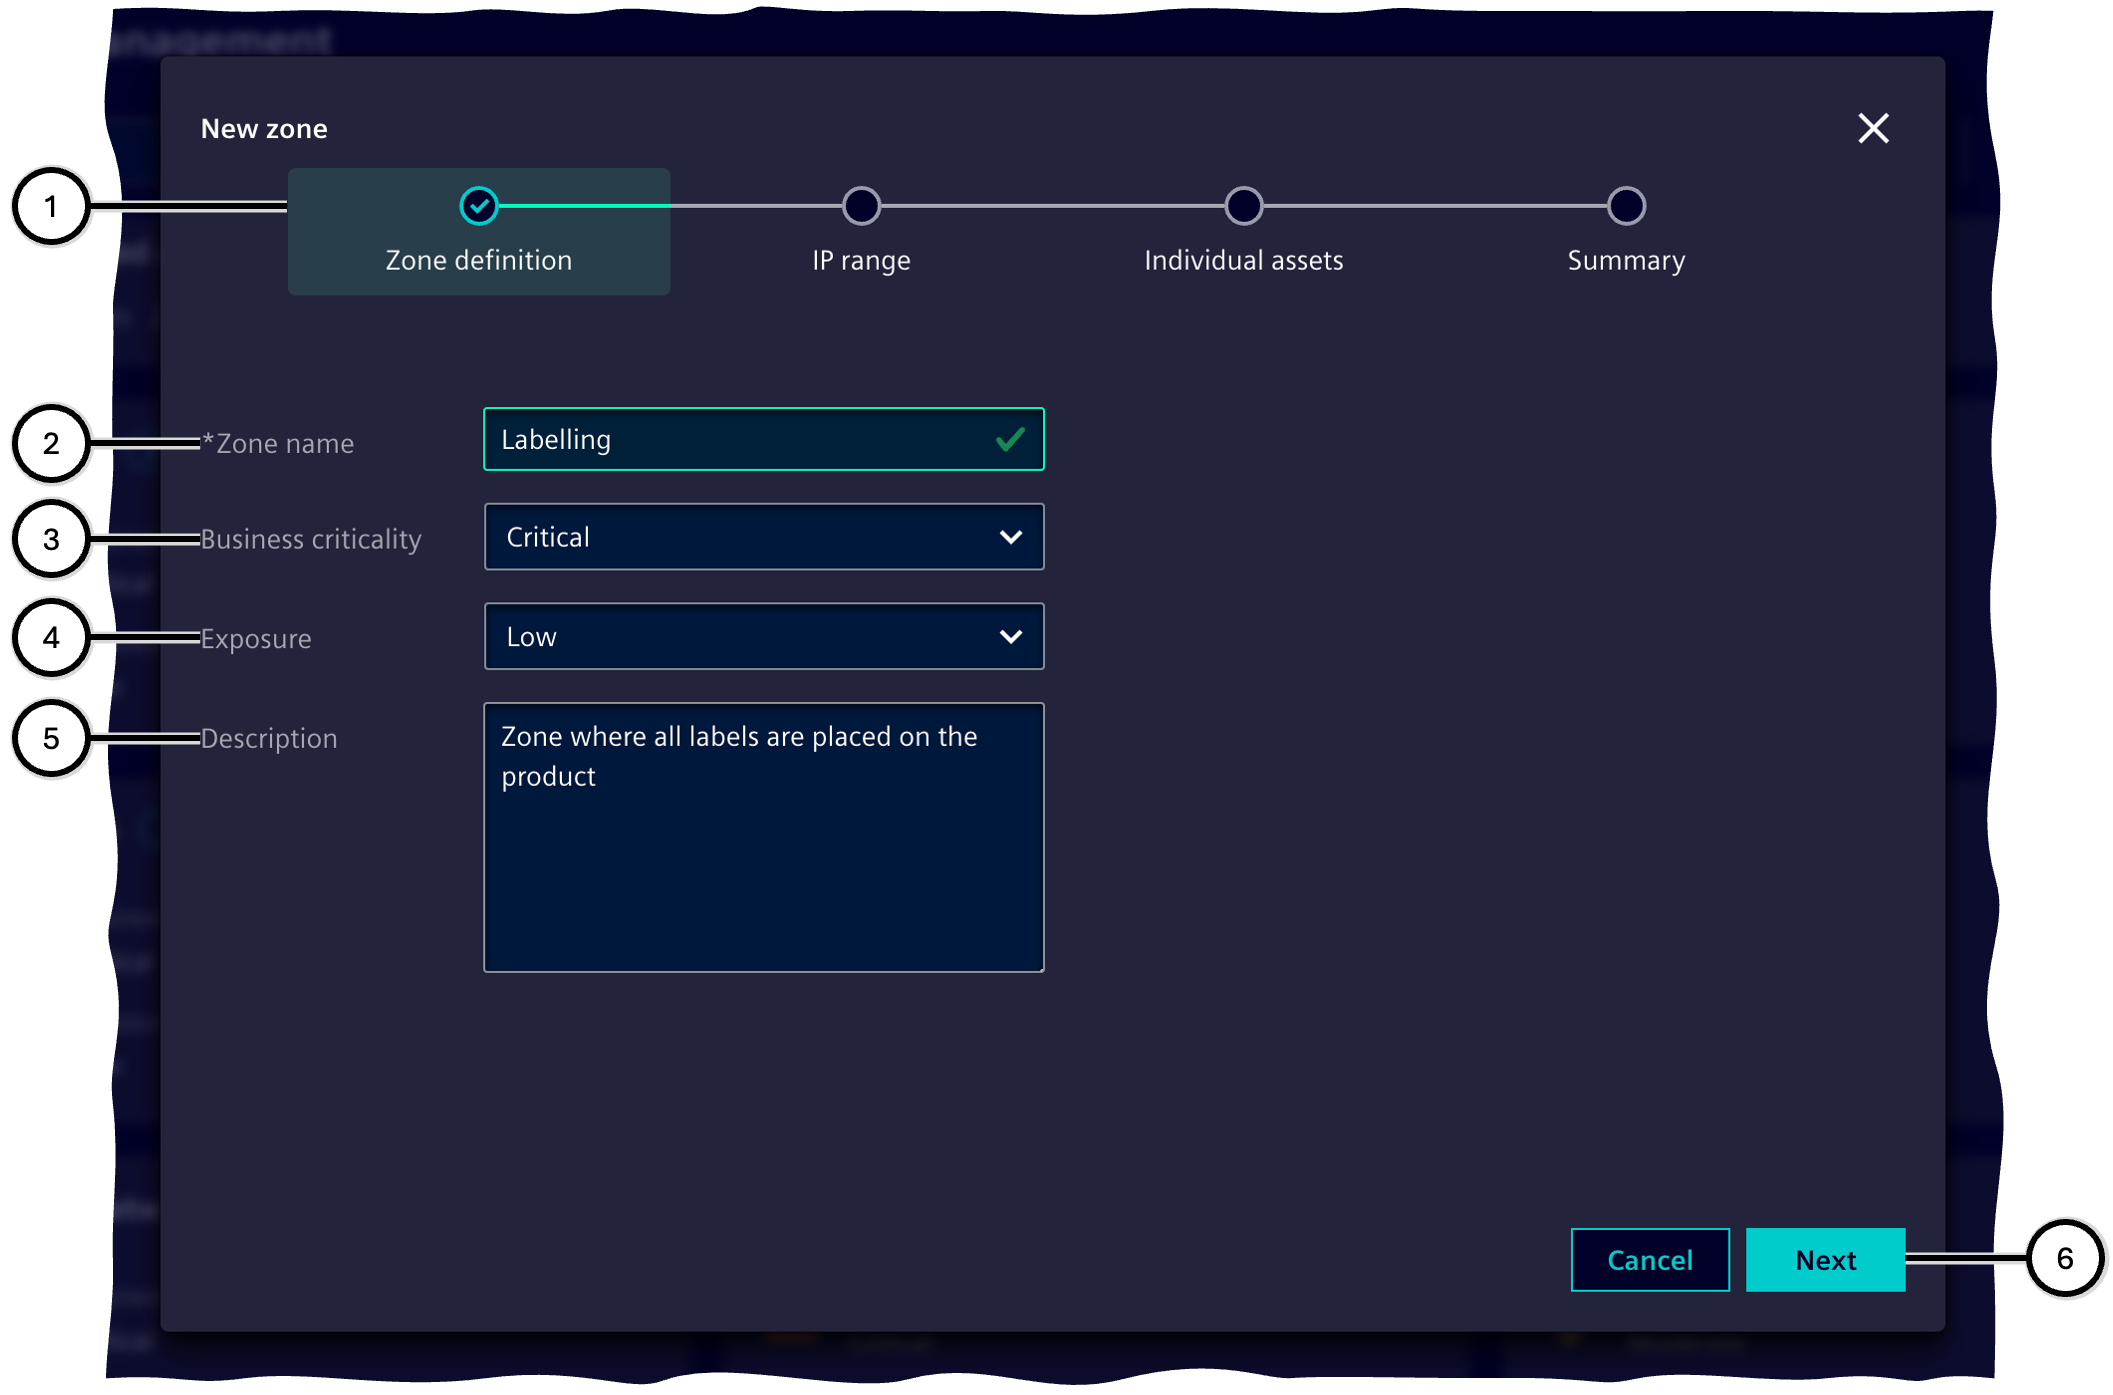
| Number | Element |
|---|---|
| ① | Steps of the 'Zone wizard' |
| ② | Zone name |
| ③ | Business criticality |
| ④ | Exposure |
| ⑤ | Description |
| ⑥ | Buttons for navigating through the 'Zone wizard' |
IP range
In this step, assets are added to the zone based on their belonging to an IP range.
Note Assets that are part of an IP range of the current zone and have been manually added to its exclusion list in step 'IP range' will not be listed in the step 'Individual assets'.
Any number of IP ranges ⑤ can be defined according to the IPv4 or IPv6 protocols (③, ⑥); the start IP address (⑧) and end IP address (⑨) are required for this. See also Checking user input.
IP ranges can be duplicated and also deleted (⑫, ⑬).
All assets that have at least one IP address in an IP range are automatically assigned to this range. If the IP address displayed with an asset is not in the IP range, the asset has other IP addresses, at least one of which is in the IP range.
The assignment of assets in an IP range to the zone can then be adjusted manually ⑪. For each IP range, it is shown how many assets from the IP range are actually assigned to the zone and how many assets are within the start and end addresses in principle ⑩.
The assignment of assets offers these lists:
-
Exclusion list ⑯
These assets are not assigned to the zone and remain part of the unassigned assets.
-
Assignment list ⑰
These assets are part of the zone.
It is possible to move all assets in a list ⑱ or individual assets ⑲ to the other list. The manufacturer, asset name and IP address are displayed for each asset ⑳. An input field ⑮ makes it possible to find specific assets within the lists (⑯, ⑰). The sorting of the assets can be changed (㉒).
| Number | Element |
|---|---|
| ① | Steps of the 'Zone wizard' |
| ② | Display of defined IP ranges |
| ③ | Button to create a new IP range |
| ④ | Buttons for navigation through the Zone wizard |
| Number | Element |
|---|---|
| ⑤ | IP range, consisting of start and end IP address |
| ⑥ | Button to create a new IP range |
| ⑦ | Total individual assets assigned via at least one IP range |
| ⑧ | Input field for start IP address |
| ⑨ | Input field for end IP address |
| ⑩ | Number of assigned assets |
| ⑪ | Button for navigation to manual assignment of assets |
| ⑫ | Button to display the menu |
| ⑬ | Menu with options |
| Number | Element |
|---|---|
| ⑭ | Button for navigation back to the display of IP ranges, as well as information on the selected IP range |
| ⑮ | Input field for searching assets within the IP range |
| ⑯ | List of assets to be excluded from this IP range |
| ⑰ | List of assets to be assigned to this IP range |
| ⑱ | Button to move all assets from the respective list to the other list (⑯/⑰) |
| ⑲ | Button to move this asset from the current list to the other list |
| ⑳ | Information on the asset (manufacturer, asset name, IP address) |
| ㉑ | Number of assets in the respective list |
| ㉒ | Button to adjust the sorting order |
Individual assets
In this step, assets are added to the zone that are searched for by criteria other than their IP address, e.g., by name or product type.
Note Assets that are part of an IP range of the current zone and have been manually added to its exclusion list in step 'IP range' will not be listed in the step 'Individual assets'.
The functionality of this step largely corresponds to that of the last dialog of IP range. Differences are:
-
The step does not use IP ranges and therefore does not offer navigation to a parent dialog.
-
The left list ④ shows unassigned assets instead of excluded assets.
| Number | Description |
|---|---|
| ① | Steps of the 'Zone wizard' |
| ② | Display of unassigned assets and manually added assets |
| ③ | Input field for searching assets within the IP range |
| ④ | List of unassigned assets |
| ⑤ | List of manually added assets |
| ⑥ | Button to move all assets from the respective list over to the other list (④/⑤) |
| ⑦ | Button to move this asset from the current over to the other list |
| ⑧ | Information on the asset (manufacturer, asset name, IP address) |
| ⑨ | Number of assets in the respective list |
| ⑩ | Button to adjust the sorting order |
Summary
In this step, the information on the zone definition is summarized before the data is finally confirmed and the zone is created. This step does not offer its own interaction possibilities.
The information on assigned assets ③ shows how many assets were added via IP ranges, how many were added via individually, and how many assets belong to this zone in total.
The information on the defined IP ranges ④ displays the individual IP ranges. For each IP range, the start and end IP address, the number of added, and the total number of assets belonging to the IP range are shown.
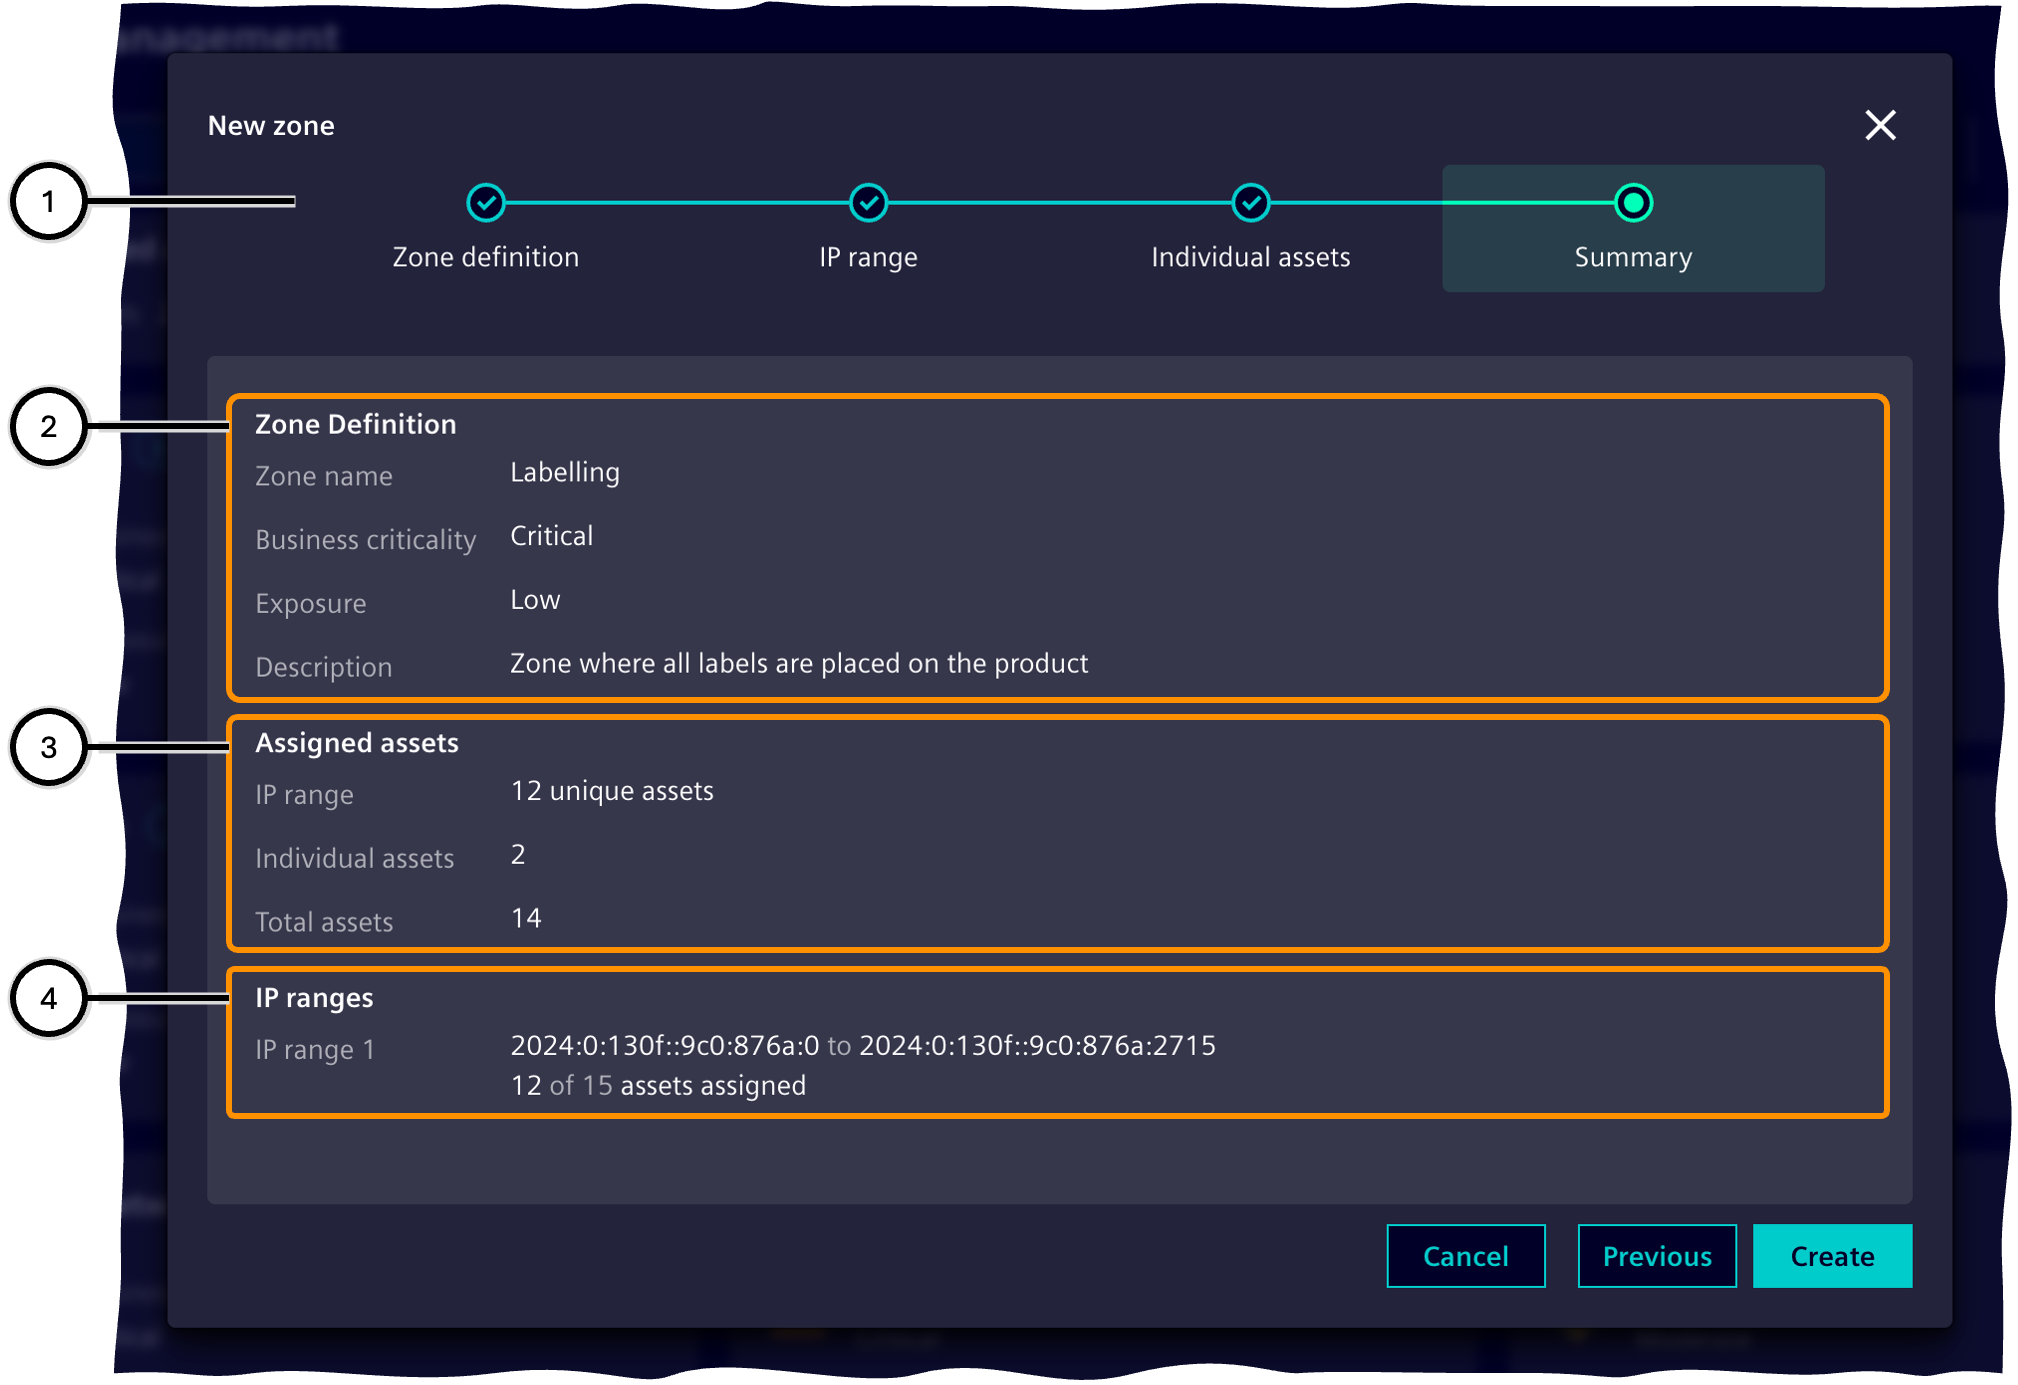
| Number | Description |
|---|---|
| ① | Steps of the 'Zone wizard' |
| ② | Information on the zone definition |
| ③ | Information on assigned assets |
| ④ | Information on the defined IP ranges |
Vulnerability feeds
This area lists all vulnerability feeds which are used by SINEC Security Guard - both vulnerability feeds which are native part of SINEC Security Guard and vulnerability feed which became added to your tenant manually. A vulnerability feed is a source of information about vulnerabilities of products and assets. Vulnerability feeds are required to equip SINEC Security Guard with information about vulnerabilities in the given inventory. Vulnerability feeds are compiled by manufacturers, vendors, organizations, or other stakeholders.
SINEC Security Guard allows to incorporate vulnerability feeds ④ that use the standardized CSAF format. This format enables to map huge amounts of vulnerability information onto a given inventory, including recommendations on how to deal with each specific vulnerability of a product.
Each vulnerability feed indicates its publisher ⑦, the URL ⑧, and the date when information was retrieved last ⑨ as well as the amount of vulnerabilities which came by that retrieval ⑩.
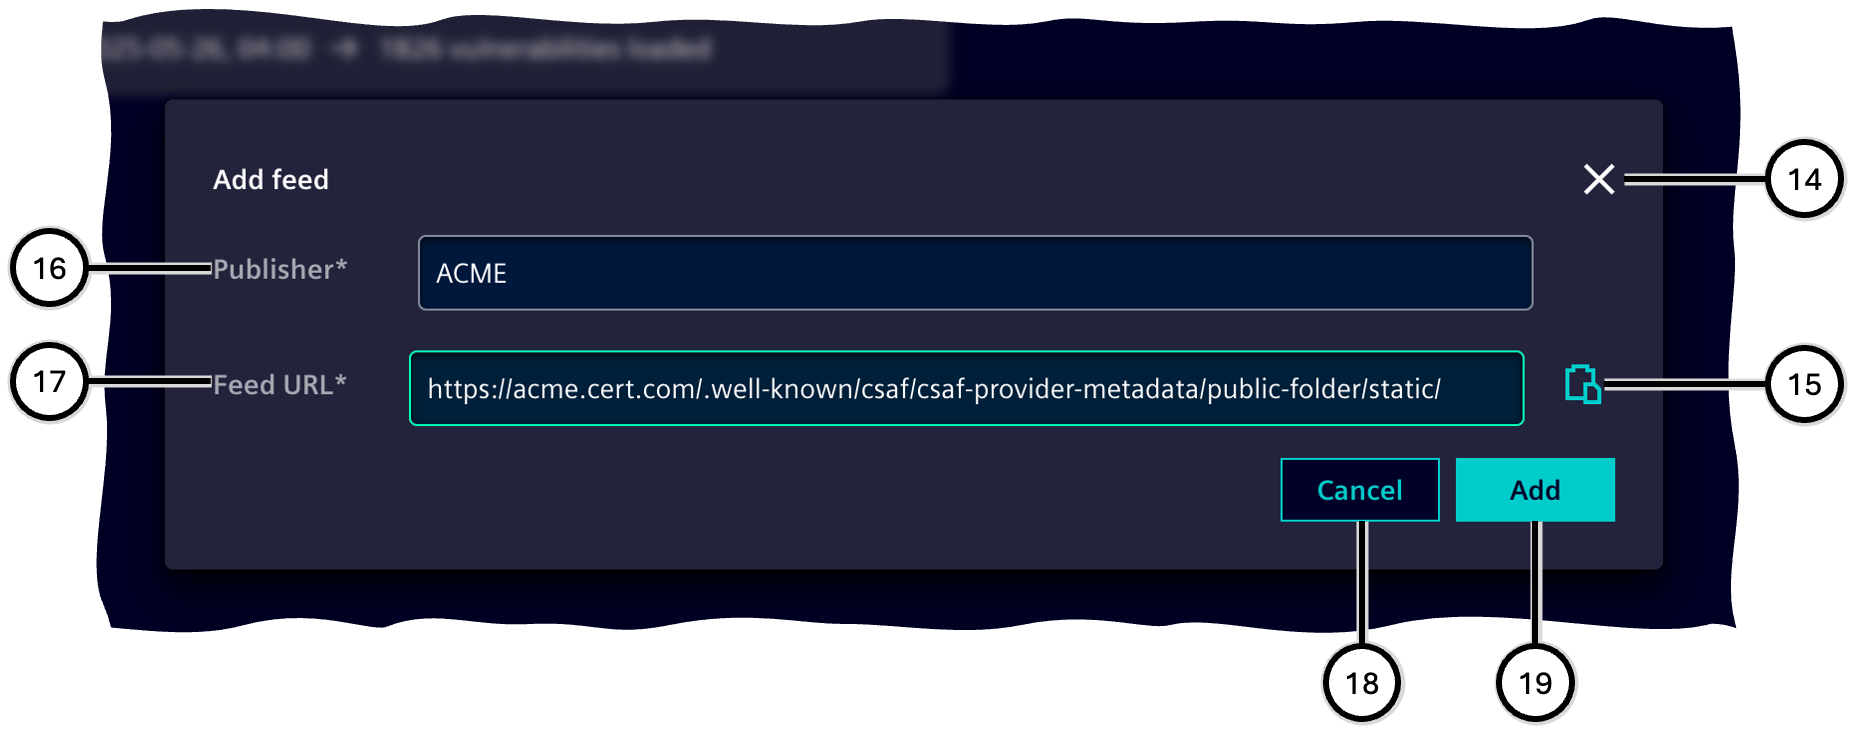
When adding a new vulnerability feed by using the add functionality ④, you need to enter the name of the publisher ⑯ (max. 64 characters) and the URL of the feed ⑰. You can get the URL directly from the publisher - in many cases these are the manufacturers/vendors of assets. You may type or paste ⑮ the URL in the respective input field.
Note After adding a new vulnerability feed, vulnerability information is fetched from the new source ⑪. This process may take some minutes, and during this the new vulnerability feed cannot be deleted again.
The retrieval date will update each time the connection between SINEC Security Guard and the vulnerability feed had been established and information had been exchanged - independent of finding any new advisories for any of the assets in the inventory.
The copy button ⑥ copies the URL of the respective vulnerability feed into the clipboard - e.g. for usage in other tools.
The delete button ⑤ allows to delete a manually added vulnerability feed, so that no further information about vulnerabilities will be retrieved. Finally deleting a feed ㉒ will stop receiving vulnerabilities from this and will delete all associated vulnerabilities and related tasks.
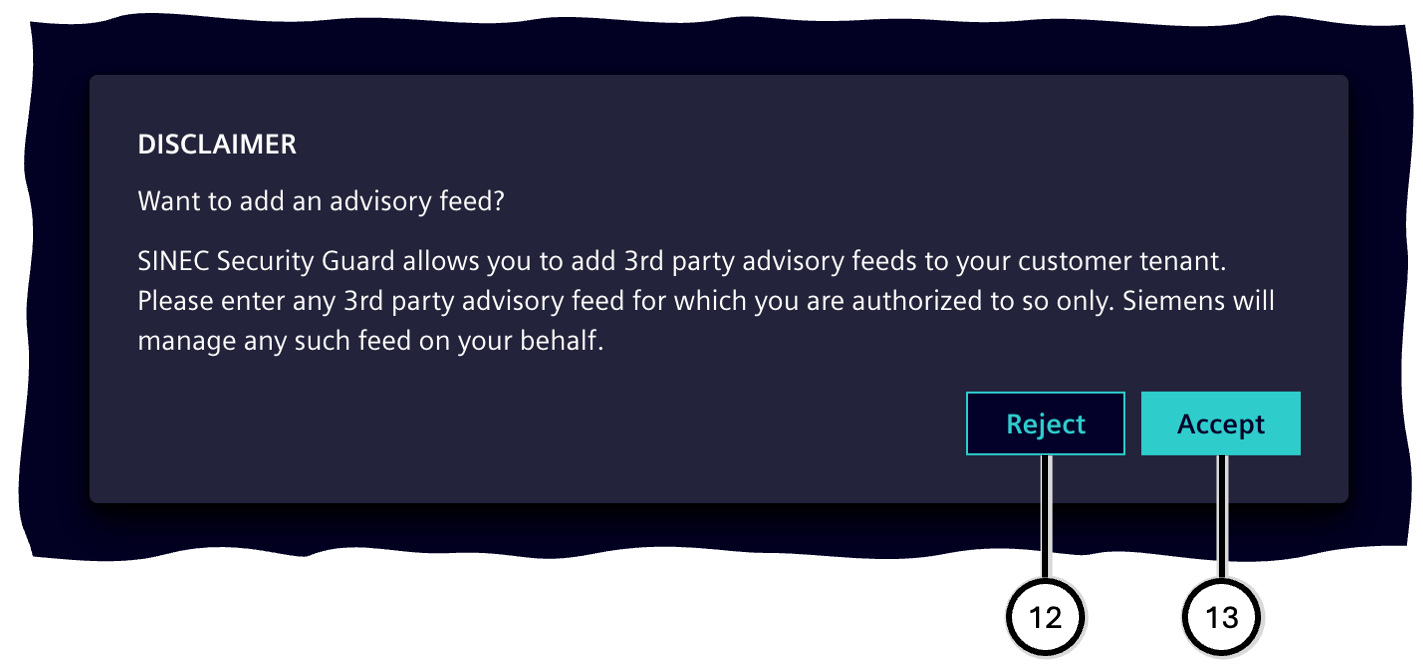
Note SINEC Security Guard allows you to add 3rd party advisory feeds to your customer tenant. Please enter any 3rd party advisory feed for which you are authorized to so only. Siemens will manage any such feed on your behalf. You need to accept these conditions ② to use 3rd party vulnerability feeds with SINEC Security Guard. A vulnerability may be communicated by several vulnerability feeds in parallel. A publisher may offer a vulnerability feed and use it to describe vulnerabilities for own products and/or for products of other manufacturers.
| Number | Description |
|---|---|
| ① | Total number of vulnerability feeds |
| ② | Search field |
| ③ | Indicator for manually added vulnerability feed |
| ④ | Add button |
| ⑤ | Delete button |
| ⑥ | Copy button |
| ⑦ | Publisher name |
| ⑧ | Feed URL |
| ⑨ | Date of latest retrieval |
| ⑩ | Number of vulnerabilities |
| ⑪ | Notification on fetching vulnerabilities |
| Number | Description |
|---|---|
| ⑫ | Button to reject conditions |
| ⑬ | Button to accept condition |
| Number | Description |
|---|---|
| ⑭ | Cancel button |
| ⑮ | Button to paste from clipboard |
| ⑯ | Input field for publisher name |
| ⑰ | Input field for feed URL |
| ⑱ | Button to cancel the adding process |
| ⑲ | Button to add the feed |
| Number | Description |
|---|---|
| ⑳ | Button to cancel the deletion process |
| ㉑ | Button to cancel the deletion process |
| ㉒ | Button to delete the feed |
Settings
This area allows to adapt SINEC Security Guard to personal preferences.
To close the settings, either navigate to another view or use the close button ④.
All settings apply immediately when selecting a given option.
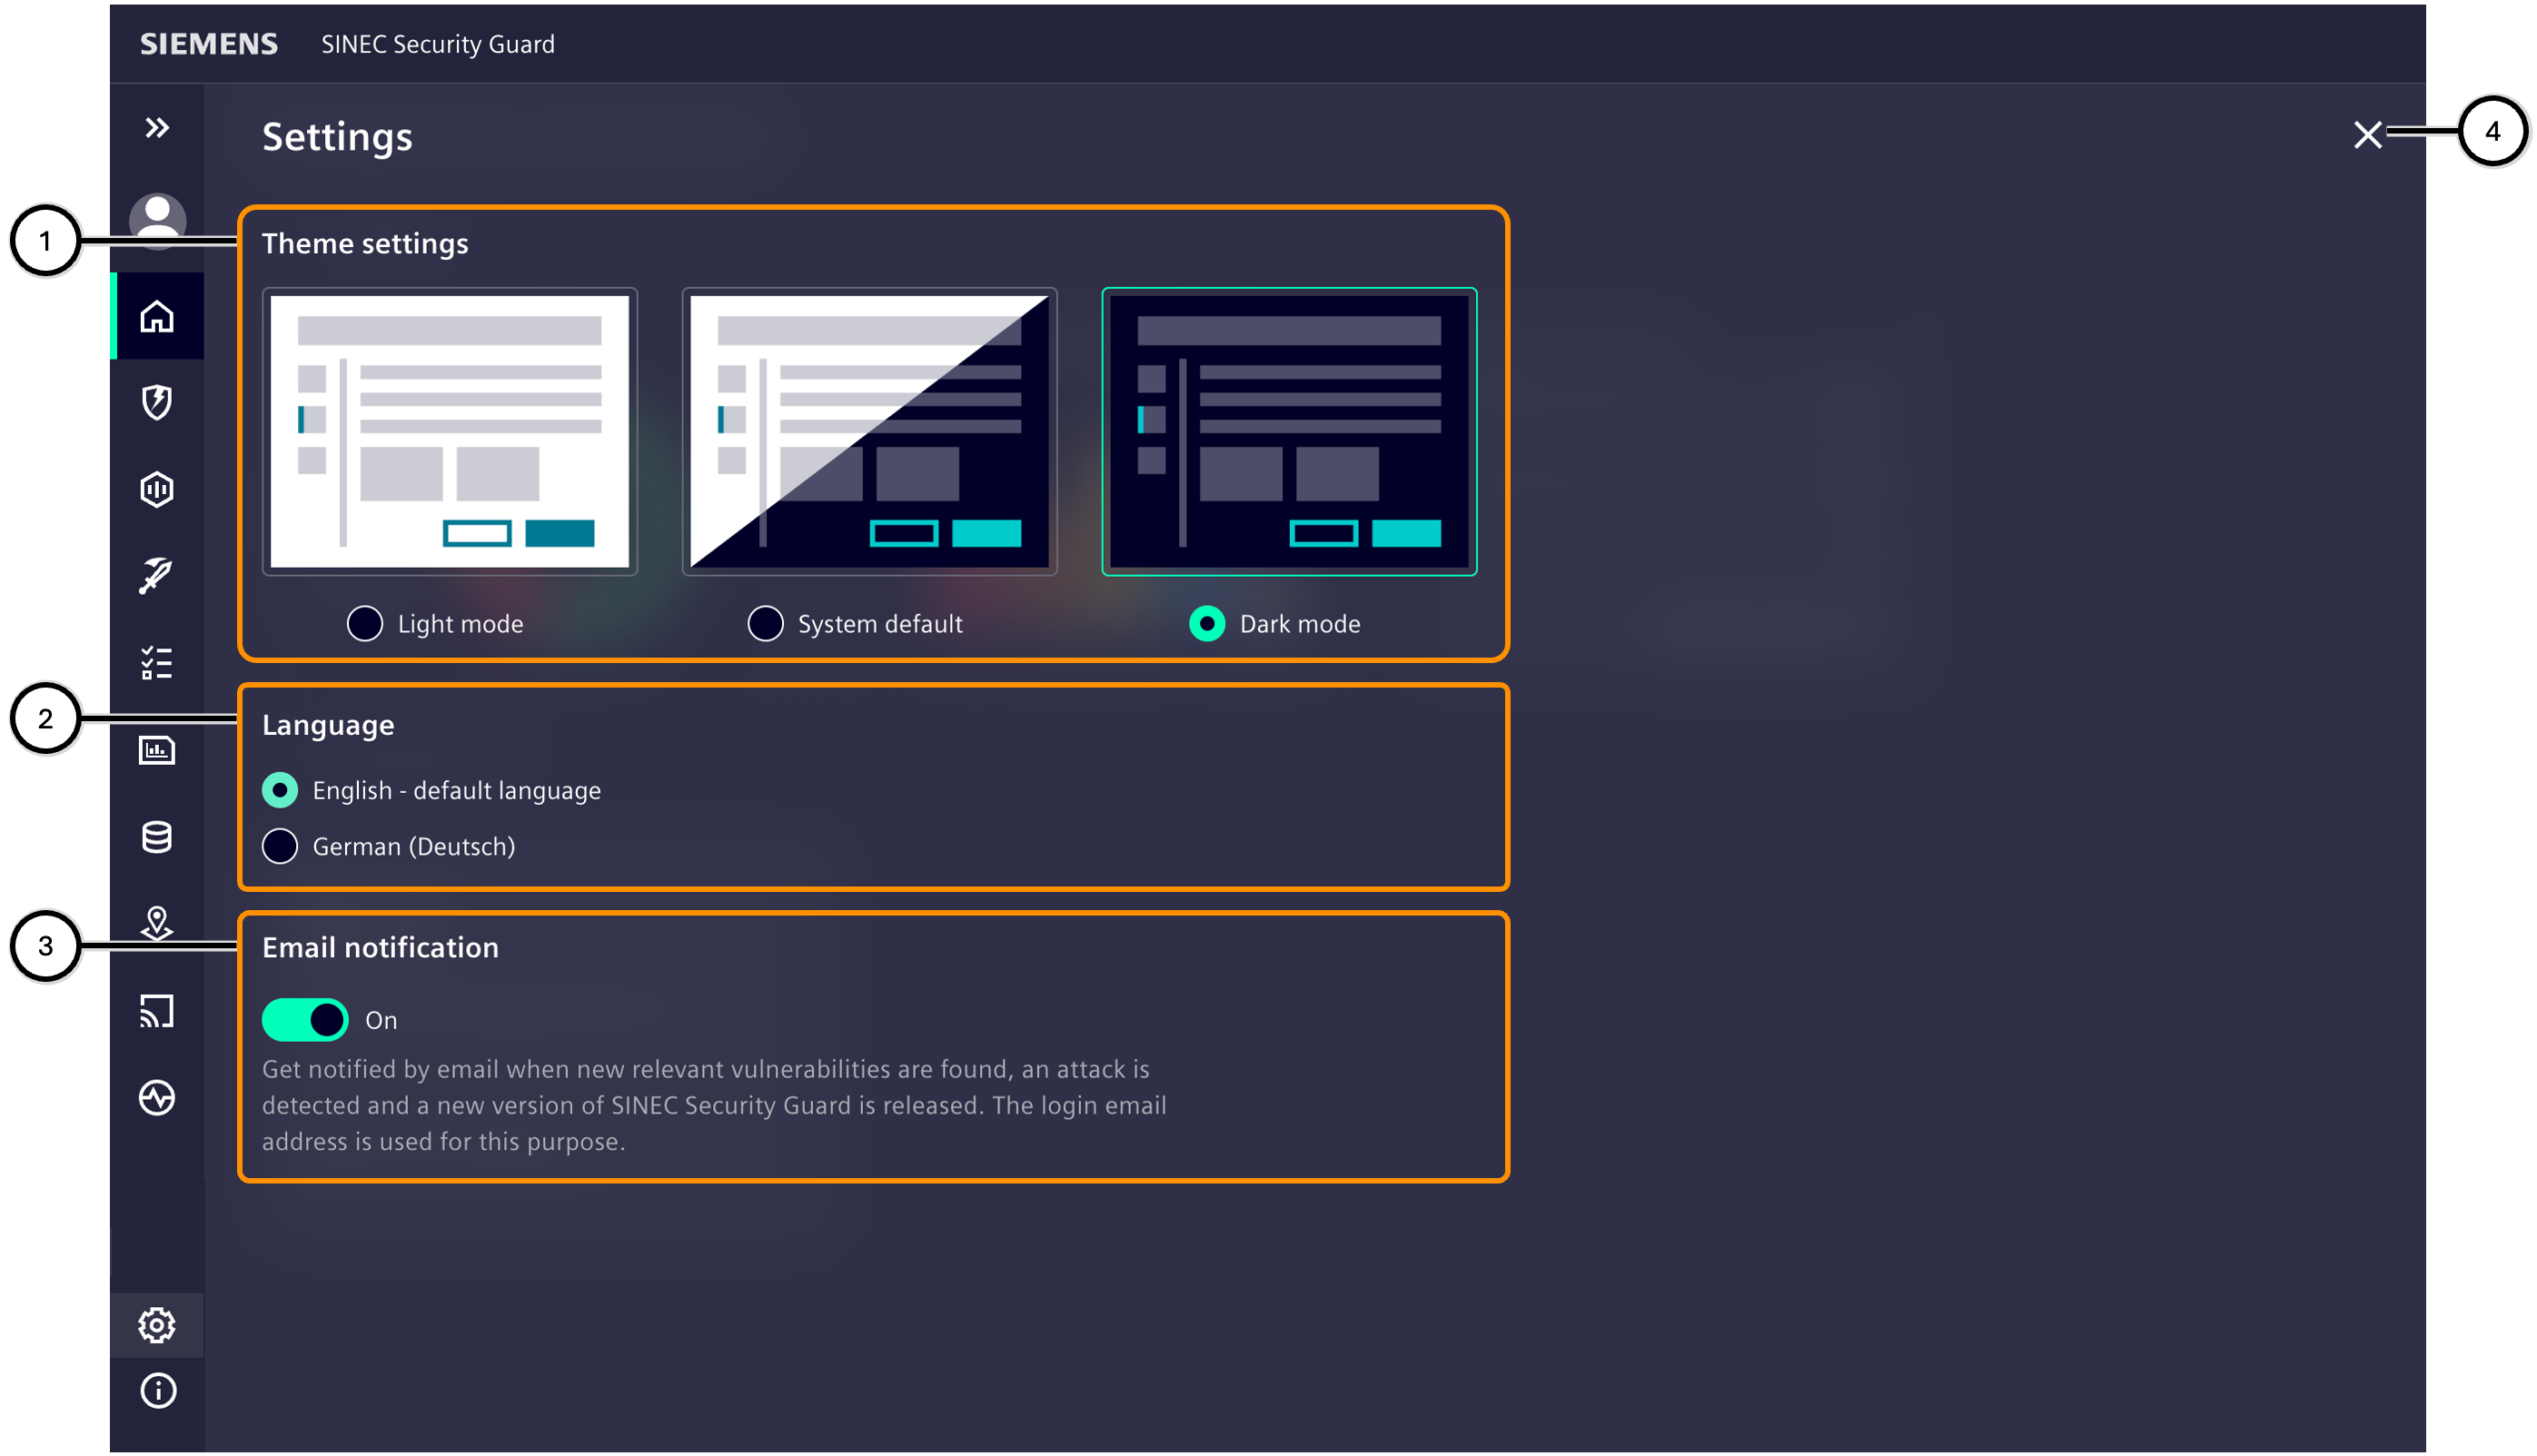
| Number | Description |
|---|---|
| ① | Theme settings |
| ② | Language settings |
| ③ | Delimiter for CSV files |
| ④ | Email notification |
| ⑤ | Button to close the settings view |
Note Settings for theme and language are stored in browser cache and so apply only to the device they are defined on. If using the browser in incognito mode, the settings are not stored in any way, and when starting SINEC Security Guard again, it will start with product default settings (theme: 'Light mode'; language: 'English'). Email notification settings are stored per user and apply for the entire user account.
Theme settings
There are several themes available for SINEC Security Guard which one can choose from by taste:
| Name | Description |
|---|---|
| Light mode | This mode may be preferred for usage in bright surroundings or during day times - or by personal taste. |
| System default | This mode automatically adapts to system settings of e.g. mobile devices which may recognize the current light situation (if technically equipped like that). |
| Dark mode | This mode may be preferred for usage in dark surroundings or at night - or by personal taste. |
Language
The user is free to choose a language the interface of SINEC Security Guard should be displayed in. Switching the language just takes seconds and does not require a restart.
Delimiter for CSV files
For any exports using the CSV format, the user here may define which character is used to separate cell data from each other. This helps when opening the exported CSV file with other applications.
Email notification
SINEC Security Guard sends emails about activities in the system. This behaviour can be adapted to personal needs, using the email notification setting in the settings. It can be changed whenever desired.
Any change will work for future notifications. If toggling from 'switched-off' status to 'switched-on' status, notifications for events which took place before switching the notifications on will not be sent again.
If you subscribe to the system emails service, you will receive notifications in these cases:
- New vulnerabilities are discovered on the uploaded assets
- SINEC Security Guard is updated to the next version
To prevent additional security risks, system emails do not contain detailed information about vulnerabilities or security events. For more information please log in to SINEC Security Guard.
About & legal information
This area shows information about the product SINEC Security Guard and legal matters. Use the info group navigation ① to switch between the offered content types.
Links ②, ⑤ will open in a separate browser tab.
To close about & legal information, either navigate to another view or use the close button ③.
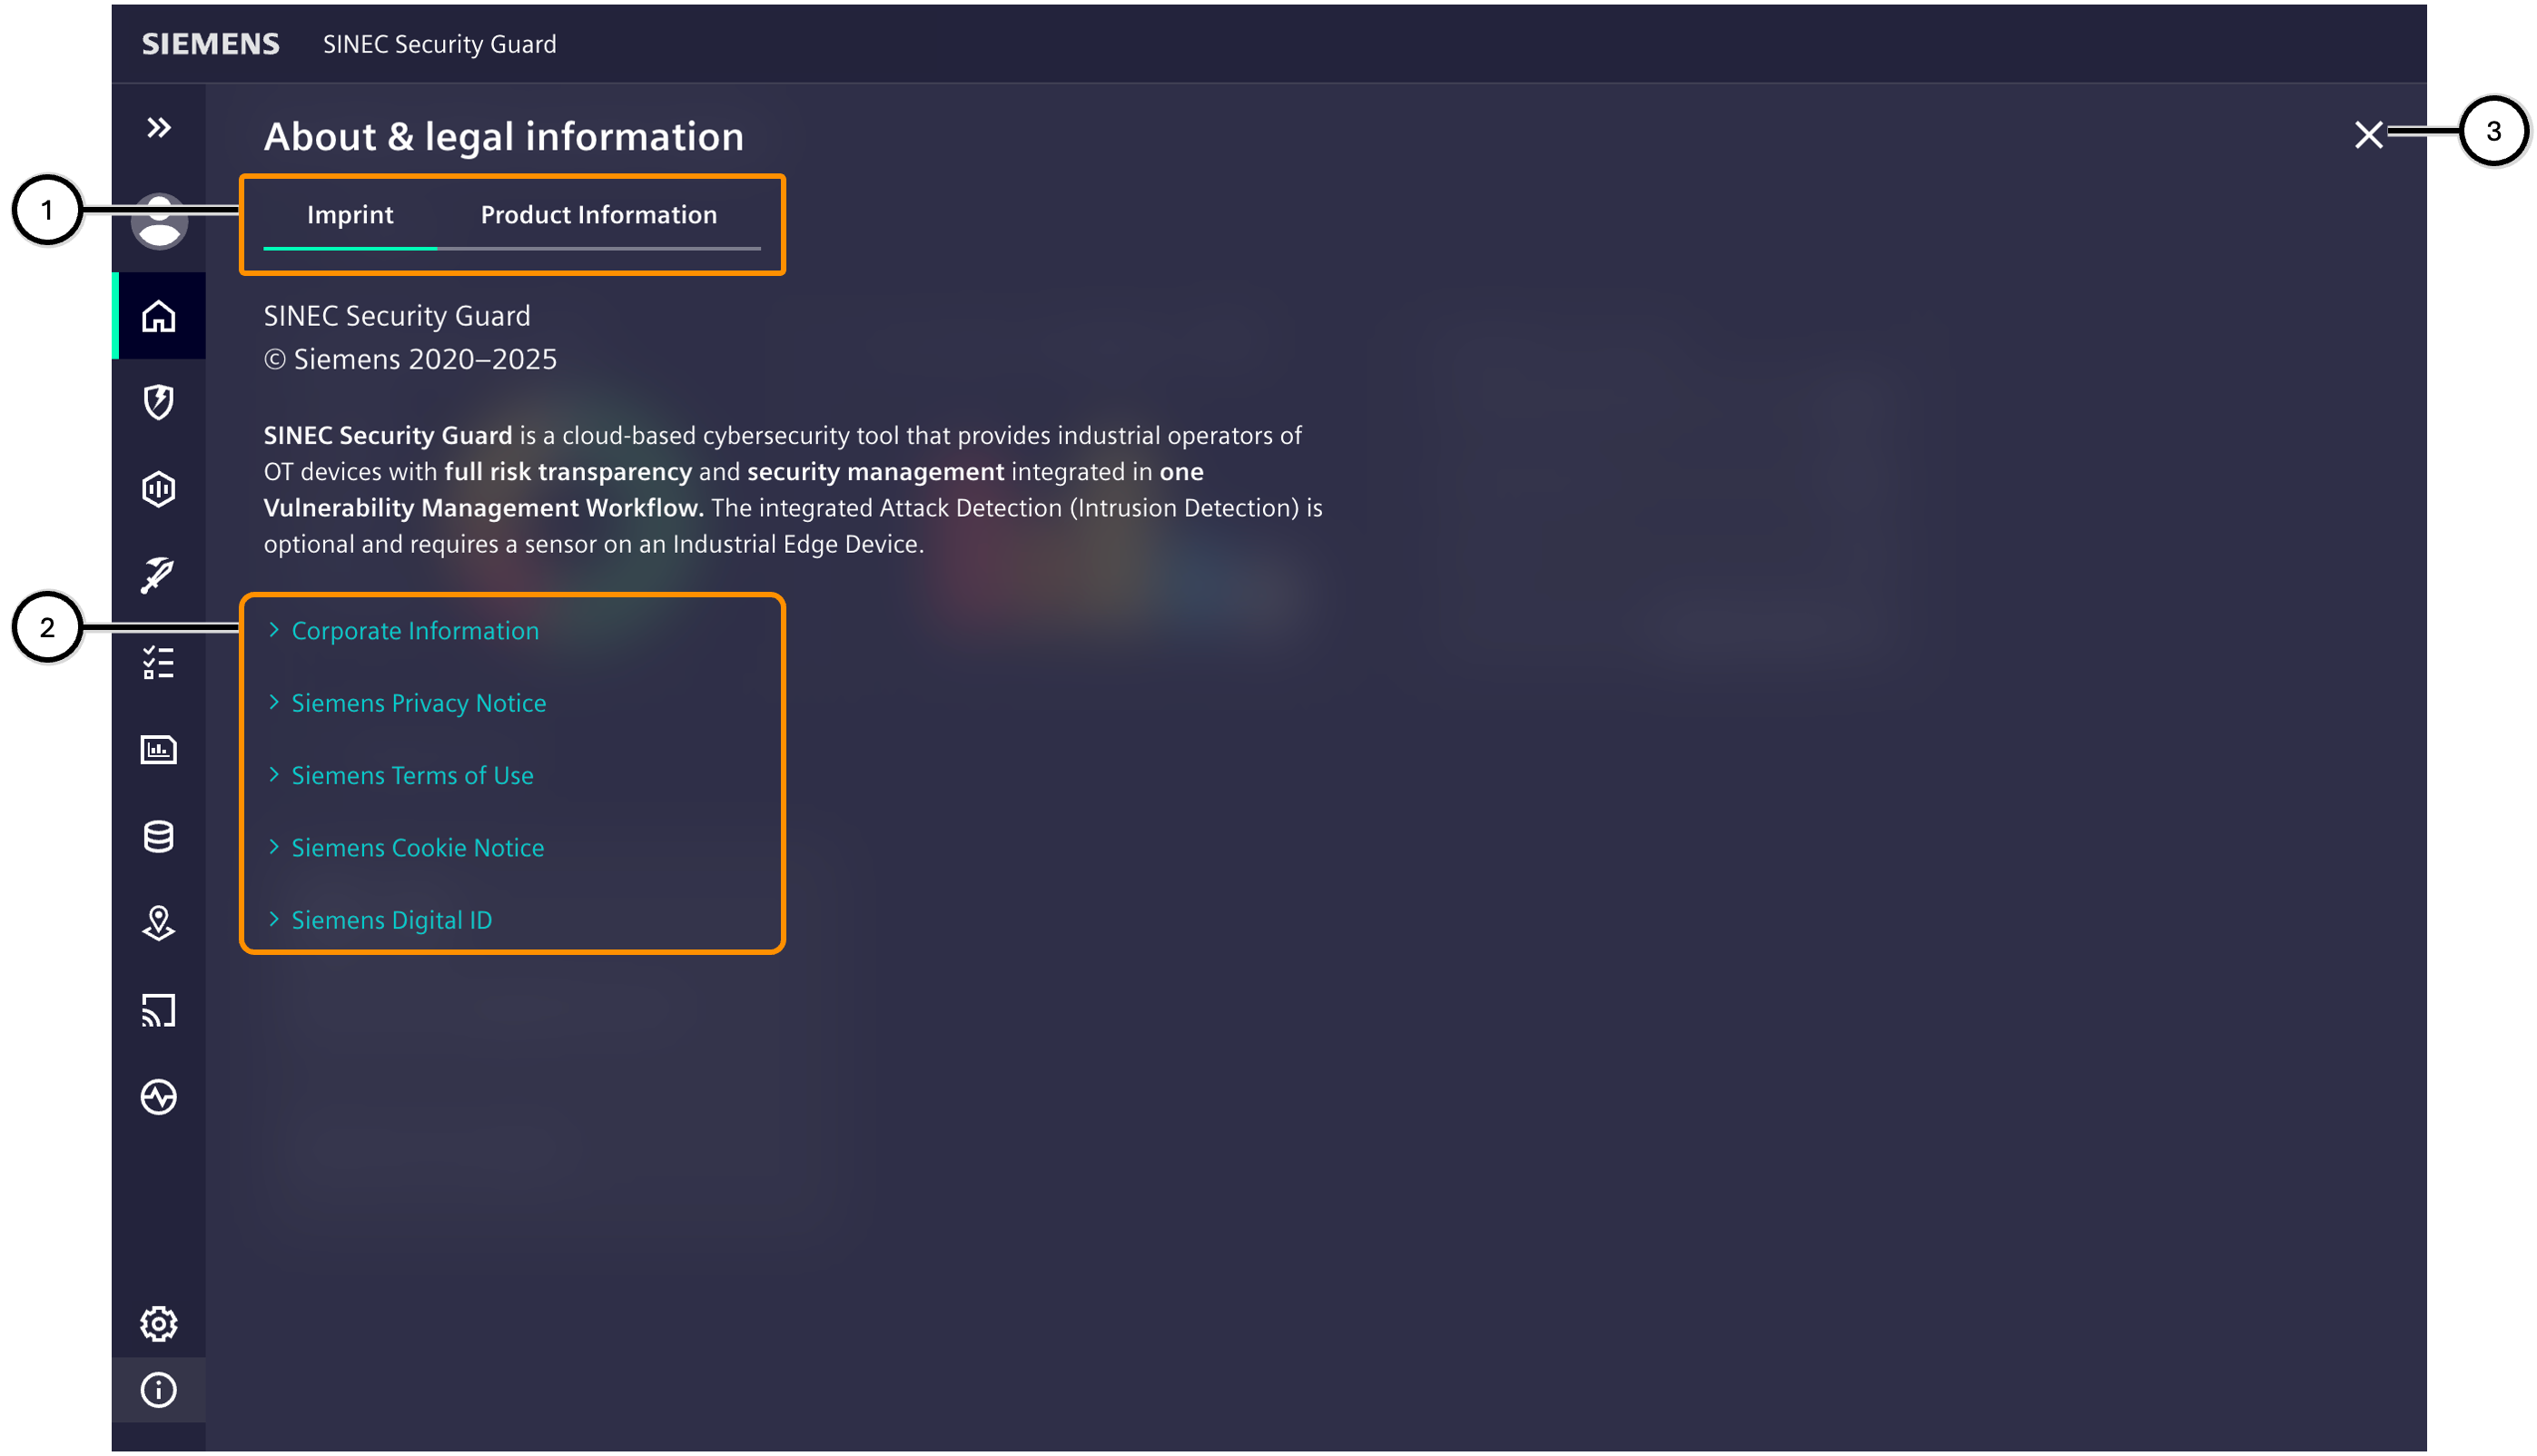
| Number | Description |
|---|---|
| ① | Info group navigation |
| ② | Links to legal sources |
| ③ | Button to close the settings view |
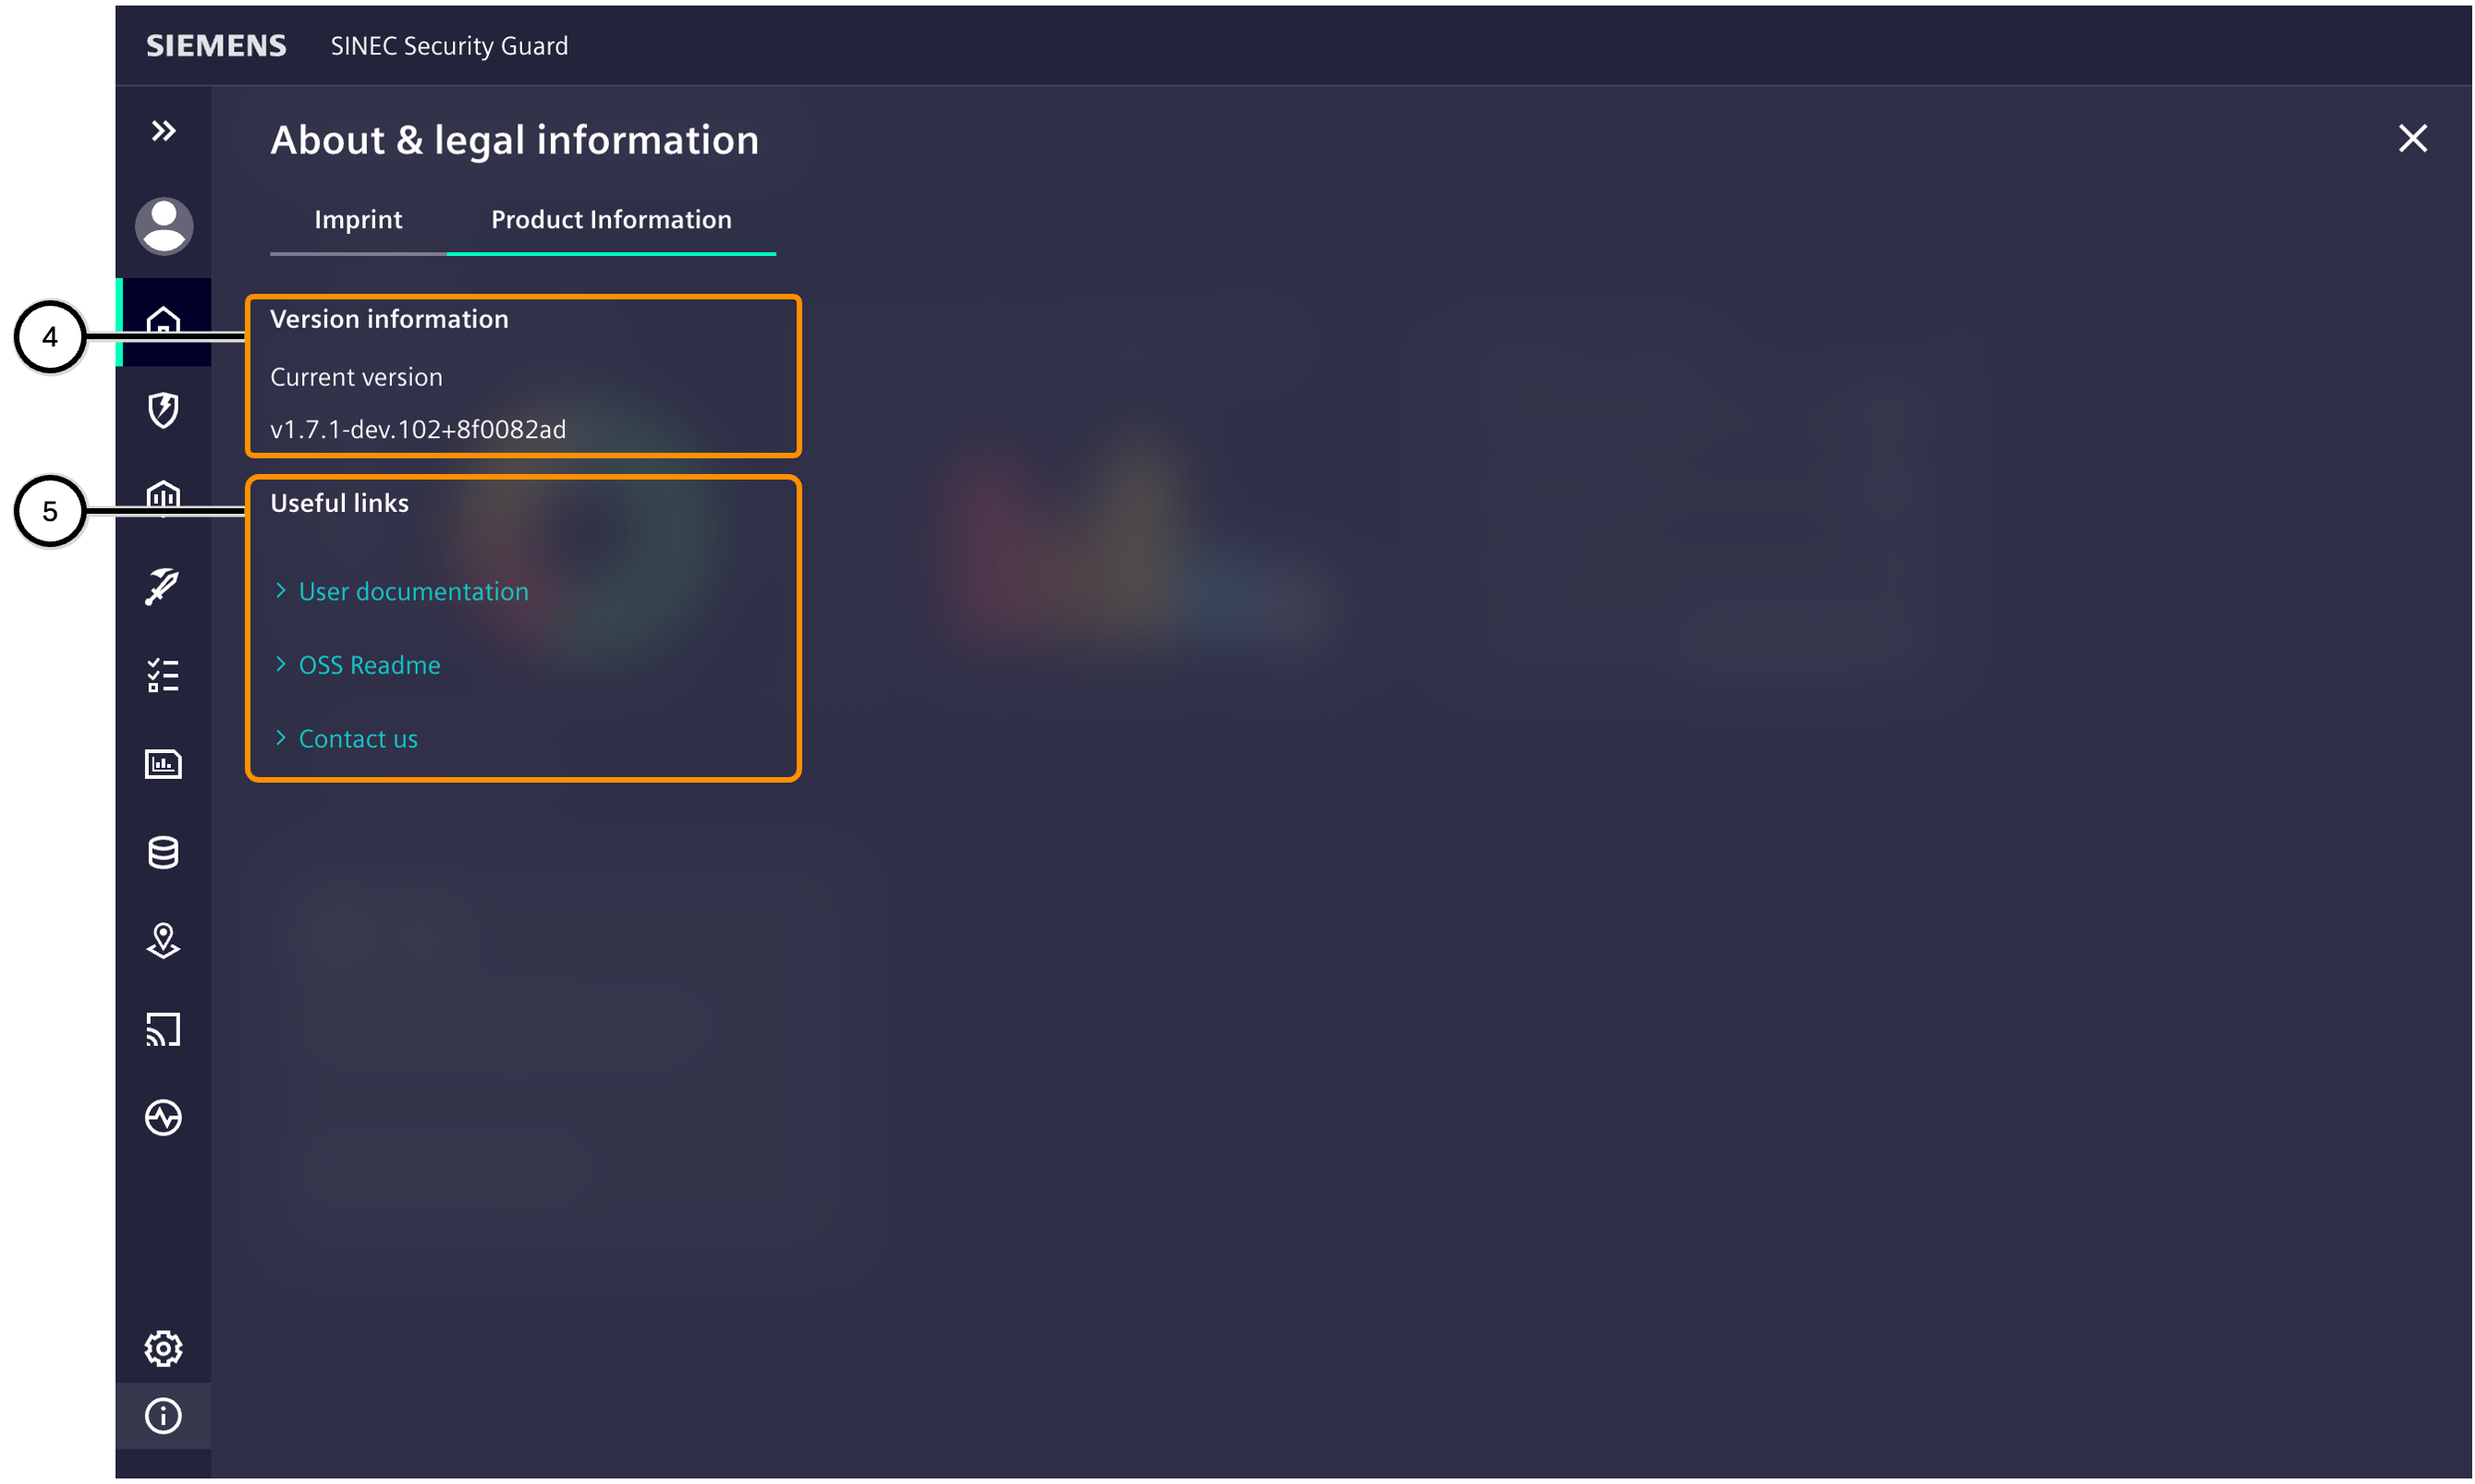
| Number | Description |
|---|---|
| ④ | Information about currently used version of SINEC Security Guard |
| ⑤ | Links to useful information like documentation and contact |