Recurring elements
Task definition
The sidebar shows recommendations that are contained in the vulnerability description, which is usually provided by the manufacturer. You can decide for each vulnerability which tasks should be planned and implemented. Observe the recommendations of the respective vulnerability description.
Note To finish the task definition and so going from status 'Open' to status 'Managed', one has to use button ⑫. The 'Close' button ⑲ to exit the Task definition only navigates back to 'Threat focus' or 'Asset focus' but does not finish the task definiton. In 'Threat focus > Assets and tasks': When closing the 'Assets and tasks' dialogue and reopening it again for the same vulnerability: All assets in status 'Performed' are not shown anymore as there is nothing to do. In 'Asset focus > Threats and tasks': When closing the 'Threats and tasks' dialogue and reopening it again for the same asset: All vulnerabilities in status 'Performed' are not shown anymore as there is nothing to do.
A vulnerability can take on these statuses:
Status | Description |
---|---|
Open | Newly identified vulnerabilities that have not yet been managed. |
Managed | Vulnerabilities for which measures are planned but have not yet been implemented. |
Performed | Vulnerabilities for which all measures have been successfully implemented. |
All newly identified vulnerabilities are given the status 'Open'; the remaining statuses are caused by user input.
Update of an existing vulnerability
Vulnerability descriptions can be updated by the organization that published the vulnerability. Descriptions, affected products and recommendations can be added or existing descriptions can be removed or adapted.
When updating a vulnerability, SINEC Security Guard proceeds as follows:
-
All tasks that have already been planned and not yet implemented will be removed.
-
All tasks that have already been implemented are listed in the 'Implementation history'.
-
The status ② of the vulnerability is set to 'Open'.
An update can change the impact of a vulnerability, for example, additional products may have been detected as affected or a firmware version newer than the previously recommended firmware version may be recommended. SINEC Security Guard then updates the list of vulnerabilities and affected products, including effects and recommendations, accordingly.
Number | Element |
---|---|
① | Area of the 'Implementation history' with two entries |
Task definition status 'Open'
Task definition in 'Open' status
In status 'Open', the task definition shows these areas:
-
General information
Here you can find the current status of the vulnerability ② and information about the firmware of the asset ③.
-
Remediations ④
This area lists the 'vendor fix' according to the vulnerability description ⑤ in the upper part; in the lower part, corresponding task suggestions are displayed ⑦, which can be selected and deselected as well as specified in more detail.
-
Workarounds and mitigation ⑩
The task suggestions in this area, which can be selected and deselected, do not completely eliminate the vulnerability, but may be easier and faster to implement than the 'remediations' ④.
-
Completion of the 'Task definition'
- If at least one task has been selected and, if necessary, provided with additional information, the task definition can be completed by clicking the button ⑫. All selected tasks will then transferred be to the next status and all unselected tasks will be removed.
-
If the vulnerability seems acceptable, select the menu item 'Risk accepted' ⑯ via the menu ⑭. This means that no tasks are taken over and the vulnerability is considered closed and removed from the corresponding views and KPIs.
-
If the vulnerability has already been fixed or made obsolete by the other task (e.g. by a firmware update for another vulnerability), it must be marked with the button 'Obsolete by implementation' ⑰ (accessible via menu ⑭).
If no decision is made now and the vulnerability should remain in the lists and KPIs, the task definition can be left without completing it and edited later (e.g. by clicking the 'Close' button ⑲).
Task types
Note To update the firmware to a different version, the update task according to the vulnerability description ⑧ must be used. If further steps are necessary in addition the firmware update, these can be noted in a task according to the manufacturer's description ⑨.
There are the following task types, for which more information is usually required after selection:
-
Remediations
-
'Create firmware update task' ⑧:
This task type has to be used for any desired update of the firmware version; in the additional input field the firmware version has to be entered – e.g. '1.3.0' or '2.6 ServicePack 2'.
-
'Create task from vendor fix' ⑨:
This task type has to be used if anything besides of a firmware version update is desired; in the additional free text field the task description according to the vendor fix suggestion has to be entered – e.g. 'Migrate project in TIA portal to this version and redeploy'. If according to the vendor fix (⑤, ⑥) a firmware update and further tasks shall be defined, the firmware update needs to be defined in ⑧ and further tasks need to be defined in ⑨.
-
-
Workarounds and mitigation
-
Variable task according to vulnerability description
All (means none, one, or several) workaround and mitigation tasks containted in the vulnerability description are provided here. They cannot be edited but just selected or deselected.
-
'Create custom task' ⑨:
To define a task based on a description by your own, select this task type and enter a task description.
-
If no tasks are described, a corresponding note ⑮ is displayed.
Number | Description |
---|---|
① | Title of the area |
② | Status of the vulnerability |
③ | Version of the firmware installed on the asset |
④ | 'Remediations' section |
⑤ | List of all tasks recommended by the manufacturer |
⑥ | Example of a recommended task, possibly with a link to a specific firmware version |
⑦ | List of task suggestions based on the list of recommended tasks ⑤ |
⑧ | Example of a task suggestion that can be selected individually through a selection field |
⑨ | Example of a task that can be freely formulated; by clicking on ⑬ the text of a task suggestion becomes copied into the manually to be completed task description |
⑩ | List of all immediate or mitigating task suggestions |
⑪ | Example of a task that can be freely formulated |
⑫ | Button to complete the task planning for this vulnerability |
⑬ | Button to copy the text of a task suggestion into the manually to be completed task description |
⑭ | Button to open the menu |
Number | Description |
---|---|
⑮ | Note in case there are no known eliminating, removing or mitigating task suggestions for this vulnerability |
⑯ | 'Accept risk' button |
⑰ | 'Obsolete by implementation' button |
⑱ | Button to close the opened menu |
⑲ | Button to exit the task definition |
Task definition status 'Managed'
If the task definition had been finished by switching status from 'Open' to 'Managed', this area shows all tasks which finally had been selected for later execution. If you want to change something about the existing tasks, click the 'Re-open vulnerability' button ⑧. The task definition will revert to the 'Open' status, and all original task suggestions according to the vulnerability description will be displayed again. All selections and inputs for this vulnerability are lost through this action.
Each task has a 'Mark as implemented' button ⑥.
After clicking the 'Mark as implemented' button ⑥ of a task, that task is marked with an 'Implemented' icon ⑨:
-
'Create firmware update task': When marked as 'Implemented', such tasks cannot be undone
-
All other task types: When marked as 'Implemented', they can be undone using the 'Undo' button ⑪.
If all planned tasks for a vulnerability are marked as 'Implemented', the Task definition status automatically changes to 'Performed'.
Number | Description |
---|---|
① | Title of the area |
② | Status of the vulnerability; amount of tasks which are not yet performed |
③ | Version of the firmware installed on the asset |
④ | List of all selected remediations |
⑤ | Example of a task, including detailed information |
⑥ | 'Mark as implemented' button for a task not yet implemented |
⑦ | List of all selected immediate or mitigating task suggestions |
⑧ | Example of a freely formulated task, including detailed information |
⑨ | 'Mark as implemented' button |
⑩ | 'Re-open vulnerability' button to return to the 'Open' status |
⑪ | 'Undo' button |
Task definition status 'Performed'
This displays tasks that were marked as 'Implemented' in the 'Managed' status. If you want to change something about the tasks here, you can return to the 'Open' status with the 'Re-open vulnerability' button ⑩; all original task suggestions according to the vulnerability description will be displayed again. Every selection and input for this vulnerability is lost in the process.
In the 'Performed' status, the following options are still available:
-
The task texts can be read.
-
Undo:
o Firmware updates already marked as 'Performed' cannot be changed.
o For all other tasks, the 'Performed' marking can be undone and the task can be marked as 'Managed' again through the associated button ⑪; this changes the status of the vulnerability back to 'Managed'.
o The undo function is only available if you are still within this vulnerability or asset. If you switch the vulnerability or asset and return to this page, the implemented task will be displayed in the 'Implementation history'.
-
If you want to change something about the tasks here, you can return to the 'Open' status with the 'Re-open vulnerability' button (⑩).
Number | Description |
---|---|
① | Title of the area |
② | Status of the vulnerability |
③ | Version of the firmware installed on the asset |
④ | List of all selected remediations |
⑤ | Example of a task, including detailed information |
⑥ | 'Mark as implemented' button for a task not yet implemented |
⑦ | List of all selected immediate or mitigating task suggestions |
⑧ | Example of a freely formulated task, including detailed information |
⑨ | 'Mark as implemented' button |
⑩ | 'Re-open vulnerability' button to return to the 'Open' status |
⑪ | 'Undo' button |
Color bar for risk level
The color bar for the risk level is displayed in various places, e.g., in the 'Threat focus' or in the zone information of the 'Asset focus'.
The color bar indicates which risk levels apply to a group of assets.
In its upper half, the bar shows segments with corresponding coloring, e.g., a long red bar (for the 54 assets with 'Critical' risk level), a very short gray one (1 asset with 'Undefined'), etc. The length of the colored bar segments corresponds to the proportion of their status in the total amount. In the example, 54 assets have a 'Critical' risk level, 4 asset 'High', 0 assets 'Medium', 16 assets 'Low', and 1 asset 'Undefined'. Risk levels which do not apply are not shown at all.
A segment can be dashed, solid, or both:
- Fully dashed: All assets with that risk level already are managed.
- Fully solid: All assets with that risk level are still unmanaged. In the example, all 16 assets with 'Low' ③ and the 1 asset with 'Undefined' ④ are still unmanaged.
- Partially dashed and solid: Some assets of the given risk level are already managed, others aren't. In the example, from the 54 assets with risk level 'Critical' ① there is 1 asset already managed, 53 aren't; and from the 4 assets with risk level 'Critical' ② there is 1 asset already managed (see dashed part ⑥), 3 aren't.
In the lower half of the color bar, the corresponding colored symbol and the amount of assets ⑤ are displayed.
Number | Color | Risk Level | Description |
---|---|---|---|
① | Red | Critical | |
② | Orange | High | |
(Not shown) | Yellow | Medium | |
③ | Blue | High | |
④ | Gray | Undefined | |
⑤ | - | - | For each existing risk level: Corresponding symbol of affected asset |
⑥ | Dashed | - | Dashed bar is shown for the number of assets which are already managed |
Managing progress
Progress bars appear in various places in SINEC Security Guard. They show how many assets are completely managed (all asset-vulnerabilities are set to managed) compared to the total number of assets.
On managing progress bars which depict assets from a certain risk level ②, dashed and solid areas depict the relation of already managed to still unmanged assets (from the 5 assets in the example, 2 assets are already managed, 3 assets are still unmanaged).
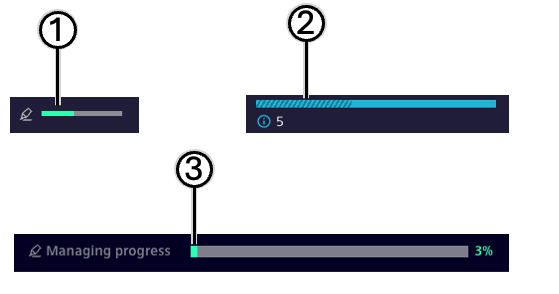
Number | Description |
---|---|
① | Progress of managing for an entity (vulnerability/product) |
② | Managing progress (dashed) compared to total number of assets with certain risk level |
③ | Managing progress in current view |
Asset details
The 'Asset details' can be closed with button ③. If you have opened a list of assets from the asset details, switch to the previous or next asset with its details using buttons ①.
The 'Product information' ④ shows information about the general product type. This information usually does not change when you switch to the details of another asset of the same model.
The 'Asset information' ⑤ shows information about the specific individual asset. This information will differ from the information of other assets, regardless of whether it is an asset of the same model or a completely different product.
The 'Network interfaces' ⑥ display all known information. If the asset has multiple interfaces, all are listed accordingly.
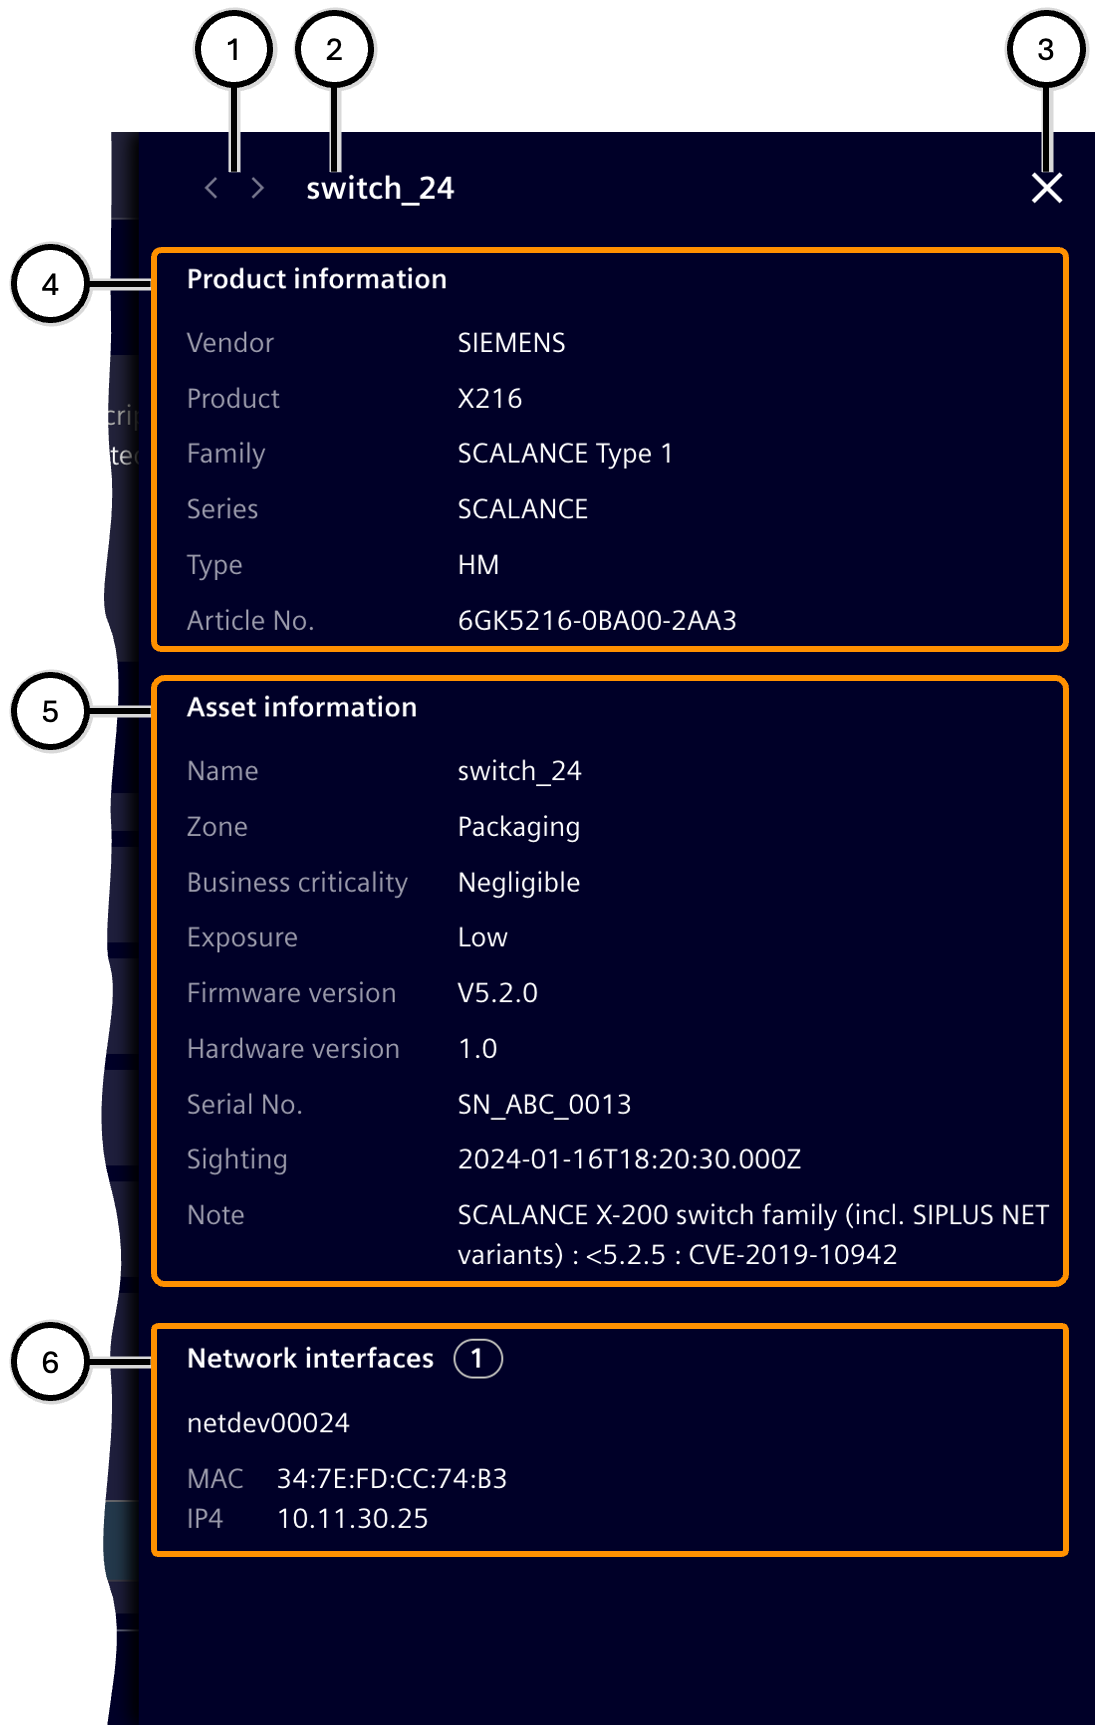
Number | Description |
---|---|
① | Navigation buttons |
② | Asset name |
③ | Button to close the asset details |
④ | Information related to the product type |
⑤ | Information related to the specific asset |
⑥ | Network interfaces |
Threat details
The view of the Threat details shows information about the description of the vulnerability as well as its penetration and relevance to the facility. It appears in the following variants:
-
as a large-scale view in 'Description' of Details of the selected vulnerability
-
as additional information in 'Threats and tasks'; here, there is an additional header with navigation options and information (⑥-⑧).
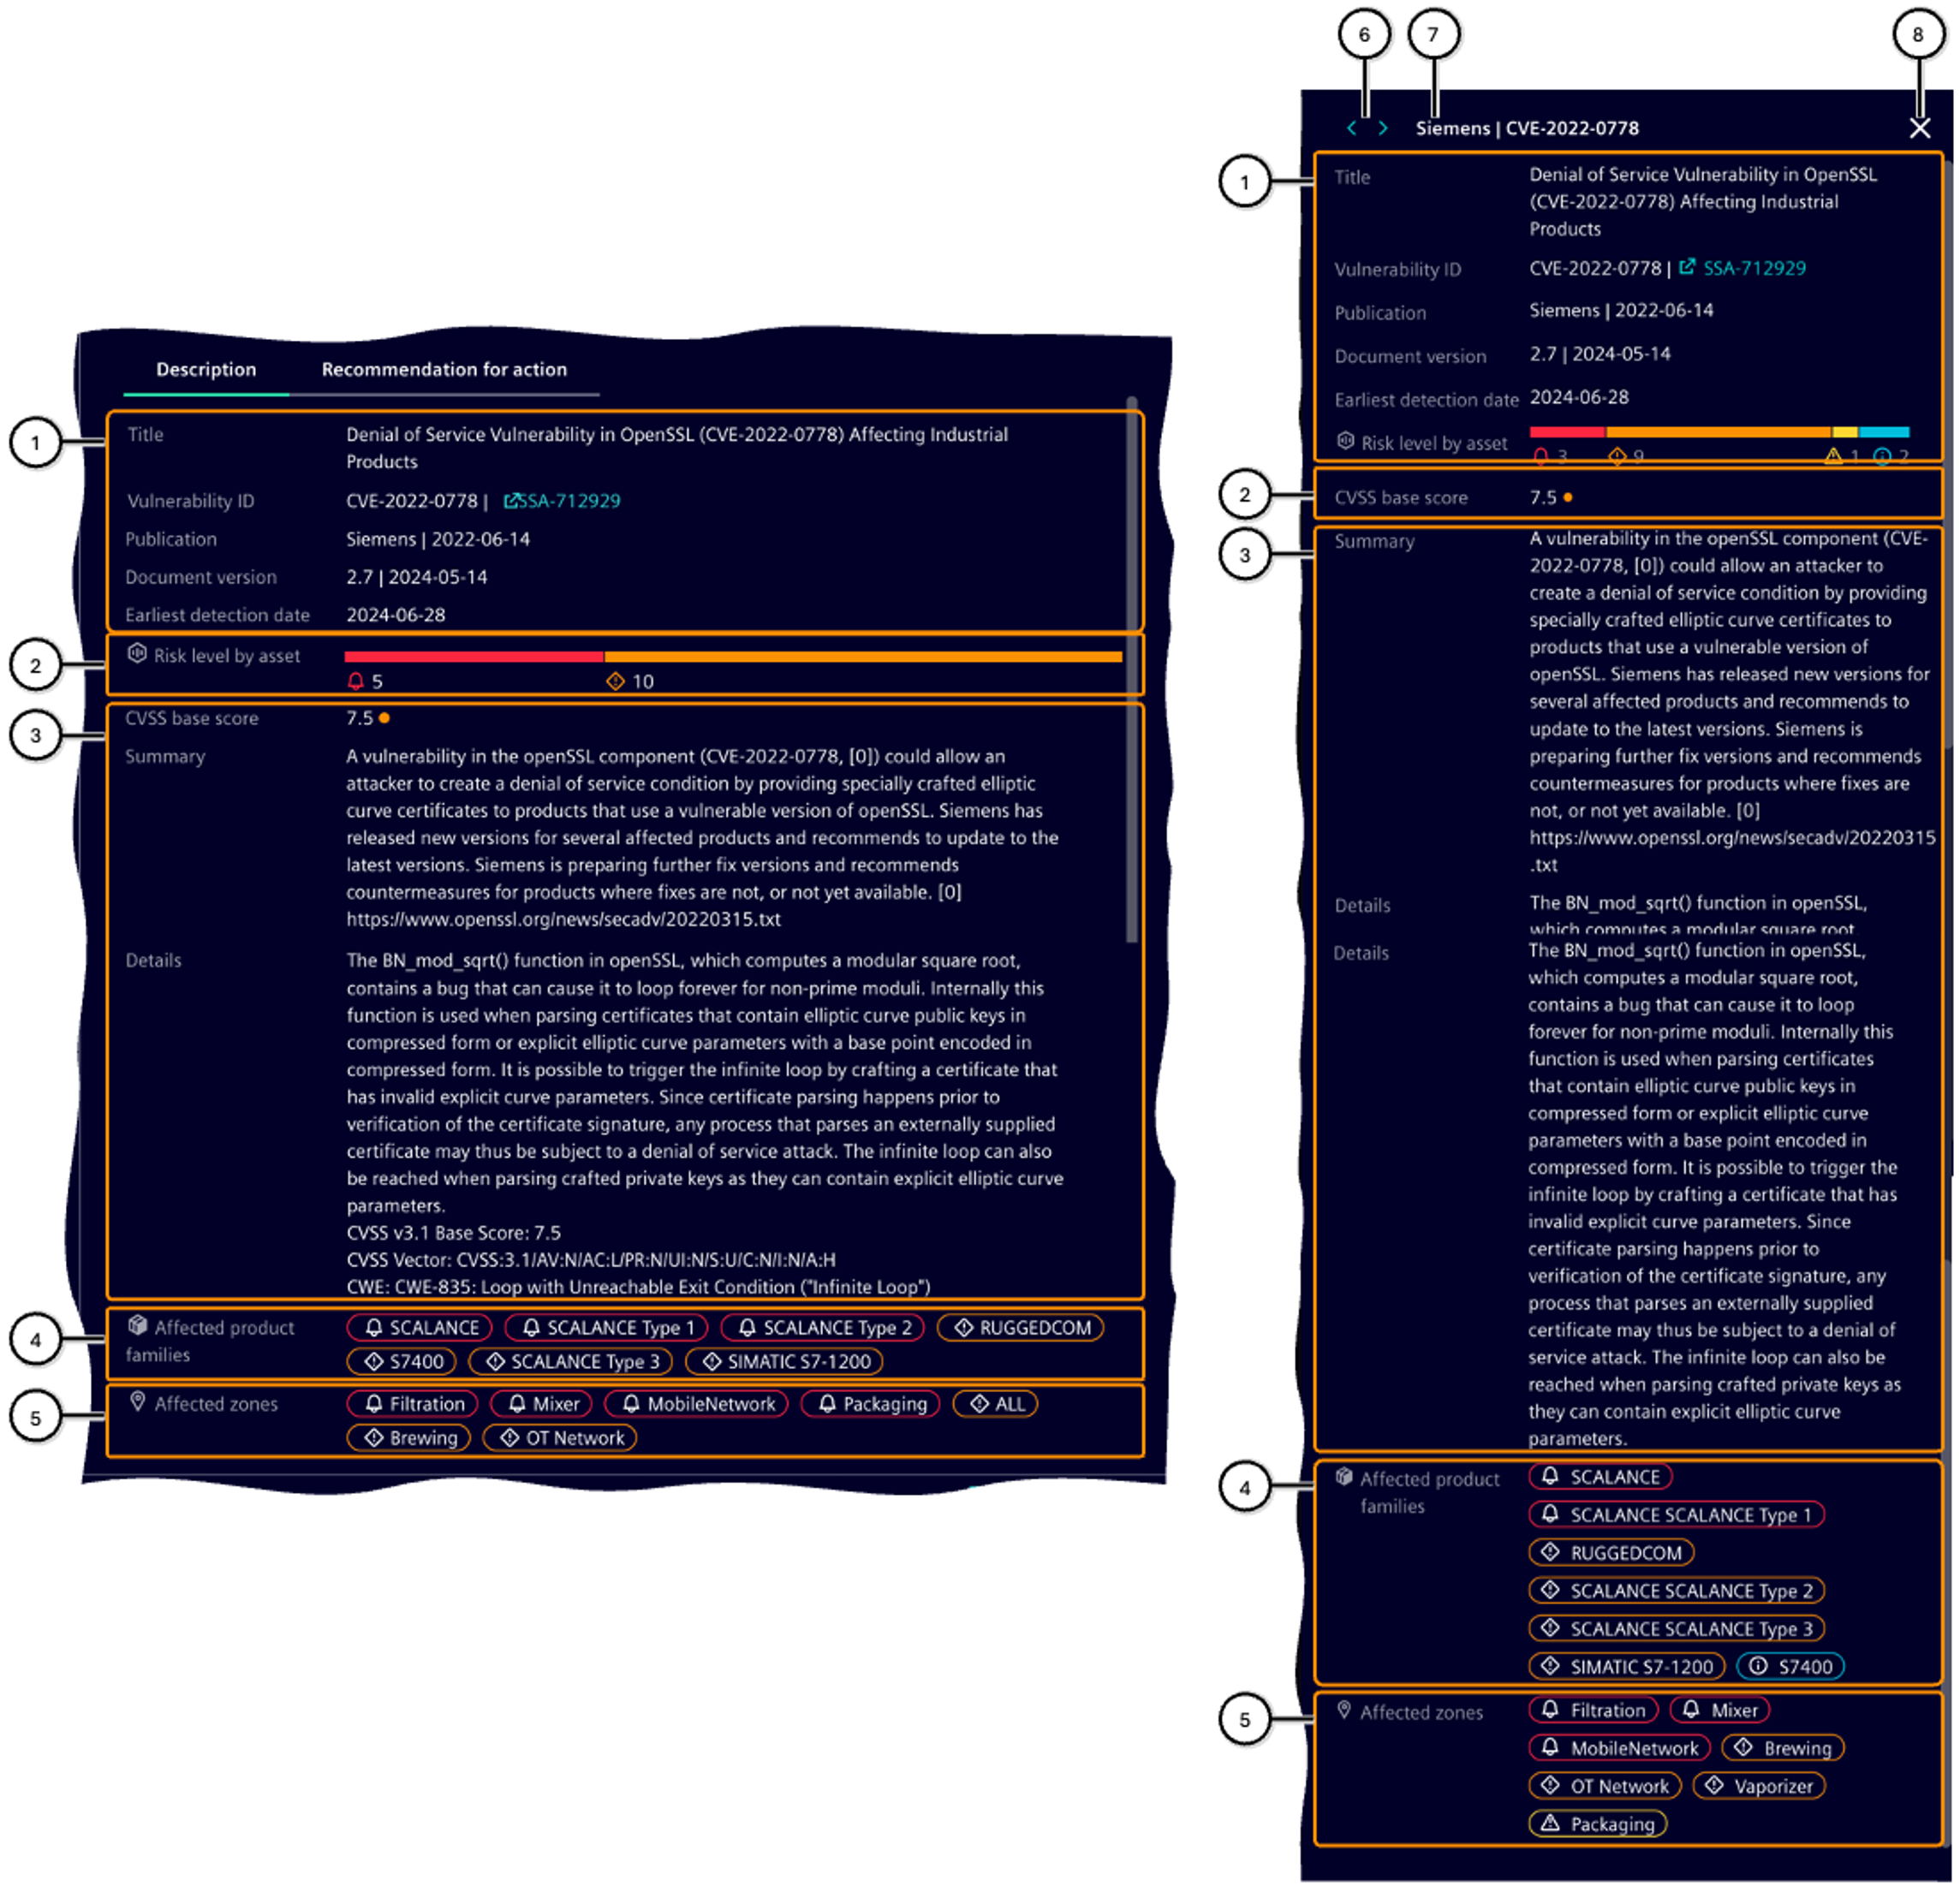
Number | Description |
---|---|
① | Information about the source and classification of the vulnerability |
② | Distribution of the individual risk levels across all affected assets |
③ | Detailed description of the vulnerability |
④ | Product families in the facility affected by the vulnerability |
⑤ | Zones in the facility affected by the vulnerability |
⑥ | Navigation buttons |
⑦ | Organization that published the vulnerability (ID) |
⑧ | Button to close the vulnerability details |
Checking user input
SINEC Security Guard checks all user inputs and outputs whether the input meets the criteria. Such checks can occur:
-
immediately after entering a character
-
upon leaving the input field
-
upon exiting the dialog or step
These feedback options are possible:
Design | Example | Effect |
---|---|---|
Not checked / Initial state | If the field requires input and is left empty, it changes to the 'Checked - Error' state | |
Tested - Error | This field prevents the dialog from closing (Note: The shown error appears as in this example there is already another zone called "Brewing") | |
Tested – Error-free | This field does not prevent the dialog from closing |